


This tutorial reveals methods to arrange a easy type validation instance utilizing a registration type.
We’ll use the jQuery Validation Plugin to validate an HTML type. This plugin’s primary performance is to specify validation logic and error messages for HTML parts in JavaScript code.
Right here’s a reside demo of the HTML type validation utilizing jQuery that we’re going to construct:
See the Pen
jQuery Type Validation by SitePoint (@SitePoint)
on CodePen.
Key Takeaways:
- First, embody the jQuery library in your HTML code snippet to arrange primary type enter validation with the jQuery plugin. You possibly can obtain it from the official web site, use a bundle supervisor like Bower or npm, or use a CDN.
- After together with jQuery, embody the jQuery information validation Plugin. This plugin permits you to specify validation logic and error messages for HTML parts in JavaScript code. For instance, you possibly can create a primary type with enter fields for person info and use the plugin to validate this info.
- To model the shape, create a brand new CSS file and embody it within the head part of your HTML code. Then, initialize the jQuery validation on type submit in a brand new JavaScript(JS) file, specifying every enter discipline’s validation guidelines and error messages.
- Do not forget that client-side validation doesn’t substitute server-side validation, as a malicious person can nonetheless manipulate or bypass the validation guidelines.
- Discover superior strategies, similar to customized validation strategies, real-time validation, and distant validation for server-side checks.
- Comply with safety greatest practices by combining client-side and server-side validation to guard towards malicious enter.
Understanding Type Validation Approaches
Earlier than diving into implementation, let’s evaluate handbook and jQuery information validation plugin approaches to know why the validation Plugin stands out:
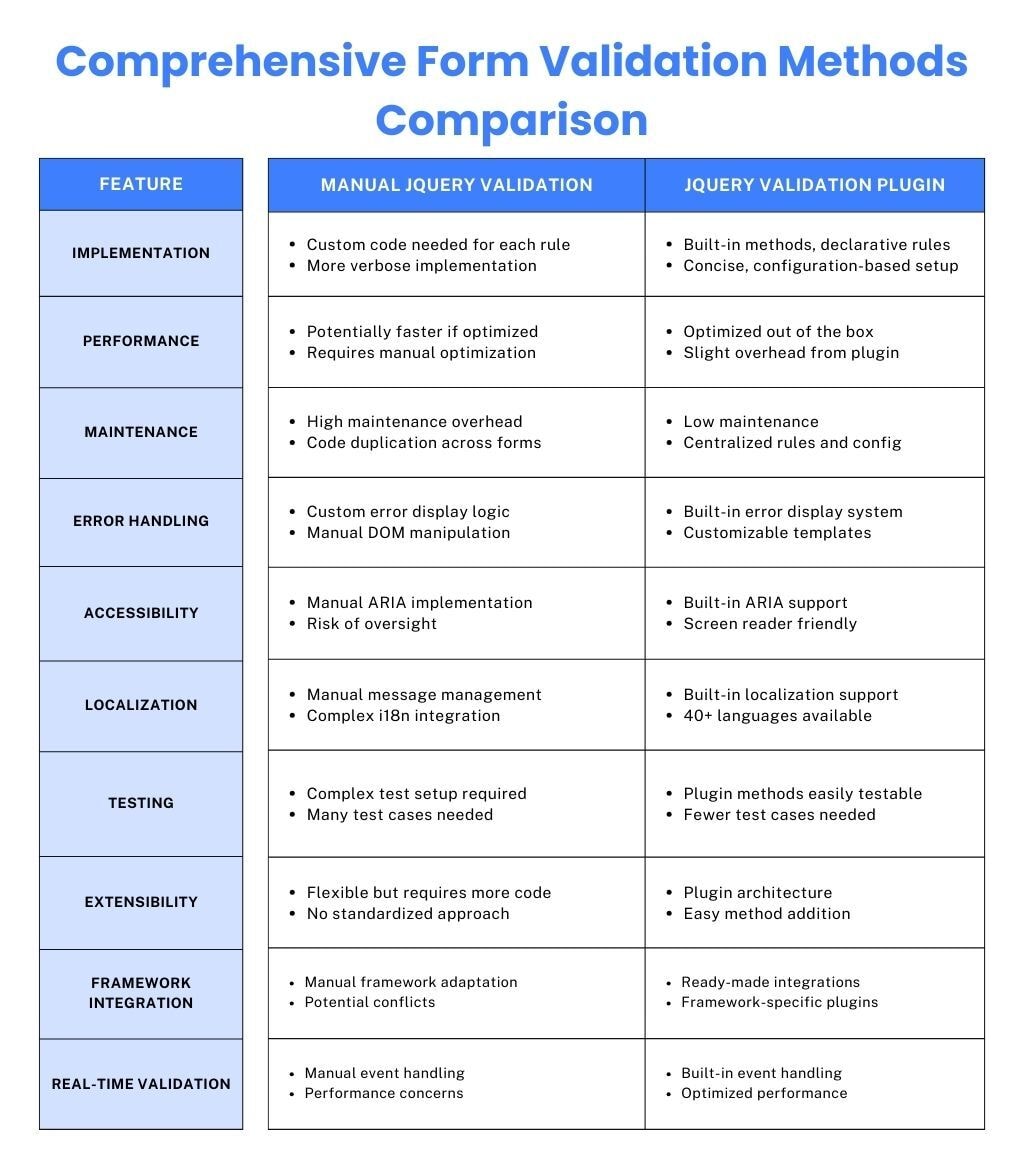
Total, the jQuery plugin method affords a number of benefits:
- Constructed-in validation strategies.
- Automated error dealing with.
- Constant behaviour throughout types.
- Simple customization.
- Higher code group.
- Constructed-in accessibility options.
Because you now have a primary understanding of what JQuery is, let’s get into the steps of constructing a easy jQuery type validation instance. The steps under gives you a transparent understanding of methods to validate a type earlier than submission.
Step 1: Embrace jQuery
First, we have to embody the jQuery library. On the time of writing, we use the most recent model, jQuery 3.7.1.
You should use any of the next obtain choices:
- Obtain it from jquery.com.
- Obtain it utilizing Bower: $ bower set up jquery.
- Obtain it utilizing npm or yarn: $ npm set up jquery or yarn add jquery.
- Use the most recent appropriate CDN model.
Create a brand new HTML file named index.html and embody jQuery earlier than the closing
tag:
<script src="vendor/jquery/dist/jquery.min.js">script>Should you’d like to make use of Bower or npm however aren’t acquainted with them, you could be curious about these two articles:
Step 2: Embrace the jQuery Validation Plugin
The validation Plugin extends jQuery’s capabilities with built-in validation strategies.
Select between:
- Obtain it from the plugin’s GitHub repo.
- Obtain it utilizing Bower: $ bower set up jquery-validation.
- Obtain it utilizing npm: npm i jquery-validation.
- NuGet: Set up-Package deal jQuery.Validation.
- Use the most recent appropriate CDN model.
Embrace the plugin after jQuery:
<script src="vendor/jquery-validation/dist/jquery.validate.min.js">script>Step 3: Create the HTML File
Within the registration type, we are going to use the next person info:
- First title
- Final title
- Password
So, let’s create our primary type containing these enter fields:
<div class="container">
  <h2>Registrationh2>
  <type motion="" title="registration">

    <label for="firstname">First Identifylabel>
    <enter kind="textual content" title="firstname" id="firstname" placeholder="John"/>

    <label for="lastname">Final Identifylabel>
    <enter kind="textual content" title="lastname" id="lastname" placeholder="Doe"/>

    <label for="e mail">E-maillabel>
    <enter kind="e mail" title="e mail" id="e mail" placeholder="john@doe.com"/>

    <label for="password">Passwordlabel>
    <enter kind="password" title="password" id="password" placeholder="●●●●●"/>

    <button kind="submit">Registerbutton>

  type>
div>
When integrating this into an precise utility, don’t neglect to fill within the motion attribute within the above code to make sure the shape is submitted to the proper vacation spot.
Step 4: Create Kinds for the Type
Create a brand new file, css/kinds.css, and embody it within the
part of your HTML code snippet:
<hyperlink rel="stylesheet" href="css/model.css"/>Copy the next kinds into the newly created file:
@import url("https://fonts.googleapis.com/css?household=Open+Sans");


* {
  margin: 0;
  padding: 0;
}

physique {
  font-family: "Open Sans";
  font-size: 14px;
}

.container {
  width: 500px;
  margin: 25px auto;
}

type {
  padding: 20px;
  background: #2c3e50;
  shade: #fff;
  -moz-border-radius: 4px;
  -webkit-border-radius: 4px;
  border-radius: 4px;
}

type label,
type enter,
type button {
  border: 0;
  margin-bottom: 3px;
  show: block;
  width: 100%;
}

type enter {
  top: 25px;
  line-height: 25px;
  background: #fff;
  shade: #000;
  padding: 0 6px;
  -moz-box-sizing: border-box;
  -webkit-box-sizing: border-box;
  box-sizing: border-box;
}

type button {
  top: 30px;
  line-height: 30px;
  background: #e67e22;
  shade: #fff;
  margin-top: 10px;
  cursor: pointer;
}


type .error {
  shade: #ff0000;
}
The shape will appear to be the under after this step:
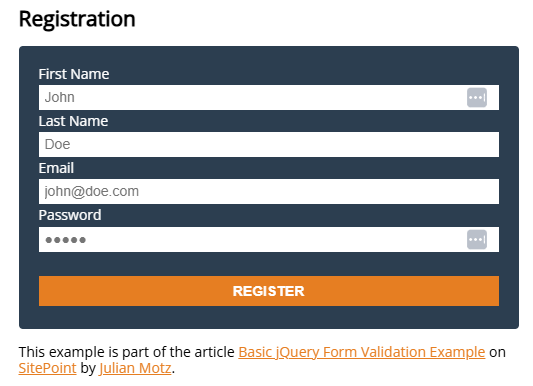
Be aware: The kinds for .error, will show all of the error messages.
Step 5: Create the Validation Logic
Lastly, we have to initialize the validation plugin. Create a brand new file js/form-validation.js and reference it after the
<script src="js/form-validation.js">script>Copy the next code into the newly created file:
$(perform() {


  $("type[name="registration"]").validate({

    guidelines: {


      firstname: "required",
      lastname: "required",
      e mail: {
        required: true,


        e mail: true
      },
      password: {
        required: true,
        minlength: 5
      }
    },

    messages: {
      firstname: "Please enter your firstname",
      lastname: "Please enter your lastname",
      password: {
        required: "Please present a password",
        minlength: "Your password should be no less than 5 characters lengthy"
      },
      e mail: "Please enter a sound e mail deal with"
    },


    submitHandler: perform (type) {
     type.submit();

  });
});
The above code will carry out jQuery validation on type submission.
Superior Validation Methods
1. Customized Validation Strategies
- Customized validation strategies permits to create guidelines for situations that aren’t coated by the built-in validation choices.
- The plugin offers the $.validator.addMethod perform to create such guidelines.
- The under code reveals a jQuery validation instance for alphanumeric characters (3-20 characters)
$.validator.addMethod("username", perform(worth, component) {
  return this.non-compulsory(component) || /^[a-zA-Z0-9]{3,20}$/.check(worth);
}, "Username should be 3-20 alphanumeric characters.");

$("type[name="registration"]").validate({
  guidelines: {
    username: {
      required: true,
      username: true
    }
  }
});
2. Actual-Time Validation
- Use occasion listeners similar to onkeyup, onfocusout, and onclick to set off validations.
- Validate solely seen fields to enhance responsiveness.
- Use debounced validation for efficiency optimization.
$("type[name="registration"]").validate({
  onkeyup: perform(component) {
    var validator = this;
    setTimeout(perform() {
      validator.component(component);
    }, 300);
  }
});
3. Asynchronous (Distant) Validation
- Use the distant technique to validate enter towards a server-side endpoint for situations like checking username or e mail availability.
- Present loading indicators throughout validation.
- Instance: Username availability verify
guidelines: {
  username: {
    required: true,
    distant: {
      url: "/check-username",
      kind: "submit",
      information: {
        username: perform() {
          return $("#username").val();
        }
      }
    }
  }
},
messages: {
  username: {
    distant: "Username is already taken."
  }
}
4. Conditional Validation
- Dynamically set guidelines primarily based on the shape state, similar to requiring a transport deal with provided that a checkbox is chosen.
- Instance: Validates the deal with discipline solely when the transport checkbox is chosen.
guidelines: {
  deal with: {
    required: perform(component) {
      return $("#transport").is(":checked");
    }
  }
}
5. Enhancing Person Expertise
- Error Messages: Customise error messages and placement for a greater UI.
errorPlacement: perform(error, component) {
  error.appendTo(component.guardian().discover(".error-container"));
}- Internationalization: Assist a number of languages utilizing localized error messages. You possibly can combine pre-defined language information from the validation plugin, or create customized localization information.
perform loadLanguage(lang) {
  $.getScript("js/localization/messages_" + lang + ".js", perform() {
    $("type[name="registration"]").validate();
  });
}


loadLanguage('fr');
6. Safety Greatest Practices
- Sanitize enter earlier than validation to take away harmful characters.
- Mix client-side and server-side validation to make sure sturdy safety.
7. Frequent Pitfalls and Options
- Deal with dynamically added fields by attaching validation guidelines dynamically utilizing jQuery selectors.
$("#add-field").click on(perform() {
  $("#new-field").guidelines("add", {
    required: true,
    e mail: true
  });
});- Forestall a number of submissions with a submission lock mechanism.
submitHandler: perform(type) {
  $("#submit-button").prop("disabled", true);
  type.submit();
}
8. Accessibility Enhancements
- Use ARIA attributes (aria-invalid, aria-describedby) for display readers.
- Guarantee all errors are correctly introduced and navigable.
Conclusion
That’s it, you’re achieved! Now you know the way to arrange type information validation with jQuery, full with a customized validation message. Please remember that this doesn’t substitute server-side validation. It’s nonetheless potential for a malicious person to govern or bypass the validation constraints (for instance, through the use of the browser’s developer instruments).
Often Requested Questions (FAQs)
What Is jQuery Type Information Validation?
It ensures that person enter in HTML types meets particular standards earlier than it’s submitted to a server, serving to forestall incorrect or incomplete information from being processed.
Why Is Type Information Validation Essential?
Validation ensures information accuracy, prevents errors, and improves person expertise. Validating person enter helps preserve information integrity and reduces the probability of points arising from incorrect or malicious information.
How Do I Carry out Type Information Validation Utilizing jQuery?
The plugin can be utilized to validate information or write customized jQuery code. It simplifies the method by offering pre-built validation logic and error messages.
What Are Some Customary Type Information Validation Constraints?
Validation requirements embody checking for required fields, legitimate e mail addresses (e mail validation), numeric values, and password complexity. The jQuery information validation plugin affords built-in guidelines for these situations.
Can I Create Customized Validation Constraints?
Sure, you possibly can create customized validation constraints utilizing the jQuery information validation plugin. Outline a brand new validation technique and specify its behaviour, similar to checking a particular sample or worth.
How Do I Provoke Type Information Validation Utilizing the jQuery Information Validation Plugin?
You usually name the .validate() technique in your type component to provoke validation. The jQuery information validation plugin offers this technique and units up the principles and behaviours for validation.
What Occurs If a Type Doesn’t Cross Validation?
If a type doesn’t move validation, the jQuery information validation plugin will forestall it from being submitted and show error messages subsequent to the corresponding enter fields. It will give customers suggestions about what must be corrected.
How Can I Customise Error Messages in jQuery Type Information Validation?
The plugin permits you to customise error messages for particular validation guidelines. You possibly can outline customized error messages within the validation settings for every enter discipline.
Can I Use jQuery Type Information Validation With out the Validation Plugin?
Sure, you possibly can carry out type information validation utilizing customized jQuery code with out counting on the Validation plugin. You’ll want to write JavaScript capabilities that manually verify type inputs and show error messages.
Are There Alternate options to the Question Validate Plugin?
Sure, different type validation libraries and frameworks can be found, similar to Parsley.js and Formik (for React purposes). Moreover, HTML5 launched built-in type validation attributes and constraints.
Can I Use AJAX to Validate Type Information?
Sure, you should utilize AJAX with type validation to carry out real-time validation or submit type information asynchronously. This can assist improve person expertise by lowering web page reloads.
Is Type Information Validation Just for Shopper-Aspect Validation?
Type validation might be carried out each on the consumer and server sides. Shopper-side validation improves person expertise, whereas server-side validation is important to forestall malicious or incorrect information from reaching the server.
How Can I Deal with Type Submission After Validation?
Should you’re utilizing the plugin, it can deal with the submission mechanically if the validation passes. Should you’re utilizing customized validation, you possibly can manually submit the shape if validation is profitable.
Can I Use jQuery Type Information Validation with Different JavaScript Frameworks?
Sure, you should utilize jQuery type validation alongside different JavaScript frameworks. Be cautious about potential conflicts or compatibility points, and make sure you combine the validation logic appropriately.
How Do I Implement Actual-Time Validation Effectively?
To boost efficiency, real-time validation might be carried out with debouncing. The “onkeyup” technique is used for debouncing enter validation.
Can I Validate Information Asynchronously, Like Checking Username Availability?
Sure, jQuery information validation helps asynchronous validation for instances like checking if a username has already been taken. That is achieved by making an API name within the background and displaying applicable suggestions primarily based on the server’s response.
Maria Antonietta Perna is a instructor and technical author. She enjoys tinkering with cool CSS requirements and is interested in educating approaches to front-end code. When not coding or writing for the online, she enjoys studying philosophy books, taking lengthy walks, and appreciating good meals.
type validationgitCSjQuerynilsonj


