On this article, you’ll learn to configure the brand new Google Auth “Sign up with Google” button in a React.js and Specific.js utility.
Integrating Google Login React performance has develop into less complicated and extra strong with the up to date “Sign up with Google” button. Utilizing Google’s newest Identification Providers SDK, builders can simply implement a safe and seamless Google login expertise for his or her customers.
This technique introduces options comparable to profile image previews for account choice, One Faucet login for easy person entry, and enhanced token administration to keep up classes. With the deprecation of the outdated “Signal In With Google” JavaScript library, it’s now essential to transition to this up to date strategy for brand spanking new and current initiatives.
On this information, you’ll learn to configure the brand new “Sign up with Google” button in a React.js and Specific.js utility. We’ll cowl the whole lot from producing a Google Shopper ID and Secret to implementing authentication flows on each the shopper and server sides.
Right here’s the supply code for this text: Server and Shopper.
Key Takeaways
- Simplified Google Auth Integration: This text offers a complete information on integrating the brand new “Sign up with Google” button in purposes constructed with React.js and Specific.js, highlighting the simplified authentication course of, which incorporates advantages like permitting customers to decide on their account utilizing a profile image, and the need to undertake this technique as a result of deprecation of the outdated Google Signal-In JavaScript library.
- Step-by-Step Implementation Information: From producing a Google Shopper ID and Secret within the Google console to establishing the React Google auth and Specific environments, the article walks by way of each step required to implement Google Auth, together with dealing with client-side and server-side configurations and offering code snippets and explanations for every a part of the method.
- Last Final result and Sources: Upon finishing the steps outlined, builders may have a purposeful authentication system that leverages Google’s safe login. The article additionally hyperlinks to the complete supply code for each the server and client-side implementations, guaranteeing readers have entry to all essential sources to efficiently implement the brand new Google auth technique of their initiatives.
Generate a Google Shopper ID and Secret
To arrange sign-in with Google React, step one is to generate a Google Shopper ID and Secret utilizing the Google Cloud Console. These credentials are important for establishing safe authentication in your utility.
Comply with these steps to create a brand new OAuth 2.0 Shopper and configure your challenge to assist each internet purposes and One Faucet log in.
Step 1: Navigate to Google Console
We start by heading to Google Console.
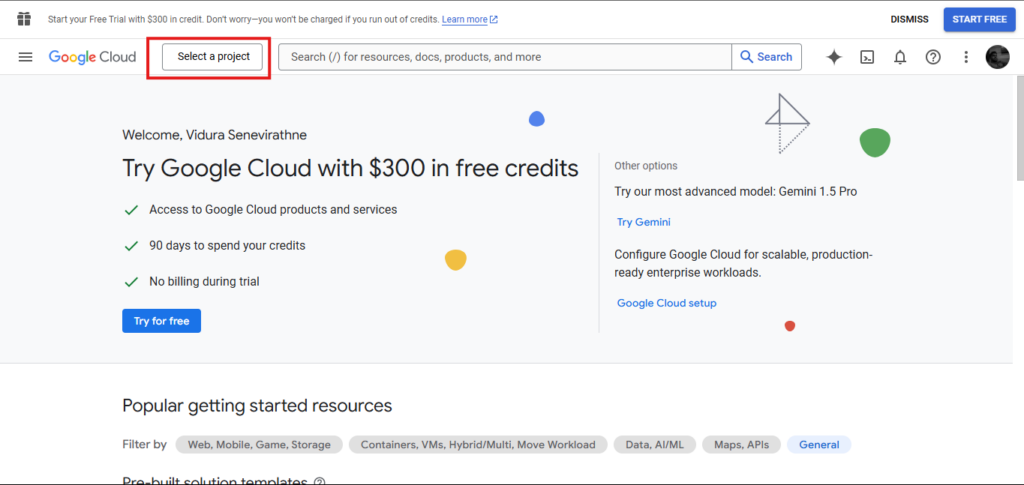
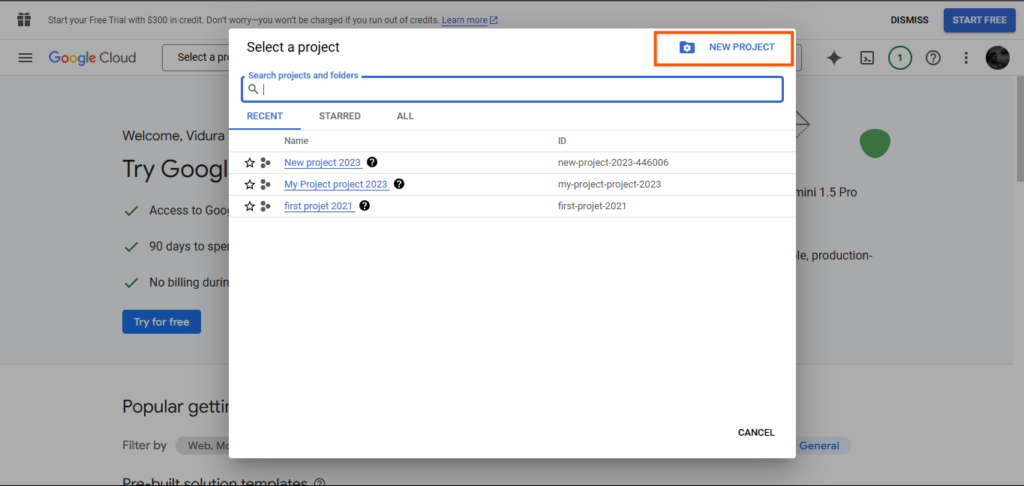
Step 2: Create a New Challenge
Click on the challenge dropdown within the high navigation and choose “New Challenge.”. After that, click on on the brand new challenge highlighted under.
Step 3: Enter Challenge Particulars
Enter a challenge title, comparable to connect-google-auth-2024, and click on “Create.”.
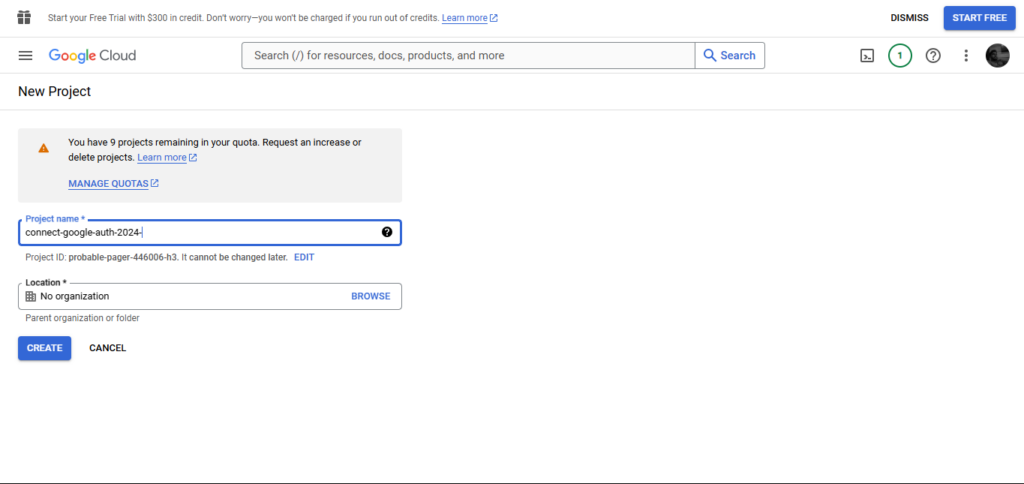
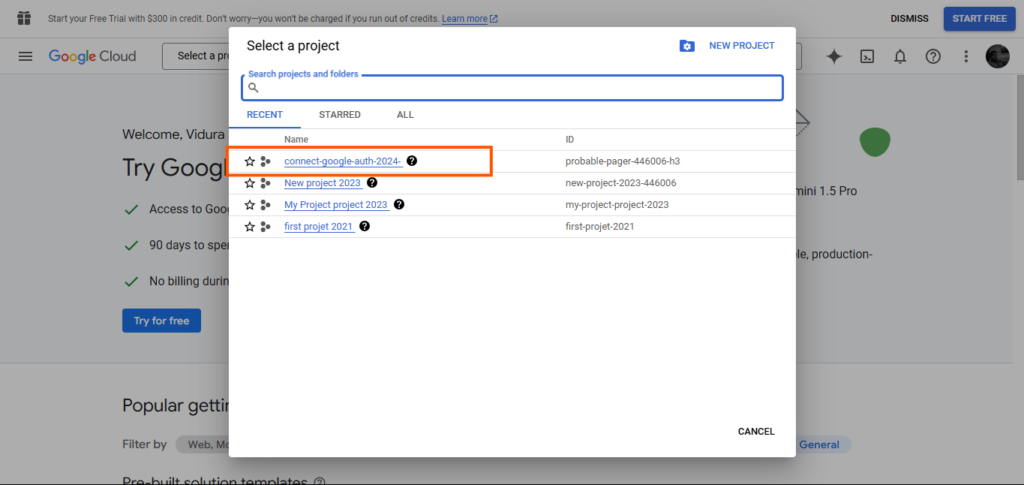
Then, navigate again to the challenge dropdown and choose the newly created challenge.
Step 4: Configure OAuth Consent
From the left menu, click on “APIs & Providers.” The display you will note ought to appear like the pattern under.
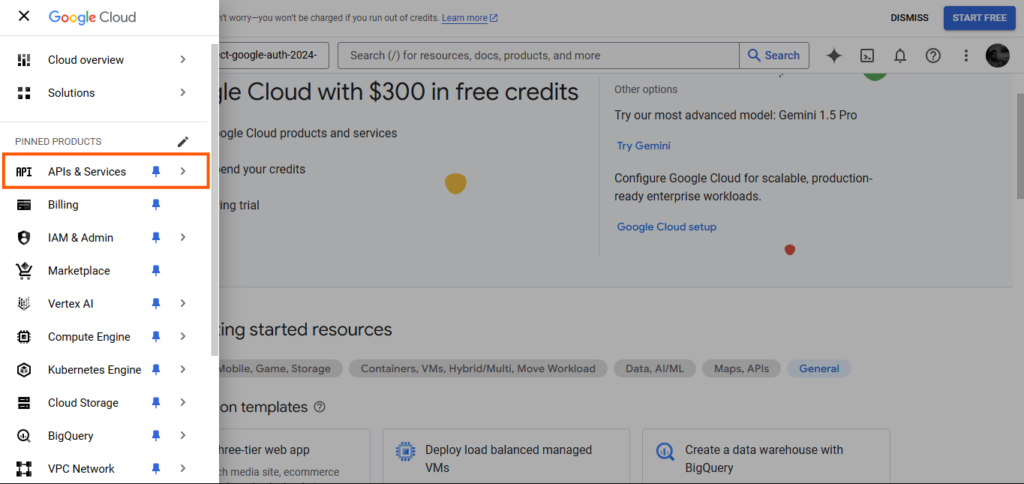
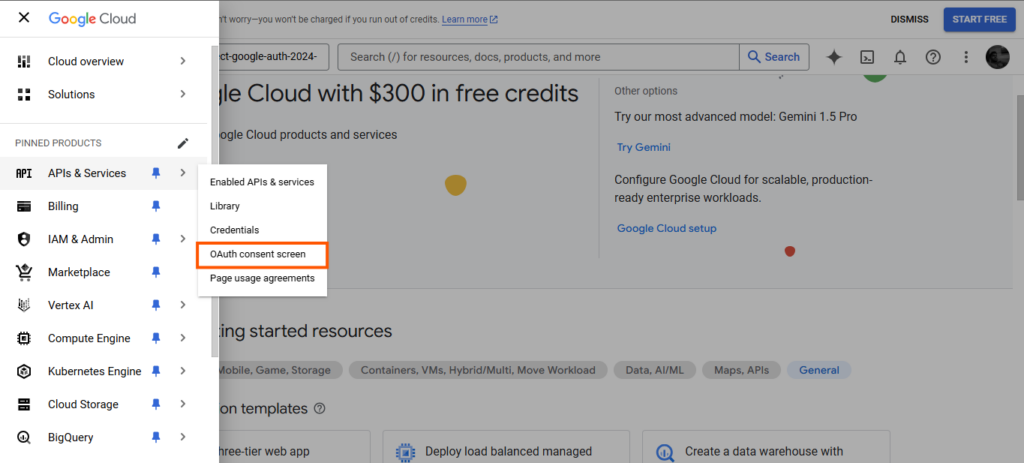
Then, click on “OAuth consent display” to configure OAuth consent.
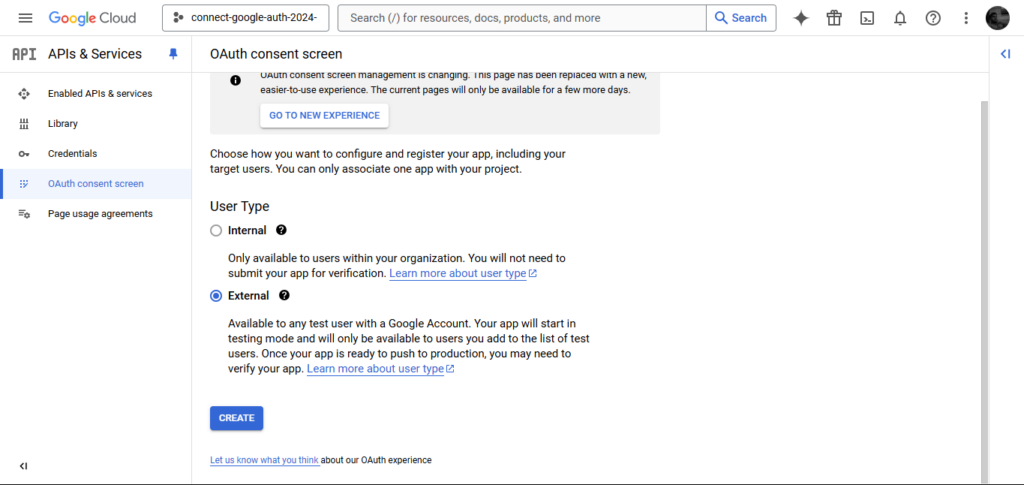
Choose the kind of consent you need, and click on CREATE.
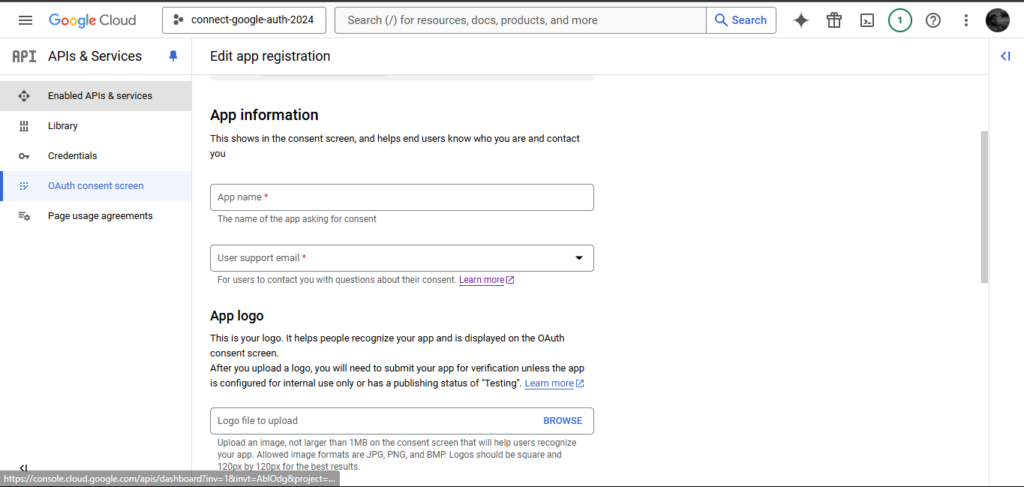
Full the consent display kind, offering app particulars like app title, assist e-mail, and emblem. Save your settings.
Observe: whenever you’re able to deploy your utility, you must substitute the URI1 and URI2 with the area title you wish to use — comparable to https://instance.com.
Step 5: Creating Credentials
Go to “Credentials” and create a brand new OAuth 2.0 Shopper ID:
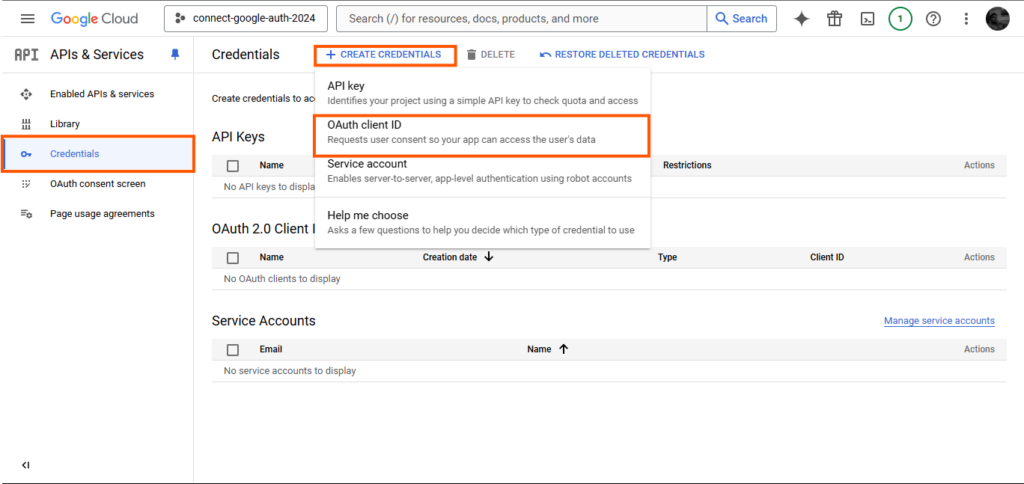
Utility kind: Net utility
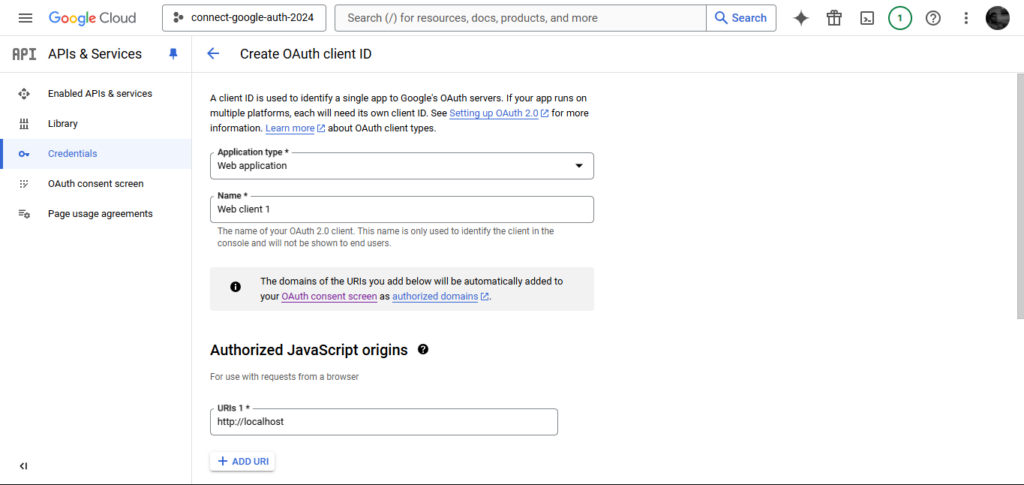
Licensed redirect URIs: Add http://localhost and http://localhost:3000. (when deploying to manufacturing, substitute these together with your area, e.g., https://instance.com.)
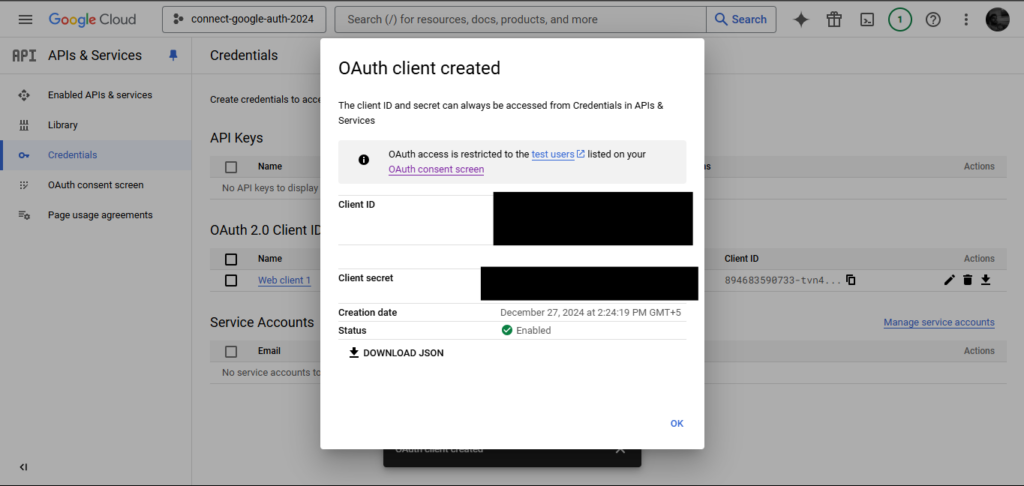
Step 6: Obtain Shopper ID and Secret
As soon as your credentials have been saved efficiently, you may copy or obtain the generated Shopper ID and Secret.
Setup React App
Begin by bootstrapping your React.js app with Create React App or an equal trendy setup. Open a terminal, create your challenge folder, and run the next command:
For contemporary purposes, think about using instruments like Vite for sooner builds. Set up the @react-oauth/google package deal to leverage Google’s Identification Providers SDK:
npm set up @react-oauth/googleSetting Up the Specific Server
Create one other folder within the root listing named server. Then, open a terminal and cd into server: cd server.
After that, create a file named server.js and run npm init -y to create the package deal.json file. Subsequent, set up the next packages:
- Specific.js: A minimal Node.js internet utility framework that gives a sturdy set of options for internet and cell purposes.
- CORS: A Node.js package deal that gives Join/Specific middleware that can be utilized to allow cross-origin useful resource sharing with varied choices.
- Dotenv: A Node.js package deal that masses setting variables from .env file.
- Google-auth-library: Google API’s Authentication Shopper Library for Node.js.
- Jsonwebtoken: A JSON Net Token implementation library for Node.js.
- Nodemon: A easy monitor script to be used in the course of the growth of a Node.js app.
You may set up the packages above by working the next command:
npm set up specific cors dotenv google-auth-library jsonwebtoken nodemonAfter that, configure your script by doing this:
  "scripts": {
    "begin": "node server.js",
    "dev": "nodemon server.js"
  },
Your package deal.json ought to appear like this:
{
  "title": "connect-google-auth-article",
  "model": "1.0.0",
  "description": "",
  "most important": "server.js",
  "scripts": {
    "begin": "node server.js",
    "dev": "nodemon server.js"
  },
  "dependencies": {
    "cors": "^2.8.5",
    "dotenv": "^16.0.2",
    "specific": "^4.18.1",
    "google-auth-library": "^8.5.2",
    "jsonwebtoken": "^8.5.1",
    "nodemon": "^2.0.20"
  },
  "key phrases": [],
  "writer": "",
  "license": "ISC"
}
After that, write the next code in server.js and run npm run dev to begin your server:
const specific = require("specific");
const app = specific();
require("dotenv/config");
const cors = require("cors");
const { OAuth2Client } = require("google-auth-library");
const jwt = require("jsonwebtoken");

app.use(
  cors({
    origin: ["http://localhost:3000"],
    strategies: "GET,POST,PUT,DELETE,OPTIONS",
  })
);
app.use(specific.json());

let DB = [];

app.hear("5152", () => console.log("Server working on port 5152"));
Making ready the React App
Fashionable purposes now not require including the Google script manually. As a substitute, import the GoogleLogin element from the @react-oauth/google package deal for a cleaner integration. Instance:
import { GoogleLogin } from '@react-oauth/google';Our index.html file ought to appear like this:
DOCTYPE html>
<html lang="en">
  <head>
    <meta charset="utf-8" />
    <hyperlink rel="icon" href="%PUBLIC_URL%/favicon.ico" />
    <meta title="viewport" content material="width=device-width, initial-scale=1" />
    <meta title="theme-color" content material="#000000" />
    <meta
      title="description"
      content material="Site created utilizing create-react-app"
    />
    <hyperlink rel="apple-touch-icon" href="%PUBLIC_URL%/logo192.png" />
    <hyperlink rel="manifest" href="%PUBLIC_URL%/manifest.json" />

    <script src="https://accounts.google.com/gsi/shopper" async defer>script>
    <title>React Apptitle>
  head>
  <physique>
    <noscript>It's good to allow JavaScript to run this app.noscript>
    <div id="root">div>
  physique>
html>
Subsequent, we’ll create two folders within the src folder named screens and hooks. The screens folder will comprise 5 information: Dwelling.jsx, Touchdown.jsx, Login.jsx, Signup.jsx and index.js. The hooks folder will comprise just one file: useFetch.jsx.
Configure Shopper-Facet Routing
The package deal we’ll leverage for the client-side routing is react-router-dom. Open a brand new terminal, cd into the app, and run the next command:
npm set up react-router-domWe are able to then replace our App.js to appear like this:
import React, { useEffect } from "react";
import { useState } from "react";
import { BrowserRouter, Routes, Route, Navigate } from "react-router-dom";

const App = () => {
  const [user, setUser] = useState({});

  return (
    <BrowserRouter>
      <Routes>

      </Routes>
    </BrowserRouter>
  );
};

export default App;
Creating the Touchdown Web page
On this utility, the touchdown web page is the one web page out there for an unauthenticated person. It’ll comprise hyperlinks to the sign-up and login pages and can appear like this:
import React from "react";
import { Hyperlink } from "react-router-dom";

const Touchdown = () => {
  return (
    <>
      <header fashion={{ textAlign: "heart" }}>
        <h1>Welcome to my world</h1>
      </header>
      <most important fashion={{ show: "flex", justifyContent: "heart", hole: "2rem" }}>
        <Hyperlink
          to="/signup"
          fashion={{
            textDecoration: "none",
            border: "1px stable grey",
            padding: "0.5rem 1rem",
            backgroundColor: "wheat",
            coloration: "#333",
          }}
        >
          Signal Up
        </Hyperlink>
        <Hyperlink
          to="/login"
          fashion={{
            textDecoration: "none",
            border: "1px stable grey",
            padding: "0.5rem 1rem",
            backgroundColor: "whitesmoke",
            coloration: "#333",
          }}
        >
          Login
        </Hyperlink>
      </most important>
    </>
  );
};

export default Touchdown;
Let’s break it down:
- The element returns a React fragment aspect represented by an empty tag.
- The fragment comprises two parts:
and . The header returns an - A unique background coloration is offered for the 2 hyperlinks to enhance UX.
Subsequent, we are able to open the screens/index.js file and export the Touchdown.jsx like so:
export { default as Touchdown } from "./Touchdown";After that, we are able to import it into the App.js file, the place we configure a route for it:
import {  Touchdown } from "./screens";

<Route

  path="https://www.sitepoint.com/"

  aspect={person?.e-mail ? <Navigate to="/dwelling" /> : <Touchdown />}

  />
Making a useFetch Hook
A hook in React is a particular operate that permits you to use React’s performance. To create a hook, open hooks/useFetch.jsx and add the next code:
import { useState } from "react";

const useFetch = (url) => {
  const [loading, setLoading] = useState(false);
  const [error, setError] = useState("");

  const handleGoogle = async (response) => {
    console.log(response)
  };
  return { loading, error, handleGoogle };
};

export default useFetch;
Creating Signal-up Web page
Open the screens/Signup.jsx file and add the next code:
import React, { useEffect } from "react";
import { Hyperlink } from "react-router-dom";
import useFetch from "../hooks/useFetch";


const SignUp = () => {
  const { handleGoogle, loading, error } = useFetch(
    "http://localhost:5152/signup"
  );

  useEffect(() => {

    if (window.google) {
import { useGoogleLogin } from '@react-oauth/google';
const login = useGoogleLogin({
  onSuccess: tokenResponse => console.log(tokenResponse),
  onError: () => console.error('Login Failed'),
});


 google.accounts.id.renderButton(doc.getElementById("signUpDiv"), {

        theme: "filled_black",

        textual content: "continue_with",
        form: "tablet",
      });


    }
  }, [handleGoogle]);

  return (
    <>
      <nav fashion={{ padding: "2rem" }}>
        <Hyperlink to="https://www.sitepoint.com/">Go Again</Hyperlink>
      </nav>
      <header fashion={{ textAlign: "heart" }}>
        <h1>Register to proceed</h1>
      </header>
      <most important
        fashion={{
          show: "flex",
          justifyContent: "heart",
          flexDirection: "column",
          alignItems: "heart",
        }}
      >
        {error && <p fashion={{ coloration: "crimson" }}>{error}</p>}
        {loading ? (
          <div>Loading....</div>
        ) : (
          <div id="signUpDiv" knowledge-textual content="signup_with"></div>
        )}
      </most important>
      <footer></footer>
    </>
  );
};

export default SignUp;
Let’s break it down:
- We extract the out there states and features from the useFetch hook. We additionally move the URL that we’ll be calling to deal with our sign-on to the server.
- In useEffect, we verify for the supply of Google’s script — dealt with by the script we put within the public.index.html file.
- We then use the initialize technique out there within the script to deal with the performance of the authentication button.
- We additionally move a callback operate, which we’ve already outlined within the useFetch hook.
Subsequent, we’ll use the renderButton technique to show our authentication button on the display. The primary parameter we move is the aspect wherein the button shall be embedded, utilizing the getElementById technique. The subsequent parameters that we are able to move are used to customise the look of the button. It has the next required settings:
- kind: Accepts two values — commonplace and icon.
Furthermore, it has optionally available settings, together with the next:
- theme: The button theme. It may possibly settle for one of many following: filled_blue, define, and filled_black.
- dimension: Defines the dimensions of the button. It accepts massive, medium, and small.
- textual content: Defines the button textual content. It accepts one of many following: signin_with, signup_with, continue_with, and sign up.
- form: Defines the form of the button. It accepts rectangular, tablet, circle, or sq..
- logo_alignment: Defines how the brand shall be positioned on the button. It may be left or heart.
- width: Defines the width of the button. The utmost width is 400.
- locale: Used to set a selected language for the textual content.
Creating the Login Web page
The login web page is just like the sign-up display. The one distinction is the server URL and the button textual content. The code ought to appear like this:
import React, { useEffect } from "react";
import { Hyperlink } from "react-router-dom";
import useFetch from "../hooks/useFetch";


const Login = () => {
  const { handleGoogle, loading, error } = useFetch(
    "http://localhost:5152/login"
  );

  useEffect(() => {

    if (window.google) {
      google.accounts.id.initialize({
        client_id: course of.env.REACT_APP_GOOGLE_CLIENT_ID,
        callback: handleGoogle,
      });

      google.accounts.id.renderButton(doc.getElementById("loginDiv"), {

        theme: "filled_black",

        textual content: "signin_with",
        form: "tablet",
      });


    }
  }, [handleGoogle]);

  return (
    <>
      <nav fashion={{ padding: "2rem" }}>
        <Hyperlink to="https://www.sitepoint.com/">Go Again</Hyperlink>
      </nav>
      <header fashion={{ textAlign: "heart" }}>
        <h1>Login to proceed</h1>
      </header>
      <most important
        fashion={{
          show: "flex",
          justifyContent: "heart",
          flexDirection: "column",
          alignItems: "heart",
        }}
      >
        {error && <p fashion={{ coloration: "crimson" }}>{error}</p>}
        {loading ? <div>Loading....</div> : <div id="loginDiv"></div>}
      </most important>
      <footer></footer>
    </>
  );
};

export default Login;
Additionally create a .env.native file within the root folder and add the next:
REACT_APP_GOOGLE_CLIENT_ID=your shopper idSubsequent, we export the sign-up and login web page from the screens.index.js file:
export { default as Login } from "./Login";
export { default as Signup } from "./SignUp";
After that, we configure their routes within the App.js file:
import {  Touchdown, Login, Signup } from "./screens";

...

<Route
    path="/signup"
    aspect={person?.e-mail ? <Navigate to="/dwelling" /> : <Signup />}
  />
  <Route
    path="/login"
    aspect={person?.e-mail ? <Navigate to="/dwelling" /> : <Login />}
  />
The google.accounts.id.immediate() is used to robotically ask the person to sign up instantly after they open your internet web page. It may be positioned within the root file or the login web page. This behaviour is called the one-tap login.
useEffect(() => {
  if (window.google) {
    google.accounts.id.initialize({
      client_id: course of.env.REACT_APP_GOOGLE_CLIENT_ID,
      callback: handleGoogle,
    });


    google.accounts.id.immediate((notification) => {
      if (notification.isNotDisplayed() || notification.isSkippedMoment()) {
        console.warn("One Faucet immediate was not displayed.");
      }
    });
  }
}, [handleGoogle]);


const refreshAccessToken = async () => {
  strive {
    const response = await fetch('http://localhost:5152/refresh-token', {
      technique: 'POST',
      credentials: 'embody',
    });

    const knowledge = await response.json();
    if (knowledge.token) {
      localStorage.setItem("person", JSON.stringify(knowledge));
    } else {
      throw new Error('Token refresh failed.');
    }
  } catch (error) {
    console.error('Token refresh error:', error);
  }
};
Making a Customized Login Button
Generally, the Default Google login button could not align together with your branding. In such circumstances, you may create a customized button just like the one under:
import { useGoogleLogin } from '@react-oauth/google';

const CustomGoogleButton = () => {
  const login = useGoogleLogin({
    onSuccess: (response) => console.log(response),
    onError: () => console.error('Login Failed'),
  });

  return (
    <button
      onClick={login}
      fashion={{
        backgroundColor: '#4285F4',
        coloration: 'white',
        padding: '10px 20px',
        border: 'none',
        borderRadius: '5px',
        cursor: 'pointer',
      }}
    >
      Signal in with Google
    </button>
  );
};

export default CustomGoogleButton;
Updating useFetch
The Google authentication returns a response with JWT credentials. Nevertheless, to confirm its authenticity and in addition create a session for the person, we’ll be making subsequent calls to the server. We should always replace our hooks/useFetch file to appear like this:
  const handleGoogle = async (response) => {
    setLoading(true);
    fetch(url, {
      technique: "POST",
      headers: {
        "Content material-Sort": "utility/json",
      },

      physique: JSON.stringify({ credential: response.credential }),
    })
      .then((res) => {
        setLoading(false);

        return res.json();
      })
      .then((knowledge) => {
        if (knowledge?.person) {
          localStorage.setItem("person", JSON.stringify(knowledge?.person));
          window.location.reload();
        }

        throw new Error(knowledge?.message || knowledge);
      })
      .catch((error) => {
        setError(error?.message);
      });
  };
Let’s break this down:
- Our callback operate accepts a parameter from Google authentication handed in as a response.
- We then use fetch to request the server.
- After we get the suitable response, we retailer the person within the localStorage in JSON format.
Creating Signup and Login Routes
Open the server.js file. Initially, we’ll create a operate that verifies the credentials we’ll be receiving:
const GOOGLE_CLIENT_ID = course of.env.GOOGLE_CLIENT_ID;
const shopper = new OAuth2Client(GOOGLE_CLIENT_ID);

async operate verifyGoogleToken(token) {
  strive {
    const ticket = await shopper.verifyIdToken({
      idToken: token,
      viewers: GOOGLE_CLIENT_ID,
    });
    return { payload: ticket.getPayload() };
  } catch (error) {
    return { error: "Invalid person detected. Please strive once more" };
  }
}
Create a .env file within the root folder of the server and add the next:
# .env
GOOGLE_CLIENT_ID=your shopper id
JWT_SECRET=mySecret
Subsequent, create the sign-up route:
app.submit("/signup", async (req, res) => {
  strive {

    if (req.physique.credential) {
      const verificationResponse = await verifyGoogleToken(req.physique.credential);

      if (verificationResponse.error) {
        return res.standing(400).json({
          message: verificationResponse.error,
        });
      }

      const profile = verificationResponse?.payload;

      DB.push(profile);

      res.standing(201).json({
        message: "Signup was profitable",
        person: {
          firstName: profile?.given_name,
          lastName: profile?.family_name,
          image: profile?.image,
          e-mail: profile?.e-mail,
          token: jwt.signal({ e-mail: profile?.e-mail }, "myScret", {
            expiresIn: "1d",
          }),
        },
      });
    }
  } catch (error) {
    res.standing(500).json({
      message: "An error occurred. Registration failed.",
    });
  }
});
Additionally, create the login route:
app.submit("/login", async (req, res) => {
  strive {
    if (req.physique.credential) {
      const verificationResponse = await verifyGoogleToken(req.physique.credential);
      if (verificationResponse.error) {
        return res.standing(400).json({
          message: verificationResponse.error,
        });
      }

      const profile = verificationResponse?.payload;

      const existsInDB = DB.discover((particular person) => particular person?.e-mail === profile?.e-mail);

      if (!existsInDB) {
        return res.standing(400).json({
          message: "You aren't registered. Please enroll",
        });
      }

      res.standing(201).json({
        message: "Login was profitable",
        person: {
          firstName: profile?.given_name,
          lastName: profile?.family_name,
          image: profile?.image,
          e-mail: profile?.e-mail,
          token: jwt.signal({ e-mail: profile?.e-mail }, course of.env.JWT_SECRET, {
            expiresIn: "1d",
          }),
        },
      });
    }
  } catch (error) {
    res.standing(500).json();
  }
});
Let’s break it down:
- Within the routes, we first verify that the credentials are handed into the physique. We then try and confirm the credentials. If there’s an error, we ship it again to the shopper in JSON format.
- Within the sign-up route, we retailer customers’ profiles within the DB array and ship a profitable response with a JWT-signed e-mail as a token.
- Within the login route, we verify if the person exists within the DB, and if not, we throw an error. If it exists, we additionally ship a profitable response with a JWT-signed e-mail as a token with different parameters.
Updating App.js
Within the App.js of the shopper app, we’ll replace the file to verify for a person within the native storage with the next code:
 useEffect(() => {
    const theUser = localStorage.getItem("person");

    if (theUser && !theUser.contains("undefined")) {
      setUser(JSON.parse(theUser));
    }
  }, []);
Creating Dwelling.jsx
The Dwelling.jsx file is the web page that shall be out there to the person after a profitable signup or login:
import React from "react";

const Dwelling = ({ person }) => {
  const logout = () => {
    localStorage.removeItem("person");
    window.location.reload();
  };
  return (
    <div fashion={{ textAlign: "heart", margin: "3rem" }}>
      <h1>Expensive {person?.e-mail}</h1>

      <p>
        You are viewing this web page since you are logged in otherwise you simply signed
        up
      </p>

      <div>
        <button
          onClick={logout}
          fashion={{
            coloration: "crimson",
            border: "1px stable grey",
            backgroundColor: "white",
            padding: "0.5rem 1rem",
            cursor: "pointer",
          }}
        >
          Logout
        </button>
      </div>
    </div>
  );
};

export default Dwelling;
Subsequent, we’ll export it from the screens/index.js file like so:
export { default as Dwelling } from "./Dwelling";After that, we’ll import and arrange its route in App.js:
import { Dwelling, Touchdown, Login, Signup } from "./screens";

...

<Route
    path="/dwelling"
    aspect={person?.e-mail ? <Dwelling person={person} /> : <Navigate to="https://www.sitepoint.com/" />}
  />
Comparability with Different Authentication Strategies
Whereas Google Authentication affords seamless integration and trendy options, it’s vital to guage different authentication strategies out there for various use circumstances. Here’s a comparability of various authentication choices:
| Methodology | Professionals | Cons |
| Google Auth | Seamless login, profile integration, One Faucet login assist. | Requires Google account, depending on third-party. |
| Fb Auth | Social integration, extensive person base. | Privateness issues, decrease adoption vs Google. |
| GitHub Auth | Excellent for developer instruments, integrates with GitHub APIs. | Restricted to builders; not appropriate for basic apps. |
| E-mail/Password | No dependency on third-party companies. | Requires extra password administration safety. |
Conclusion
Congratulations! You’ve efficiently carried out Google Signal In Reactusing the most recent Identification Providers SDK in a React.js and Specific.js utility. This setup helps each web-based logins and One Faucet login for enhanced person convenien
The mix of React Google Auth, Google OAuth React, and react-oauth/google offers a sturdy authentication framework that simplifies integration whereas sustaining scalability.ce. Don’t overlook to check your utility completely to make sure safe and seamless authentication.
As soon as once more, the supply code is accessible right here: Server and Shopper.
Associated studying:
FAQs on Learn how to Set Up the New Google Auth React and Specific App
How Can I Set Up React Google Login in a React App with Specific Backend?
To implement React Google Login, begin by creating credentials within the Google Developer Console to acquire a Google Shopper ID. Use this ID to configure the OAuth consent display, guaranteeing you’ve set the approved JavaScript origins and redirect URIs.
Set up essential npm packages like specific, cors, and google-auth-library in your server. In your React app, use the react-google-login element for front-end integration. This course of faucets into Google APIs to facilitate person sign-ins and securely handle entry tokens.
What Steps Are Concerned in Creating the OAuth Consent Display for a React Google Login?
Navigate to the Google Developer Console, choose or create a brand new challenge, and entry the OAuth consent display part. Right here, you’ll specify the person authorization particulars, together with your utility’s title, the assist e-mail, and the approved domains. This display is essential for acquiring person consent to entry Google APIs together with your React app.
How Can I Safely Acquire Entry Tokens in a React and Specific Utility?
To securely acquire entry tokens in a Google Login React implementation, use the react-oauth/google package deal, which leverages Google’s OAuth 2.0 protocol. This ensures safe dealing with of authentication tokens with out exposing delicate knowledge.
How Can I Implement Logout Performance in My React App with Google Login?
To implement logout performance, present a logout button that, when clicked, calls a operate to take away the person particulars from native storage and the session from the server. This could invalidate the session and redirect the person to the login display to make sure the person is totally logged out.
How Do I Refresh Tokens with Google Login in a React and Specific App?
Use the refresh token offered by Google’s OAuth 2.0 server to acquire new entry tokens when the present one expires. Arrange a middleware in your Specific backend that checks the token’s validity and refreshes it as wanted. This retains the person signed in with out requiring them to repeatedly enter their credentials.
What Is the Greatest Observe for Managing Consumer Particulars in React Google Authentication?
After a profitable login, use the ID token returned by Google to retrieve person particulars. Retailer these particulars in native storage or your state administration resolution to personalize the person expertise with out compromising safety. Guarantee delicate knowledge dealing with conforms to finest practices to guard person data.
Can I Create a Customized Button to Signal In to My React Utility?
Sure, you may customise the Google Signal-In button to raised match the design of your internet utility. Google offers choices to alter the button’s look, together with its dimension, textual content, and coloration by way of the react-google-login element. Make the most of these customization choices to create a singular and seamless sign-in circulation.
How Do I Deal with Errors and Guarantee a Strong Google Login Expertise in My Utility?
Implement detailed error dealing with each on the shopper facet in your React elements and on the server facet in your Specific app. Catch and log errors successfully, present significant error messages to customers, and be certain that the person can get well gracefully from points in the course of the sign-in course of.
What Are the Mandatory Steps to Configure a New Challenge for Google Authentication within the Google Cloud Console?
To configure a brand new challenge, go to the Google Cloud Console, click on on ‘Create Challenge’, enter your challenge title, after which navigate to the APIs & Providers dashboard. From there, allow the Google+ API and configure your OAuth 2.0 credentials by specifying your shopper ID and shopper secret, in addition to redirecting URIs.
How Can I Use the Entry Token Returned by Google for Additional API Requests in My React and Specific Functions?
Use the entry token to make approved API requests to Google companies by attaching it to the HTTP Authorization header. This permits your utility to entry Google APIs on behalf of the person, enabling functionalities comparable to retrieving profile data or interacting with Google companies by attaching it to the HTTP Authorization header. This permits your utility to entry Google APIs on behalf of the person, enabling functionalities comparable to retrieving profile data or interacting with Google companies.


![The AI Search Content material Optimization Guidelines [With Google Sheets]](https://blog.aimactgrow.com/wp-content/uploads/2025/06/ai-search-optimization-checklist-120x86.png)


![How creators and entrepreneurs are utilizing AI to hurry up & succeed [data]](https://blog.aimactgrow.com/wp-content/uploads/2025/06/Untitled20design-Apr-07-2023-08-24-35-4586-PM-120x86.png)


