
Sound is vibration, imaginative and prescient is vibration you may see. I’m at all times chasing the second these waves overlap. For a latest Webflow & GSAP group problem specializing in GSAP Draggable and Inertia Plugin, I made a decision to push the thought additional by constructing a futuristic audio-reactive visualizer. The idea was to create a sci-fi “anomaly detector” interface that reacts to music in actual time, mixing moody visuals with sound.
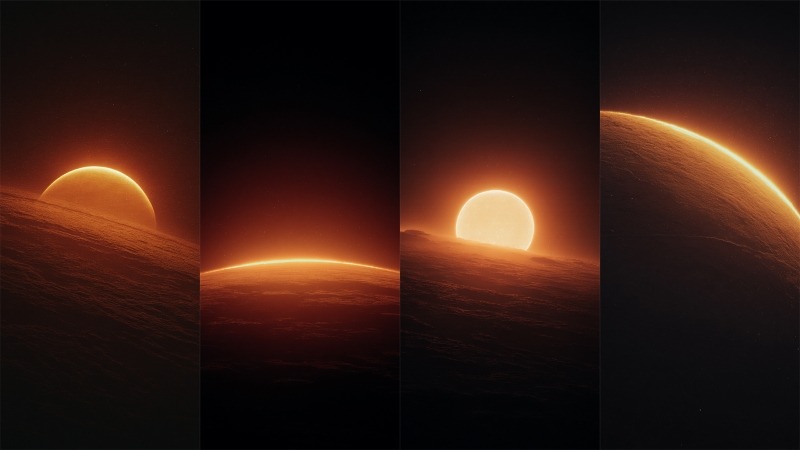
The idea started with a easy picture in my thoughts: a glowing orange-to-white sphere sitting alone in a darkish void, the core that will later pulse with the music. To solidify the thought, I ran this immediate by means of Midjourney: “Glowing orange and white gradient sphere, tender blurry layers, clean distortion, darkish black background, refined film-grain, retro-analog vibe, cinematic lighting.” After a number of iterations I picked the body that felt proper, gave it a fast shade move in Photoshop, and used that clear, luminous orb because the visible basis for your entire audio-reactive construct.
The undertaking was initially constructed as an entry for the Webflow × GSAP Neighborhood Problem (Week 2: “Draggable & Inertia”), which inspired the usage of GSAP’s dragging and inertia capabilities. This context influenced the options: I made the on-screen management panels draggable with momentum, and even gave the 3D orb a refined inertia-driven motion when “flung”. On this article, I’ll stroll you thru your entire course of – from organising the Three.js scene and analyzing audio with the Internet Audio API, to creating customized shaders and including GSAP animations and interactivity. By the top, you’ll see how code, visuals, and sound come collectively to create an immersive audio visualizer.
Setting Up the Three.js Scene
To construct the 3D portion, I used Three.js to create a scene containing a dynamic sphere (the “anomaly”) and different visible parts.
We begin with the standard Three.js setup: a scene, a digicam, and a renderer. I went with a perspective digicam to get a pleasant 3D view of our orb and positioned it a bit again so the article is absolutely in body.
An OrbitControls is used to permit primary click-and-drag orbiting across the object (with some damping for smoothness). Right here’s a simplified snippet of the preliminary setup:
// Initialize Three.js scene, digicam, renderer
const scene = new THREE.Scene();
const digicam = new THREE.PerspectiveCamera(75, window.innerWidth/window.innerHeight, 0.1, 100);
digicam.place.set(0, 0, 10);  // digicam again a bit from origin

const renderer = new THREE.WebGLRenderer({ antialias: true });
renderer.setSize(window.innerWidth, window.innerHeight);
doc.physique.appendChild(renderer.domElement);

// Add OrbitControls for digicam rotation
const controls = new THREE.OrbitControls(digicam, renderer.domElement);
controls.enableDamping = true;
controls.dampingFactor = 0.1;
controls.rotateSpeed = 0.5;
controls.enableZoom = false; // lock zoom for a extra mounted view
Subsequent, I created the anomaly object. That is the primary function: a spiky wireframe sphere that reacts to audio. Three.js offers shapes like SphereGeometry or IcosahedronGeometry that we will use for a sphere. I selected an icosahedron geometry as a result of it offers an attention-grabbing multi sided look and permits simple management of element (by way of a subdivision stage). The anomaly is definitely composed of two overlapping elements:
- Outer wireframe sphere: An IcosahedronGeometry with a customized ShaderMaterial that attracts it as a glowing wireframe. This half will distort primarily based on music (think about it “vibrating” and morphing with the beat).
- Inside glow sphere: A barely bigger SphereGeometry drawn with a semi-transparent, emissive shader (utilizing the bottom of the geometry) to create a halo or aura across the wireframe. This provides the orb a heat glow impact, like an vitality subject.
I additionally added in some additional visuals: a subject of tiny particles floating within the background (for a depth impact, like mud or sparks) and a refined grid overlay within the UI (extra on the UI later). The scene’s background is ready to a darkish shade, and I layered a background picture (the edited Midjourney visible) behind the canvas to create the mysterious-alien panorama horizon. This mix of 3D objects and 2D backdrop creates the phantasm of a holographic show over a planetary floor.
Integrating the Internet Audio API for Music Evaluation
With the 3D scene in place, the following step was making it reply to music. That is the place the Internet Audio API is available in. I allowed the consumer to both add an audio file or decide one of many 4 offered tracks. When the audio performs, we faucet into the audio stream and analyze its frequencies in real-time utilizing an AnalyserNode. The AnalyserNode offers us entry to frequency knowledge. This can be a snapshot of the audio spectrum (bass, mids, treble ranges, and many others.) at any given second, which we will use to drive animations.
To set this up, I created an AudioContext and an AnalyserNode, and linked an audio supply to it. Should you’re utilizing an
// Create AudioContext and Analyser
const audioContext = new (window.AudioContext || window.webkitAudioContext)();
const analyser = audioContext.createAnalyser();
analyser.fftSize = 2048; // Use an FFT measurement of 2048 for evaluation
analyser.smoothingTimeConstant = 0.8; // Clean out the frequencies a bit
// Join an audio ingredient supply to the analyser
const audioElement = doc.getElementById('audio-player'); // Right here we set fftSize to 2048, which implies the analyser will break the audio into 1024 frequency bins (frequencyBinCount is half of fftSize). We additionally set a smoothingTimeConstant to make the info much less jumpy frame-to-frame. Now, because the audio performs, we will repeatedly question the analyser for knowledge. The strategy analyser.getByteFrequencyData(array) fills an array with the present frequency magnitudes (0–255) throughout the spectrum. Equally, getByteTimeDomainData offers waveform amplitude knowledge. In our animation loop, I name analyser.getByteFrequencyData() on every body to get recent knowledge:
const frequencyData = new Uint8Array(analyser.frequencyBinCount);

perform animate() {
  requestAnimationFrame(animate);

  // ... replace Three.js controls, and many others.
  if (analyser) {
    analyser.getByteFrequencyData(frequencyData);
    // Compute a median quantity stage from frequency knowledge
    let sum = 0;
    for (let i = 0; i < frequencyData.size; i++) {
      sum += frequencyData[i];
    }
    const common = sum / frequencyData.size;
    let audioLevel = common / 255;  // normalize to 0.0–1.0
    // Apply a sensitivity scaling (from a UI slider)
    audioLevel *= (sensitivity / 5.0);
    // Now audioLevel represents the depth of the music (0 = silence, ~1 = very loud)
  }

  // ... (use audioLevel to replace visuals)
  renderer.render(scene, digicam);
}
In my case, I additionally recognized a “peak frequency” (the frequency bin with the best amplitude at a given second) and another metrics only for enjoyable, which I show on the UI (e.g. exhibiting the dominant frequency in Hz, amplitude, and many others., as “Anomaly Metrics”). However the important thing takeaway is the audioLevel – a price representing total music depth – which we’ll use to drive the 3D visible modifications.
Syncing Audio with Visuals: As soon as we have now audioLevel, we will inject it into our Three.js world. I handed this worth into the shaders as a uniform each body, and likewise used it to tweak some high-level movement (like rotation pace). Moreover, GSAP animations have been triggered by play/pause occasions (for instance, a slight digicam zoom when music begins, which we’ll cowl subsequent). The result’s that the visuals transfer in time with the music: louder or extra intense moments within the audio make the anomaly glow brighter and deform extra, whereas quiet moments trigger it to cool down.
Creating the Audio-Reactive Shaders
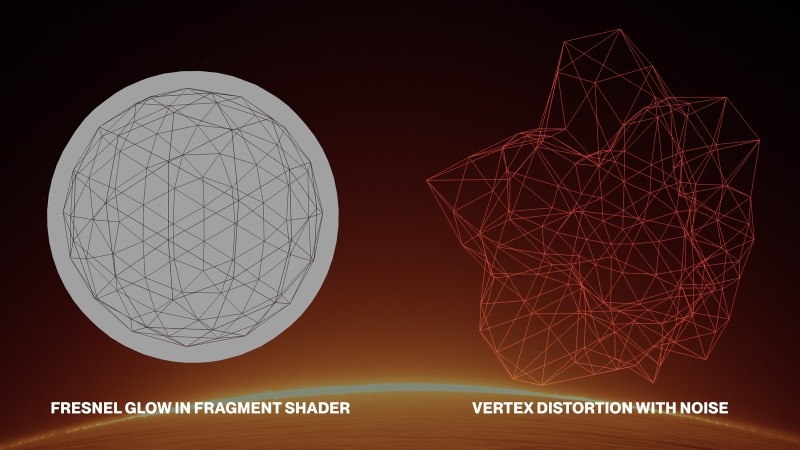
To realize the dynamic search for the anomaly, I used customized GLSL shaders within the materials. Three.js lets us write our personal shaders by way of THREE.ShaderMaterial, which is ideal for this as a result of it offers fine-grained management over vertex positions and fragment colours. This may sound tough should you’re new to shaders, however conceptually we did two main issues within the shader:
- Vertex Distortion with Noise: We displace the vertices of the sphere mesh over time to make it wobble and spike. I included a 3D noise perform (Simplex noise) within the vertex shader – it produces a clean pseudo-random worth for any 3D coordinate. For every vertex, I calculate a noise worth primarily based on its place (plus a time issue to animate it). Then I transfer the vertex alongside its regular by an quantity proportional to that noise. We additionally multiply this by our audioLevel and a user-controlled distortion issue. Basically, when the music is intense (excessive audioLevel), the sphere will get spikier and extra chaotic; when the music is tender or paused, the sphere is nearly clean.
- Fresnel Glow in Fragment Shader: To make the wireframe edges glow and fade realistically, I used a fresnel impact within the fragment shader. This impact makes surfaces extra luminous at glancing angles. We calculate it by taking the dot product of the view route and the vertex regular – it leads to a price that’s small on edges (grazing angles) and bigger on faces instantly going through the digicam. By inverting and exponentiating this, we get a pleasant glow on the define of the sphere that intensifies on the edges. I modulated the fresnel depth with the audioLevel as properly, so the glow pulsates with the beat.
Let’s take a look at a simplified model of the shader code for the outer wireframe sphere materials:
const outerMaterial = new THREE.ShaderMaterial({
  uniforms: {
    time:      { worth: 0 },
    audioLevel:{ worth: 0 },            // this will likely be up to date every body
    distortion:{ worth: 1.0 },
    shade:     { worth: new THREE.Shade(0xff4e42) }  // a reddish-orange base shade
  },
  wireframe: true,
  clear: true,
  vertexShader: `
    uniform float time;
    uniform float audioLevel;
    uniform float distortion;
    // (noise perform omitted for brevity)

    void major() {
      // Begin with the unique place
      vec3 pos = place;
      // Calculate procedural noise worth for this vertex (utilizing its place and time)
      float noise = snoise(pos * 0.5 + vec3(0.0, 0.0, time * 0.3));
      // Displace vertex alongside its regular
      pos += regular * noise * distortion * (1.0 + audioLevel);
      // Normal transformation
      gl_Position = projectionMatrix * modelViewMatrix * vec4(pos, 1.0);
    }
  `,
  fragmentShader: `
    uniform vec3 shade;
    uniform float audioLevel;
    various vec3 vNormal;
    various vec3 vPosition;

    void major() {
      // Calculate fresnel (view-angle dependent) time period
      vec3 viewDir = normalize(cameraPosition - vPosition);
      float fresnel = 1.0 - max(0.0, dot(viewDir, vNormal));
      fresnel = pow(fresnel, 2.0 + audioLevel * 2.0);
      // Make the fragment shade brighter on edges (fresnel) and pulse it barely with time
      float pulse = 0.8 + 0.2 * sin(time * 2.0);
      vec3 emissiveColor = shade * fresnel * pulse * (1.0 + audioLevel * 0.8);
      // Alpha fade out a bit when audio is excessive (to make spikes extra ethereal)
      float alpha = fresnel * (0.7 - audioLevel * 0.3);
      gl_FragColor = vec4(emissiveColor, alpha);
    }
  `
});
On this shader, snoise is a Simplex noise perform (not proven above) producing values ~-1 to 1. The vertex shader makes use of it to offset every vertex (pos += regular * noise * …). We multiply the noise by (1.0 + audioLevel) in order that when audioLevel rises, the displacement will increase. The distortion uniform is managed by a slider within the UI, so the consumer can manually dial the general spikiness. The fragment shader calculates a fresnel issue to make the wireframe edges glow. Discover how audioLevel elements into the ability and into the ultimate shade depth – louder audio makes the fresnel exponent larger (sharper glow) and likewise will increase brightness a bit. We additionally included a delicate pulsing (sin(time)) impartial of audio, simply to present a continuing respiration movement.
For the interior glow sphere, we used a separate ShaderMaterial: it’s principally a sphere drawn with facet: THREE.BackSide (so we see the interior floor) and Additive Mixing to present a blooming halo. Its fragment shader additionally makes use of a fresnel time period, however with a a lot decrease alpha so it seems as a tender haze across the orb. The interior sphere’s measurement is barely bigger (I used about 1.2× the radius of the outer sphere) in order that the glow extends past the wireframe. When mixed, the outer and interior shaders create the impact of a translucent, energy-filled orb whose floor ripples with music.
To tie all of it collectively, each body within the render loop I replace the shader uniforms with the present time and audio stage:
// within the animation loop:
outerMaterial.uniforms.time.worth = elapsedTime;
outerMaterial.uniforms.audioLevel.worth = audioLevel;
outerMaterial.uniforms.distortion.worth = currentDistortion;
glowMaterial.uniforms.time.worth = elapsedTime;
glowMaterial.uniforms.audioLevel.worth = audioLevel;
The result’s a 3D object that really feels alive with the music, it oscillates, pulses, and glows in sync with no matter observe is enjoying. Even the one you add.
Animations and Interactions with GSAP
With the visuals reacting to sound, I added GSAP to deal with clean animations and consumer interactions. GSAP is nice for creating timeline sequences and tweening properties with easing, and it additionally comes with plugins that have been good for this undertaking: Draggable for click-and-drag UI, and InertiaPlugin for momentum. Better of all, each GSAP plugin is now utterly free to make use of. Beneath are the important thing methods I used GSAP within the undertaking:
Intro Animation & Digital camera Motion: When the consumer selects a observe and hits play, I set off a quick “activation” sequence. This entails some textual content showing within the “terminal” and a slight digicam zoom-in towards the orb to sign that the system is on-line. The digicam motion was carried out with a easy GSAP tween of the digicam’s place. For instance, I outlined a default digicam place and a barely nearer “zoomed” place. On play, I take advantage of gsap.to() to interpolate the digicam place to the zoomed-in coordinates, and on pause/cease I tween it again out. GSAP makes this sort of 3D property animation easy:
const defaultCameraPos = { x: 0, y: 0, z: 10 };
const zoomedCameraPos = { x: 0, y: 0, z: 7 }; // transfer digicam nearer on zoom

perform zoomCameraForAudio(zoomIn) {
  const goal = zoomIn ? zoomedCameraPos : defaultCameraPos;
  gsap.to(digicam.place, {
    x: goal.x,
    y: goal.y,
    z: goal.z,
    length: 1.5,
    ease: "power2.inOut"
  });
}

// When audio begins:
zoomCameraForAudio(true);
// When audio ends or is stopped:
zoomCameraForAudio(false);
This clean zoom provides drama when the music kicks in, drawing the viewer into the scene. The power2.inOut easing offers it a pleasant mild begin and cease. I additionally used GSAP timelines for some other scripted sequences (like fading out the “Analyzing…” overlay textual content after a number of seconds, and many others.), since GSAP’s timeline management could be very helpful for orchestrating arranging a number of animations so as.
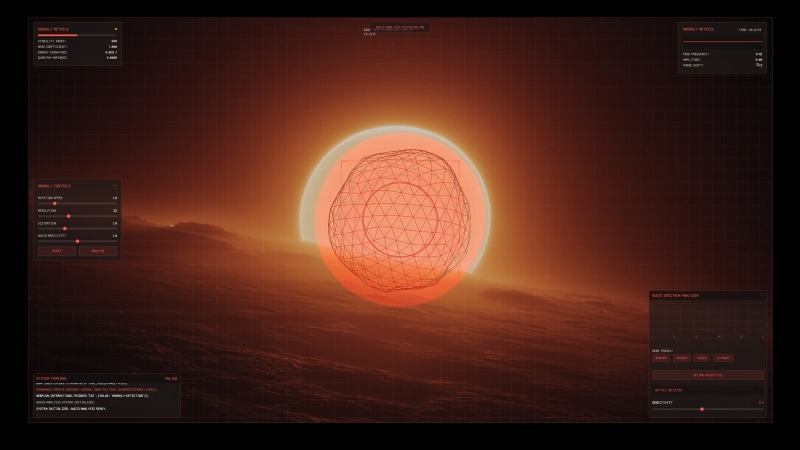
Draggable UI Panels: The interface has a number of UI parts overlaying the 3D canvas – e.g. an “Anomaly Controls” panel (with sliders for rotation pace, distortion quantity, and many others.), an “Audio Spectrum Analyzer” panel (exhibiting a bar graph of frequencies and observe choice buttons), and a “System Terminal” readout (displaying log messages like a console). To make the expertise playful, I made these panels draggable. Utilizing GSAP’s Draggable plugin, I merely turned every .panel ingredient right into a draggable object:
Draggable.create(".panel", {
  kind: "x,y",
  bounds: "physique",         // confine dragging inside the viewport
  inertia: true,          // allow momentum after launch
  edgeResistance: 0.65,   // a little bit of resistance on the edges
  onDragStart: () => { /* convey panel to entrance, and many others. */ },
  onDragEnd: perform() {
    // Optionally, log the speed or different data for enjoyable
    console.log("Panel thrown with velocity:", this.getVelocity());
  }
});
Setting inertia: true means when the consumer releases a panel, it’ll proceed transferring within the route they tossed it, steadily slowing to a cease (because of InertiaPlugin). This little contact makes the UI really feel extra tactile and actual – you may flick the panels round and so they slide with some “weight.” Based on GSAP’s docs, Draggable will routinely deal with the physics when inertia is enabled , so it was plug-and-play. I additionally constrained dragging inside the physique bounds so panels don’t get misplaced off-screen. Every panel has a clickable header (a drag deal with space), set by way of the deal with possibility, to limit the place a consumer can seize it. Underneath the hood, InertiaPlugin calculates the speed of the drag and creates a tween that easily decelerates the ingredient after you let go, mimicking friction.
Interactive Orb Drag (Bonus): As a inventive experiment, I even made the 3D anomaly orb itself draggable. This was a bit extra concerned because it’s not a DOM ingredient, however I applied it by raycasting for clicks on the 3D object after which rotating the article primarily based on mouse motion. I utilized an identical inertia impact manually: once you “throw” the orb, it retains spinning and slowly involves relaxation. This wasn’t utilizing GSAP’s Draggable instantly (since that works in display area), however I did use the InertiaPlugin idea by capturing the drag velocity after which utilizing an inertial decay on that velocity every body. It added a enjoyable strategy to work together with the visualizer – you may nudge the orb and see it reply bodily. For instance, should you drag and launch rapidly, the orb will proceed rotating with momentum. This type of customized 3D dragging is exterior the scope of a primary tutorial, however it exhibits how one can mix your personal logic with GSAP’s physics ideas to counterpoint interactions.
In abstract, GSAP handles all of the non-audio animations: the digicam strikes, panel drags, and little transitions within the UI. The mixture of sound-reactive shader animations (operating each body primarily based on audio knowledge) and event-based GSAP tweens (triggered on consumer actions or sure occasions) offers a layered end result the place all the things feels responsive and alive.
UI and Environment
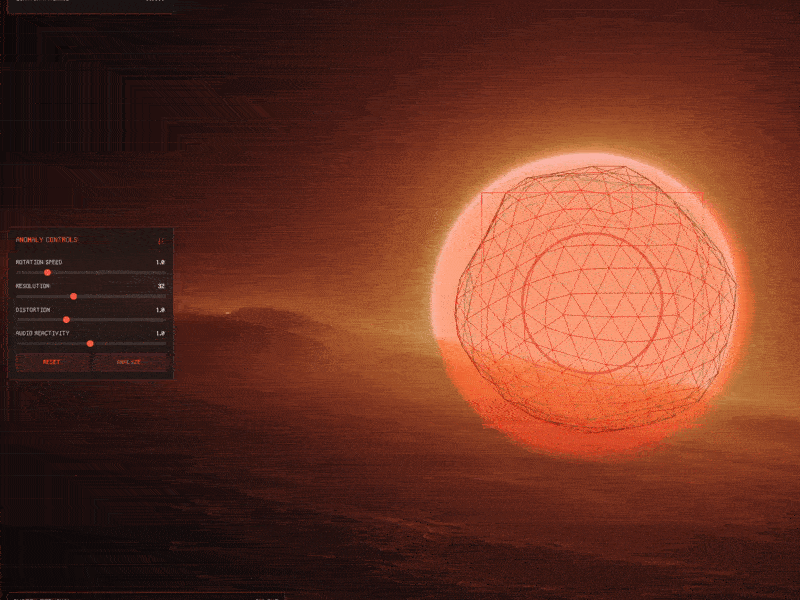
Lastly, a number of phrases concerning the surrounding UI/ambiance which glue the expertise collectively. The visualizer’s fashion was impressed by sci-fi management panels, so I leaned into that:
Management Panels and Readouts: I constructed the overlay UI with HTML/CSS, holding it minimalistic (simply semi-transparent darkish panels with gentle textual content and some sliders/buttons). Key controls embrace rotation pace (how briskly the orb spins), decision (tessellation stage of the icosahedron mesh), distortion quantity, audio reactivity (scaling of audio affect), and sensitivity (which adjusts how the audio’s quantity is interpreted). Altering these in real-time instantly impacts the Three.js scene – for instance, dragging the “Decision” slider rebuilds the icosahedron geometry with extra or fewer triangles, which is a cool strategy to see the orb go from coarse to finely subdivided. The “Audio Spectrum Analyzer” panel shows a traditional bar graph of frequencies (drawn on a canvas utilizing the analyser knowledge) so you’ve a 2D visualization accompanying the 3D one. There’s additionally a console-style terminal readout that logs occasions (like “AUDIO ANALYSIS SYSTEM INITIALIZED” or the speed of drags in a playful GSAP log format) to strengthen the idea of a high-tech system at work.
Design parts: To spice up the sci-fi really feel, I added a refined grid overlay throughout the entire display. This was carried out with pure CSS – a pair of repeating linear gradients forming horizontal and vertical strains (1px skinny, very clear) over a clear background . It’s barely noticeable however offers a technical texture, particularly in opposition to the glow of the orb. I additionally added some drifting ambient particles (tiny dots) floating slowly within the background, applied as easy divs animated with JavaScript. They transfer in pseudo-random orbits.
Soundtrack: I curated three atmospheric and moody tracks, together with one in every of my very own unreleased tracks, beneath my music alias LXSTNGHT. The observe was produced in Ableton, and it’s unfinished. The tip result’s an expertise the place design, code, and music manufacturing collide in actual time.
Bringing all these parts collectively, the ultimate result’s an interactive artwork piece: you load a observe, the “Audio ARK” system comes on-line with a flurry of textual content suggestions, the ambient music begins enjoying, and the orb begins to pulse and mutate in sync with the sound. You possibly can tweak controls or toss round panels (or the orb itself) to discover completely different visuals.
The mixture of Three.js (for rendering and shader results), Internet Audio API (for sound evaluation), and GSAP (for polished interactions) showcases how inventive coding instruments can merge to supply an immersive expertise that engages a number of senses.
And that’s a wrap, thanks for following alongside!


