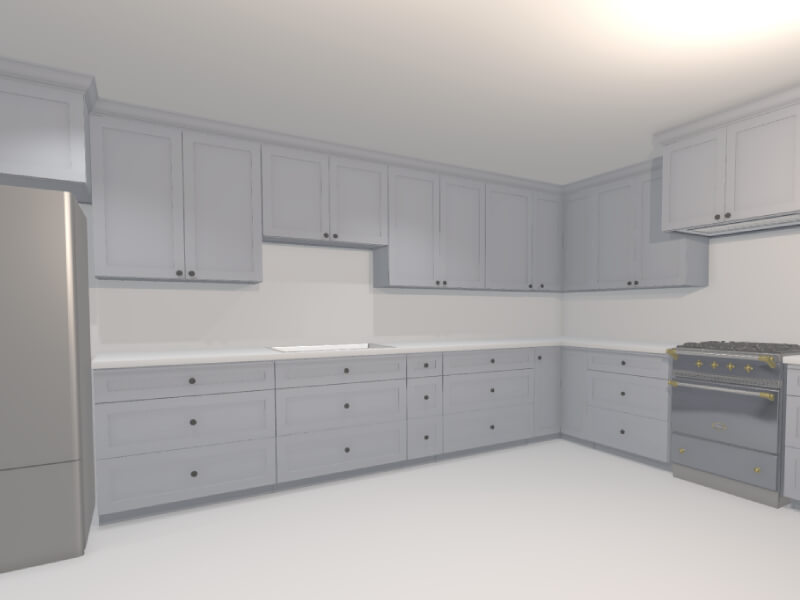
Again in November 2024, I shared a submit on X a few software I used to be constructing to assist visualize kitchen remodels. The response from the Three.js group was overwhelmingly optimistic. The demo confirmed how procedural rendering methods—typically utilized in video games—might be utilized to real-world use instances like designing and rendering a complete kitchen in underneath 60 seconds.
On this article, I’ll stroll via the method and considering behind constructing this type of procedural 3D kitchen design software utilizing vanilla Three.js and TypeScript—from drawing partitions and defining cupboard segments to auto-generating full kitchen layouts. Alongside the best way, I’ll share key technical decisions, classes realized, and concepts for the place this might evolve subsequent.
You possibly can check out an interactive demo of the most recent model right here: https://kitchen-designer-demo.vercel.app/. (Tip: Press the “/” key to toggle between 2D and 3D views.)
Designing Room Layouts with Partitions

To provoke our mission, we start with the wall drawing module. At a excessive degree, that is akin to Figma’s pen software, the place the consumer can add one line section at a time till a closed—or open-ended—polygon is full on an infinite 2D canvas. In our construct, every line section represents a single wall as a 2D airplane from coordinate A to coordinate B, whereas the entire polygon outlines the perimeter envelope of a room.
- We start by capturing the [X, Z] coordinates (with Y oriented upwards) of the consumer’s preliminary click on on the infinite flooring airplane. This 2D level is obtained through Three.js’s built-in raycaster for intersection detection, establishing Level A.
- Because the consumer hovers the cursor over a brand new spot on the ground, we apply the identical intersection logic to find out a short lived Level B. Throughout this motion, a preview line section seems, connecting the mounted Level A to the dynamic Level B for visible suggestions.
- Upon the consumer’s second click on to substantiate Level B, we append the road section (outlined by Factors A and B) to an array of segments. The previous Level B immediately turns into the brand new Level A, permitting us to proceed the drawing course of with extra line segments.
Here’s a simplified code snippet demonstrating a fundamental 2D pen-draw software utilizing Three.js:
import * as THREE from 'three';

const scene = new THREE.Scene();
const digital camera = new THREE.PerspectiveCamera(75, window.innerWidth / window.innerHeight, 0.1, 1000);
digital camera.place.set(0, 5, 10); // Place digital camera above the ground trying down
digital camera.lookAt(0, 0, 0);

const renderer = new THREE.WebGLRenderer();
renderer.setSize(window.innerWidth, window.innerHeight);
doc.physique.appendChild(renderer.domElement);

// Create an infinite flooring airplane for raycasting
const floorGeometry = new THREE.PlaneGeometry(100, 100);
const floorMaterial = new THREE.MeshBasicMaterial({ coloration: 0xcccccc, facet: THREE.DoubleSide });
const flooring = new THREE.Mesh(floorGeometry, floorMaterial);
flooring.rotation.x = -Math.PI / 2; // Lay flat on XZ airplane
scene.add(flooring);

const raycaster = new THREE.Raycaster();
const mouse = new THREE.Vector2();
let factors: THREE.Vector3[] = []; // i.e. wall endpoints
let tempLine: THREE.Line | null = null;
const partitions: THREE.Line[] = [];

operate getFloorIntersection(occasion: MouseEvent): THREE.Vector3 | null {
  mouse.x = (occasion.clientX / window.innerWidth) * 2 - 1;
  mouse.y = -(occasion.clientY / window.innerHeight) * 2 + 1;
  raycaster.setFromCamera(mouse, digital camera);
  const intersects = raycaster.intersectObject(flooring);
  if (intersects.size > 0) {
    // Spherical to simplify coordinates (non-obligatory for cleaner drawing)
    const level = intersects[0].level;
    level.x = Math.spherical(level.x);
    level.z = Math.spherical(level.z);
    level.y = 0; // Guarantee on flooring airplane
    return level;
  }
  return null;
}

// Replace non permanent line preview
operate onMouseMove(occasion: MouseEvent) {
  const level = getFloorIntersection(occasion);
  if (level && factors.size > 0) {
    // Take away previous temp line if exists
    if (tempLine) {
      scene.take away(tempLine);
      tempLine = null;
    }
    // Create new temp line from final level to present hover
    const geometry = new THREE.BufferGeometry().setFromPoints([points[points.length - 1], level]);
    const materials = new THREE.LineBasicMaterial({ coloration: 0x0000ff }); // Blue for temp
    tempLine = new THREE.Line(geometry, materials);
    scene.add(tempLine);
  }
}

// Add a brand new level and draw everlasting wall section
operate onMouseDown(occasion: MouseEvent) {
  if (occasion.button !== 0) return; // Left click on solely
  const level = getFloorIntersection(occasion);
  if (level) {
    factors.push(level);
    if (factors.size > 1) {
      // Draw everlasting wall line from earlier to present level
      const geometry = new THREE.BufferGeometry().setFromPoints([points[points.length - 2], factors[points.length - 1]]);
      const materials = new THREE.LineBasicMaterial({ coloration: 0xff0000 }); // Purple for everlasting
      const wall = new THREE.Line(geometry, materials);
      scene.add(wall);
      partitions.push(wall);
    }
    // Take away temp line after click on
    if (tempLine) {
      scene.take away(tempLine);
      tempLine = null;
    }
  }
}

// Add occasion listeners
window.addEventListener('mousemove', onMouseMove);
window.addEventListener('mousedown', onMouseDown);

// Animation loop
operate animate() {
  requestAnimationFrame(animate);
  renderer.render(scene, digital camera);
}
animate();
The above code snippet is a really fundamental 2D pen software, and but this data is sufficient to generate a complete room occasion. For reference: not solely does every line section characterize a wall (2D airplane), however the set of amassed factors can be used to auto-generate the room’s flooring mesh, and likewise the ceiling mesh (the inverse of the ground mesh).
With a purpose to view the planes representing the partitions in 3D, one can rework every THREE.Line right into a customized Wall class object, which comprises each a line (for orthogonal 2D “flooring plan” view) and a 2D inward-facing airplane (for perspective 3D “room” view). To construct this class:
class Wall extends THREE.Group {
  constructor(size: quantity, peak: quantity = 96, thickness: quantity = 4) {
    tremendous();

    // 2D line for high view, alongside the x-axis
    const lineGeometry = new THREE.BufferGeometry().setFromPoints([
      new THREE.Vector3(0, 0, 0),
      new THREE.Vector3(length, 0, 0),
    ]);
    const lineMaterial = new THREE.LineBasicMaterial({ coloration: 0xff0000 });
    const line = new THREE.Line(lineGeometry, lineMaterial);
    this.add(line);

    // 3D wall as a field for thickness
    const wallGeometry = new THREE.BoxGeometry(size, peak, thickness);
    const wallMaterial = new THREE.MeshBasicMaterial({ coloration: 0xaaaaaa, facet: THREE.DoubleSide });
    const wall = new THREE.Mesh(wallGeometry, wallMaterial);
    wall.place.set(size / 2, peak / 2, 0);
    this.add(wall);
  }
}
We will now replace the wall draw module to make the most of this newly created Wall object:
// Replace our variables
let tempWall: Wall | null = null;
const partitions: Wall[] = [];

// Substitute line creation in onMouseDown with
if (factors.size > 1) {
  const begin = factors[points.length - 2];
  const finish = factors[points.length - 1];
  const course = finish.clone().sub(begin);
  const size = course.size();
  const wall = new Wall(size);
  wall.place.copy(begin);
  wall.rotation.y = Math.atan2(course.z, course.x); // Align alongside course (assuming CCW for inward dealing with)
  scene.add(wall);
  partitions.push(wall);
}
Upon including the ground and ceiling meshes, we are able to additional rework our wall module right into a room era module. To recap what we’ve simply created: by including partitions one after the other, we’ve given the consumer the flexibility to create full rooms with partitions, flooring, and ceilings—all of which might be adjusted later within the scene.

Producing Cupboards with Procedural Modeling

Fairly than taking a number of minutes so as to add the cupboards on a case-by-case foundation—for instance, like with IKEA’s 3D kitchen builder—it’s attainable so as to add all the cupboards without delay through a single consumer motion. One methodology to make use of right here is to permit the consumer to attract high-level cupboard line segments, in the identical method because the wall draw module.
On this module, every cupboard section will rework right into a linear row of base and wall cupboards, together with a parametrically generated countertop mesh on high of the bottom cupboards. Because the consumer creates the segments, we are able to mechanically populate this line section with pre-made 3D cupboard meshes in meshing software program like Blender. In the end, every cupboard’s width, depth, and peak parameters might be mounted, whereas the width of the final cupboard might be dynamic to fill the remaining area. We use a cupboard filler piece mesh right here—a daily plank, with its scale-X parameter stretched or compressed as wanted.
Creating the Cupboard Line Segments

Right here we’ll assemble a devoted cupboard module, with the aforementioned cupboard line section logic. This course of is similar to the wall drawing mechanism, the place customers can draw straight traces on the ground airplane utilizing mouse clicks to outline each begin and finish factors. Not like partitions, which might be represented by easy skinny traces, cupboard line segments must account for the standard depth of 24 inches to characterize the bottom cupboards’ footprint. These segments don’t require closing-polygon logic, as they are often standalone rows or L-shapes, as is frequent in most kitchen layouts.
We will additional enhance the consumer expertise by incorporating snapping performance, the place the endpoints of a cupboard line section mechanically align to close by wall endpoints or wall intersections, if inside a sure threshold (e.g., 4 inches). This ensures cupboards match snugly in opposition to partitions with out requiring handbook precision. For simplicity, we’ll define the snapping logic in code however give attention to the core drawing performance.
We will begin by defining the CabinetSegment class. Just like the partitions, this needs to be its personal class, as we’ll later add the auto-populating 3D cupboard fashions.
class CabinetSegment extends THREE.Group {
  public size: quantity;

  constructor(size: quantity, peak: quantity = 96, depth: quantity = 24, coloration: quantity = 0xff0000) {
    tremendous();
    this.size = size;
    const geometry = new THREE.BoxGeometry(size, peak, depth);
    const materials = new THREE.MeshBasicMaterial({ coloration, wireframe: true });
    const field = new THREE.Mesh(geometry, materials);
    field.place.set(size / 2, peak / 2, depth / 2); // Shift so depth spans 0 to depth (inward)
    this.add(field);
  }
}
As soon as we’ve the cupboard section, we are able to use it in a fashion similar to the wall line segments:
let cabinetPoints: THREE.Vector3[] = [];
let tempCabinet: CabinetSegment | null = null;
const cabinetSegments: CabinetSegment[] = [];
const CABINET_DEPTH = 24; // all the things in inches
const CABINET_SEGMENT_HEIGHT = 96; // i.e. each wall & base cupboards -> group ought to prolong to ceiling
const SNAPPING_DISTANCE = 4;

operate getSnappedPoint(level: THREE.Vector3): THREE.Vector3 {
  // Easy snapping: verify in opposition to current wall factors (wallPoints array from wall module)
  for (const wallPoint of wallPoints) {
    if (level.distanceTo(wallPoint) < SNAPPING_DISTANCE) return wallPoint;
  }
  return level;
}

// Replace non permanent cupboard preview
operate onMouseMoveCabinet(occasion: MouseEvent) {
  const level = getFloorIntersection(occasion);
  if (level && cabinetPoints.size > 0) {
    const snappedPoint = getSnappedPoint(level);
    if (tempCabinet) {
      scene.take away(tempCabinet);
      tempCabinet = null;
    }
    const begin = cabinetPoints[cabinetPoints.length - 1];
    const course = snappedPoint.clone().sub(begin);
    const size = course.size();
    if (size > 0) {
      tempCabinet = new CabinetSegment(size, CABINET_SEGMENT_HEIGHT, CABINET_DEPTH, 0x0000ff); // Blue for temp
      tempCabinet.place.copy(begin);
      tempCabinet.rotation.y = Math.atan2(course.z, course.x);
      scene.add(tempCabinet);
    }
  }
}

// Add a brand new level and draw everlasting cupboard section
operate onMouseDownCabinet(occasion: MouseEvent) {
  if (occasion.button !== 0) return;
  const level = getFloorIntersection(occasion);
  if (level) {
    const snappedPoint = getSnappedPoint(level);
    cabinetPoints.push(snappedPoint);
    if (cabinetPoints.size > 1) {
      const begin = cabinetPoints[cabinetPoints.length - 2];
      const finish = cabinetPoints[cabinetPoints.length - 1];
      const course = finish.clone().sub(begin);
      const size = course.size();
      if (size > 0) {
        const section = new CabinetSegment(size, CABINET_SEGMENT_HEIGHT, CABINET_DEPTH, 0xff0000); // Purple for everlasting
        section.place.copy(begin);
        section.rotation.y = Math.atan2(course.z, course.x);
        scene.add(section);
        cabinetSegments.push(section);
      }
    }
    if (tempCabinet) {
      scene.take away(tempCabinet);
      tempCabinet = null;
    }
  }
}

// Add separate occasion listeners for cupboard mode (e.g., toggled through UI button)
window.addEventListener('mousemove', onMouseMoveCabinet);
window.addEventListener('mousedown', onMouseDownCabinet);
Auto-Populating the Line Segments with Stay Cupboard Fashions

As soon as the cupboard line segments are outlined, we are able to procedurally populate them with detailed elements. This entails dividing every section vertically into three layers: base cupboards on the backside, counter tops within the center, and wall cupboards above. For the bottom and wall cupboards, we’ll use an optimization operate to divide the section’s size into normal widths (preferring 30-inch cupboards), with any the rest stuffed utilizing the filler piece talked about above. Counter tops are even easier—they kind a single steady slab stretching the complete size of the section.
The bottom cupboards are set to 24 inches deep and 34.5 inches excessive. Counter tops add 1.5 inches in peak and prolong to 25.5 inches deep (together with a 1.5-inch overhang). Wall cupboards begin at 54 inches excessive (18 inches above the countertop), measure 12 inches deep, and are 30 inches tall. After producing these placeholder bounding bins, we are able to change them with preloaded 3D fashions from Blender utilizing a loading operate (e.g., through GLTFLoader).
// Constants in inches
const BASE_HEIGHT = 34.5;
const COUNTER_HEIGHT = 1.5;
const WALL_HEIGHT = 30;
const WALL_START_Y = 54;
const BASE_DEPTH = 24;
const COUNTER_DEPTH = 25.5;
const WALL_DEPTH = 12;

const DEFAULT_MODEL_WIDTH = 30;

// Filler-piece data
const FILLER_PIECE_FALLBACK_PATH = 'fashions/filler_piece.glb'
const FILLER_PIECE_WIDTH = 3;
const FILLER_PIECE_HEIGHT = 12;
const FILLER_PIECE_DEPTH = 24;
To deal with particular person cupboards, we’ll create a easy Cupboard class that manages the placeholder and mannequin loading.
import { GLTFLoader } from 'three/examples/jsm/loaders/GLTFLoader.js';

const loader = new GLTFLoader();

class Cupboard extends THREE.Group {
  constructor(width: quantity, peak: quantity, depth: quantity, modelPath: string, coloration: quantity) {
    tremendous();

    // Placeholder field
    const geometry = new THREE.BoxGeometry(width, peak, depth);
    const materials = new THREE.MeshBasicMaterial({ coloration });
    const placeholder = new THREE.Mesh(geometry, materials);
    this.add(placeholder);


    // Load and change with mannequin async

    // Case: Non-standard width -> use filler piece
    if (width < DEFAULT_MODEL_WIDTH) {
      loader.load(FILLER_PIECE_FALLBACK_PATH, (gltf) => {
        const mannequin = gltf.scene;
        mannequin.scale.set(
          width / FILLER_PIECE_WIDTH,
          peak / FILLER_PIECE_HEIGHT,
          depth / FILLER_PIECE_DEPTH,
        );
        this.add(mannequin);
        this.take away(placeholder);
      });
    }

    loader.load(modelPath, (gltf) => {
      const mannequin = gltf.scene;
      mannequin.scale.set(width / DEFAULT_MODEL_WIDTH, 1, 1); // Scale width
      this.add(mannequin);
      this.take away(placeholder);
    });
  }
}
Then, we are able to add a populate methodology to the present CabinetSegment class:
operate splitIntoCabinets(width: quantity): quantity[] {
  const cupboards = [];
  // Most well-liked width
  whereas (width >= DEFAULT_MODEL_WIDTH) {
    cupboards.push(DEFAULT_MODEL_WIDTH);
    width -= DEFAULT_MODEL_WIDTH;
  }
  if (width > 0) {
    cupboards.push(width); // Customized empty slot
  }
  return cupboards;
}

class CabinetSegment extends THREE.Group {
  // ... (current constructor and properties)

  populate() {
    // Take away placeholder line and field
    whereas (this.youngsters.size > 0) {
      this.take away(this.youngsters[0]);
    }

    let offset = 0;
    const widths = splitIntoCabinets(this.size);

    // Base cupboards
    widths.forEach((width) => {
      const baseCab = new Cupboard(width, BASE_HEIGHT, BASE_DEPTH, 'fashions/base_cabinet.glb', 0x8b4513);
      baseCab.place.set(offset + width / 2, BASE_HEIGHT / 2, BASE_DEPTH / 2);
      this.add(baseCab);
      offset += width;
    });

    // Countertop (single slab, no mannequin)
    const counterGeometry = new THREE.BoxGeometry(this.size, COUNTER_HEIGHT, COUNTER_DEPTH);
    const counterMaterial = new THREE.MeshBasicMaterial({ coloration: 0xa9a9a9 });
    const counter = new THREE.Mesh(counterGeometry, counterMaterial);
    counter.place.set(this.size / 2, BASE_HEIGHT + COUNTER_HEIGHT / 2, COUNTER_DEPTH / 2);
    this.add(counter);

    // Wall cupboards
    offset = 0;
    widths.forEach((width) => {
      const wallCab = new Cupboard(width, WALL_HEIGHT, WALL_DEPTH, 'fashions/wall_cabinet.glb', 0x4b0082);
      wallCab.place.set(offset + width / 2, WALL_START_Y + WALL_HEIGHT / 2, WALL_DEPTH / 2);
      this.add(wallCab);
      offset += width;
    });
  }
}

// Name for every cabinetSegment after drawing
cabinetSegments.forEach((section) => section.populate());
Additional Enhancements & Optimizations

At this level, we should always have the foundational parts of room and cupboard creation logic absolutely in place. With a purpose to take this mission from a rudimentary segment-drawing app into the sensible realm—together with dynamic cupboards, a number of sensible materials choices, and ranging actual equipment meshes—we are able to additional improve the consumer expertise via a number of focused refinements:
- We will implement a detection mechanism to find out if a cupboard line section is in touch with a wall line section.
- For cupboard rows that run parallel to partitions, we are able to mechanically incorporate a backsplash within the area between the wall cupboards and the countertop floor.
- For cupboard segments not adjoining to partitions, we are able to take away the higher wall cupboards and prolong the countertop by an extra 15 inches, aligning with normal practices for kitchen islands or peninsulas.
- We will introduce drag-and-drop performance for home equipment, every with predefined widths, permitting customers to place them alongside the road section. This integration will instruct our cabinet-splitting algorithm to exclude these areas from dynamic cupboard era.
- Moreover, we can provide customers extra flexibility by enabling the swapping of 1 equipment with one other, making use of completely different textures to our 3D fashions, and adjusting default dimensions—equivalent to wall cupboard depth or countertop overhang—to swimsuit particular preferences.
All these core elements lead us to a complete, interactive utility that allows the fast rendering of an entire kitchen: cupboards, counter tops, and home equipment, in a totally interactive, user-driven expertise.
The intention of this mission is to display that complicated 3D duties might be distilled all the way down to easy consumer actions. It’s absolutely attainable to take the high-dimensional complexity of 3D tooling—with seemingly limitless controls—and encode these complexities into low-dimensional, simply adjustable parameters. Whether or not the developer chooses to show these parameters to the consumer or an LLM, the top result’s that traditionally difficult 3D processes can change into easy, and thus the whole contents of a 3D scene might be absolutely reworked with just a few parameters.
For those who discover any such growth attention-grabbing, have any nice concepts, or would like to contribute to the evolution of this product, I strongly welcome you to succeed in out to me through e mail. I firmly consider that solely lately has it change into attainable to construct residence design software program that’s so wickedly quick and intuitive that any individual—no matter architectural advantage—will be capable of design their very own single-family residence in lower than 5 minutes through an internet app, whereas absolutely adhering to native zoning, architectural, and design necessities. All of the infrastructure needed to perform this already exists; all it takes is a workforce of loopy, formidable builders seeking to change the usual of architectural residence design.


