Welcome devs to the world of improvement and automation. At present, we’re diving into an thrilling mission by which we can be making a Serverless Picture Processing Pipeline with AWS companies.
The mission begins with creating S3 buckets for storing uploaded photos and processed Thumbnails, and ultimately utilizing many companies like Lambda, API Gateway (To set off the Lambda Perform), DynamoDB (storing picture Metadata), and ultimately we’ll run this program in ECS cluster by making a Docker picture of the mission.
This mission is full of cloud companies and improvement tech stacks like Subsequent.js, and working towards this may additional improve your understanding of Cloud companies and the way they work together with one another. So with additional ado, let’s get began!
Word: The code and directions on this put up are for demo use and studying solely. A manufacturing surroundings would require a tighter grip on configurations and safety.
Stipulations
Earlier than we get into the mission, we have to be sure that we’ve got the next necessities met in our system:
- An AWS Account: Since we use AWS companies for the mission, we want an AWS account. A configured IAM Consumer with required companies entry could be appreciated.
- Fundamental Understanding of AWS Companies: Since we’re coping with many AWS companies, it’s higher to have a good understanding of them, corresponding to S3, which is used for storage, API gateway to set off Lambda operate, and plenty of extra.
- Node Put in: Our frontend is constructed with Subsequent.js, so having Node in your system is important.
For Code reference, right here is the GitHub repo.
AWS Companies Setup
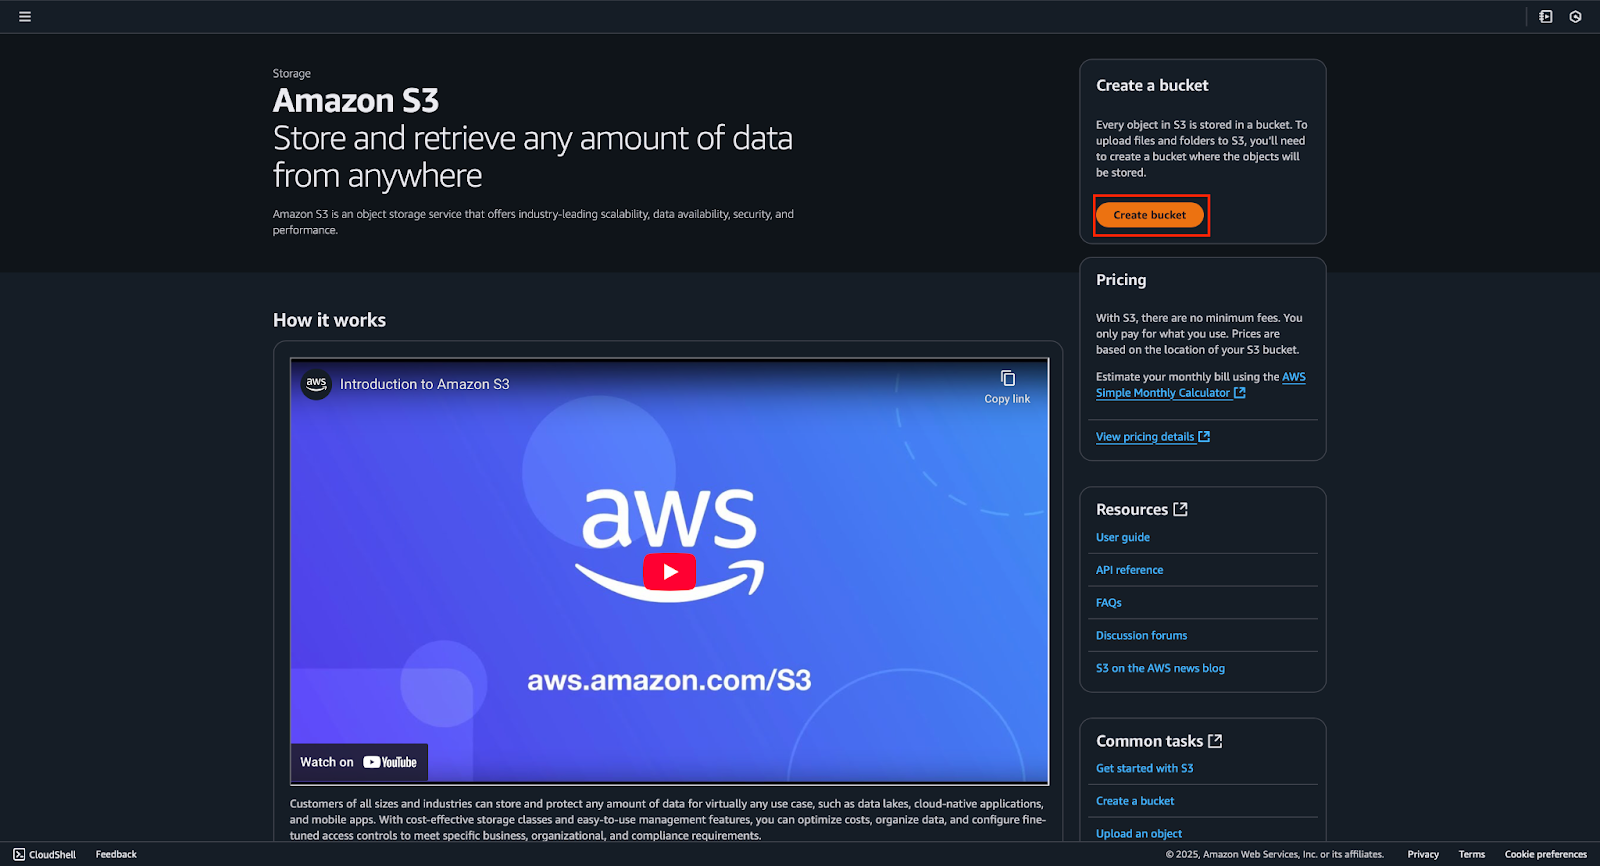
We’ll begin the mission by establishing our AWS companies. Initially, we’ll create 2 S3 buckets, particularly sample-image-uploads-bucket and sample-thumbnails-bucket. The explanation for this lengthy identify is that the bucket identify must be distinctive all around the AWS Workspace.
So to create the bucket, head over to the S3 dashboard and click on ‘Create Bucket’, choose ‘Basic Objective’, and provides it a reputation (sample-image-uploads-bucket) and depart the remainder of the configuration as default.
Equally, create the opposite bucket named sample-thumbnails-bucket, however on this bucket, ensure you uncheck Block Public Entry as a result of we’ll want it for our ECS Cluster.

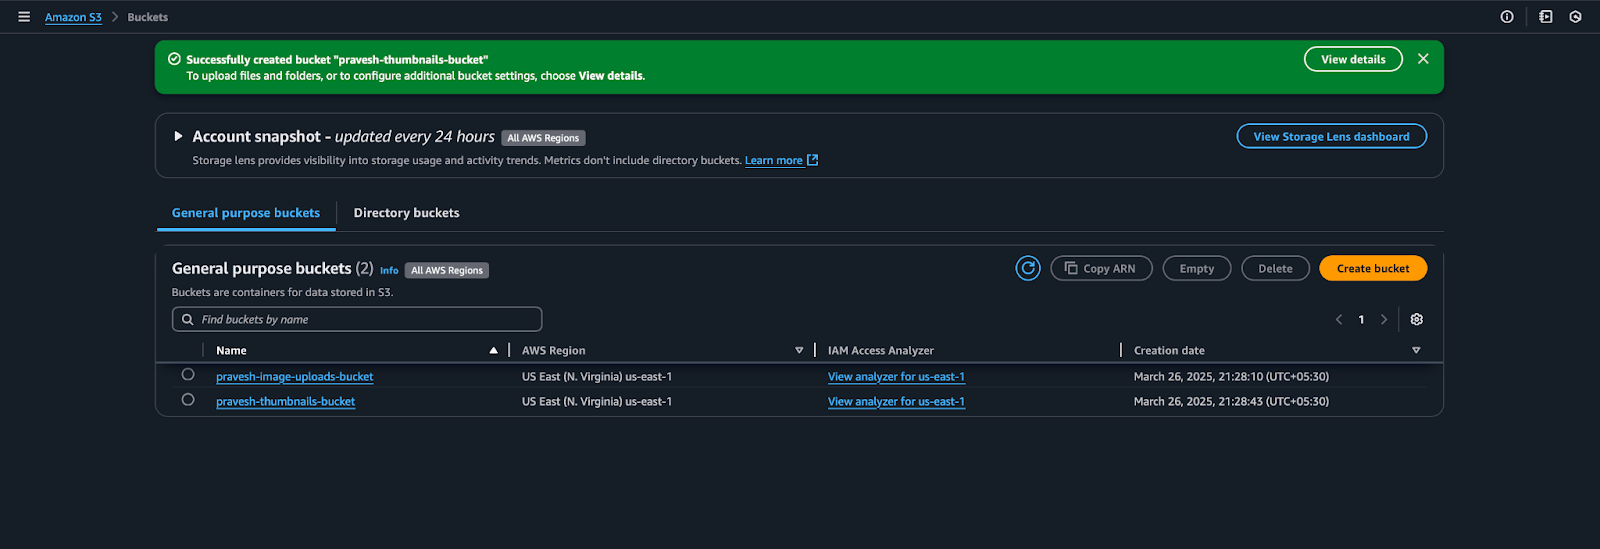
We have to be sure that the sample-thumbnails-bucket has public learn entry, in order that ECS Frontend can show them. For that, we’ll connect the next coverage to that bucket:

{
"Model": "2012-10-17",
"Assertion": [
{
"Sid": "PublicRead",
"Effect": "Allow",
"Principal": "*",
"Action": "s3:GetObject",
"Resource": "arn:aws:s3:::sample-thumbnails-bucket/*"
}
]
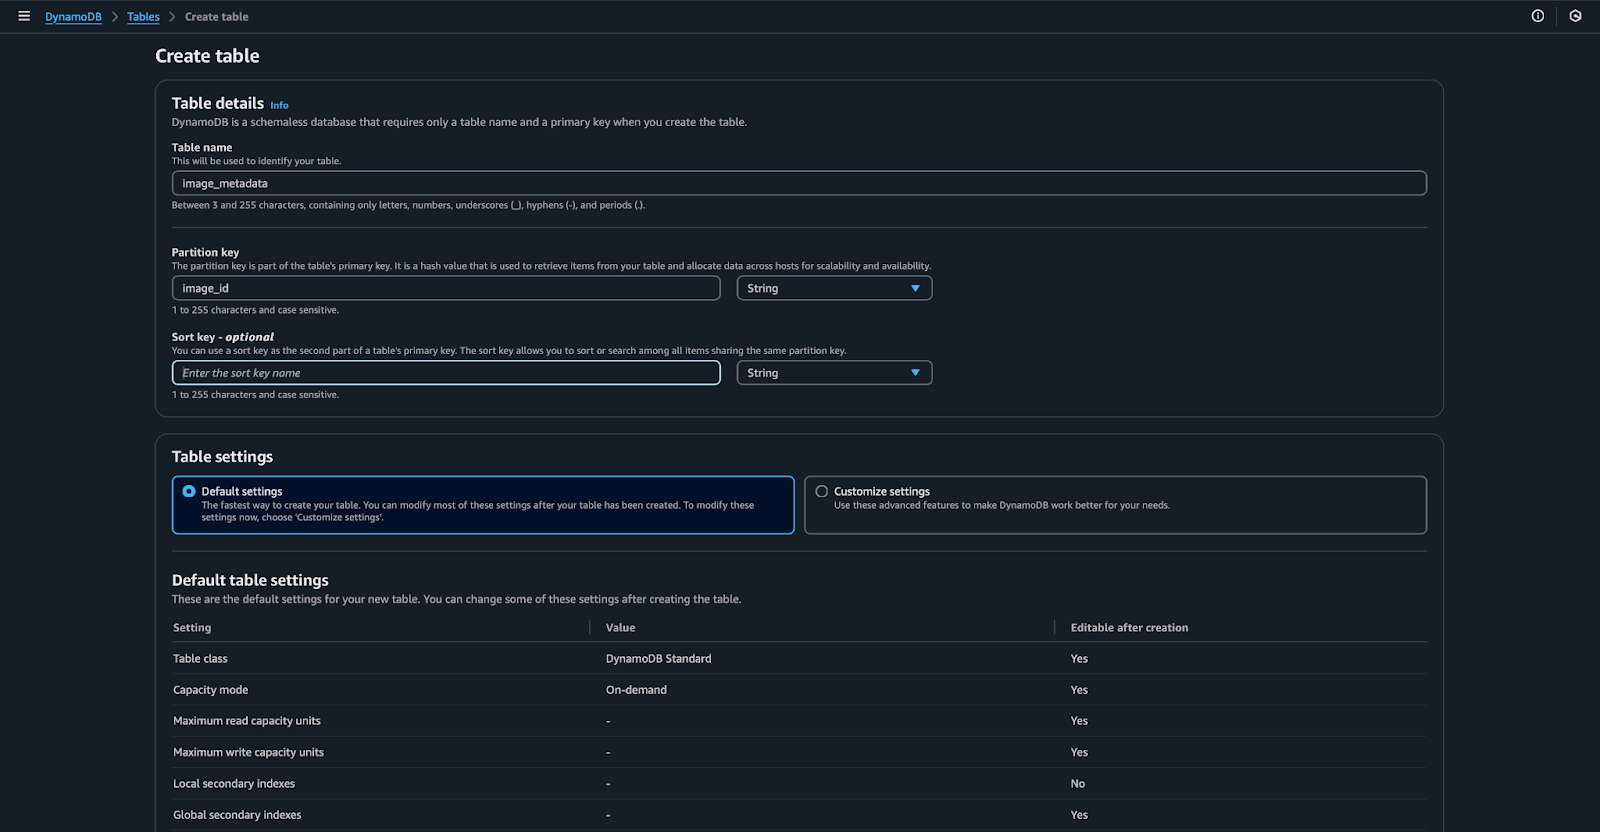
}After creating buckets, let’s transfer to our Database for storing picture metadata. We’ll create a DynamoDb desk for that. Go to your DynamoDb console, click on on Create Desk, give it a reputation (image_metadata), and within the main key choose string, identify it image_id.
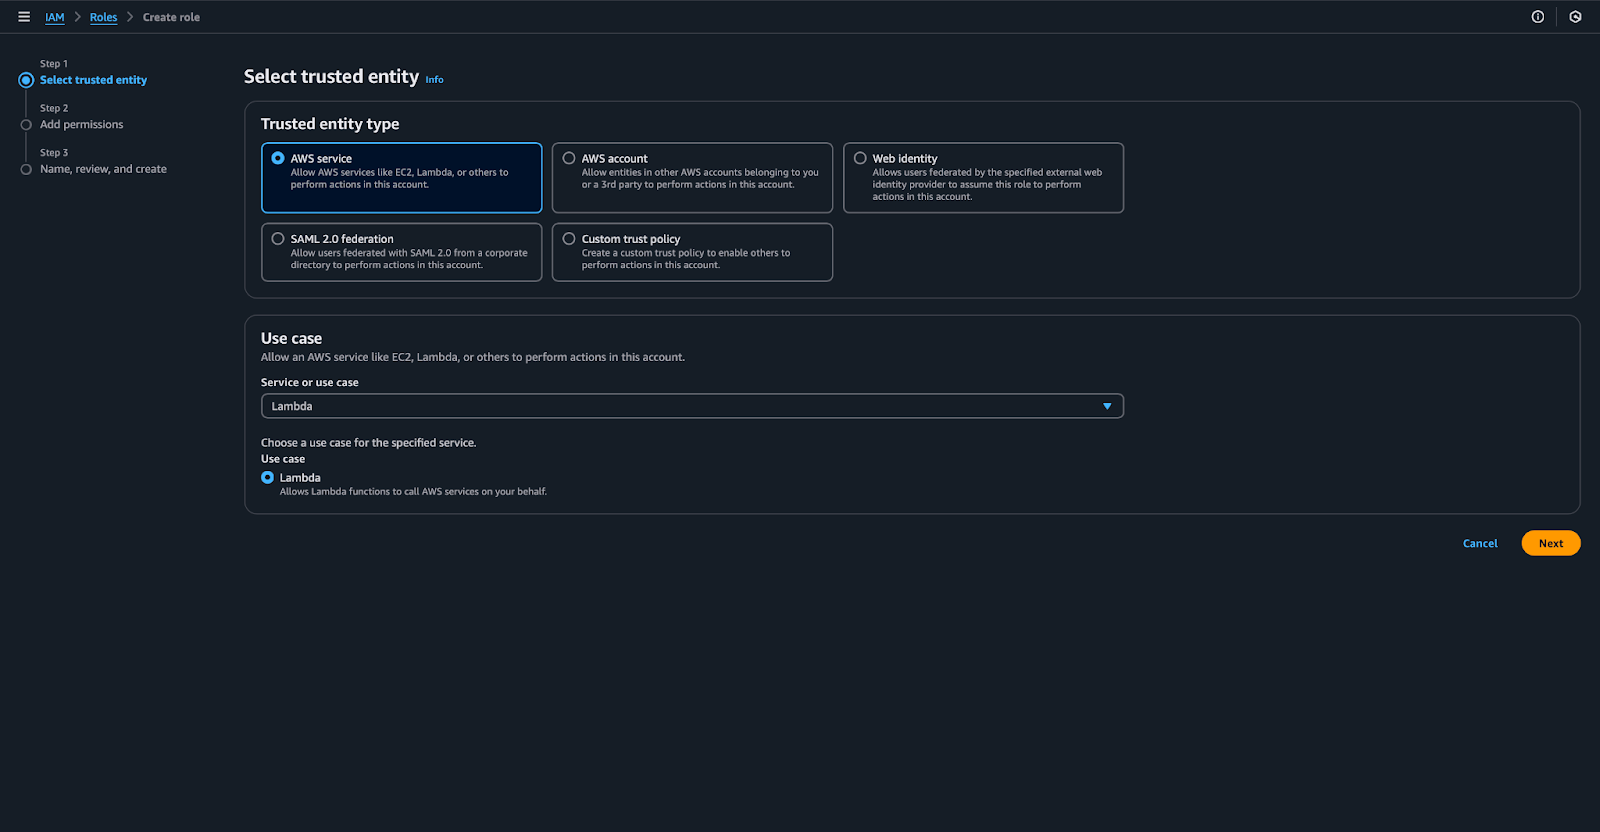
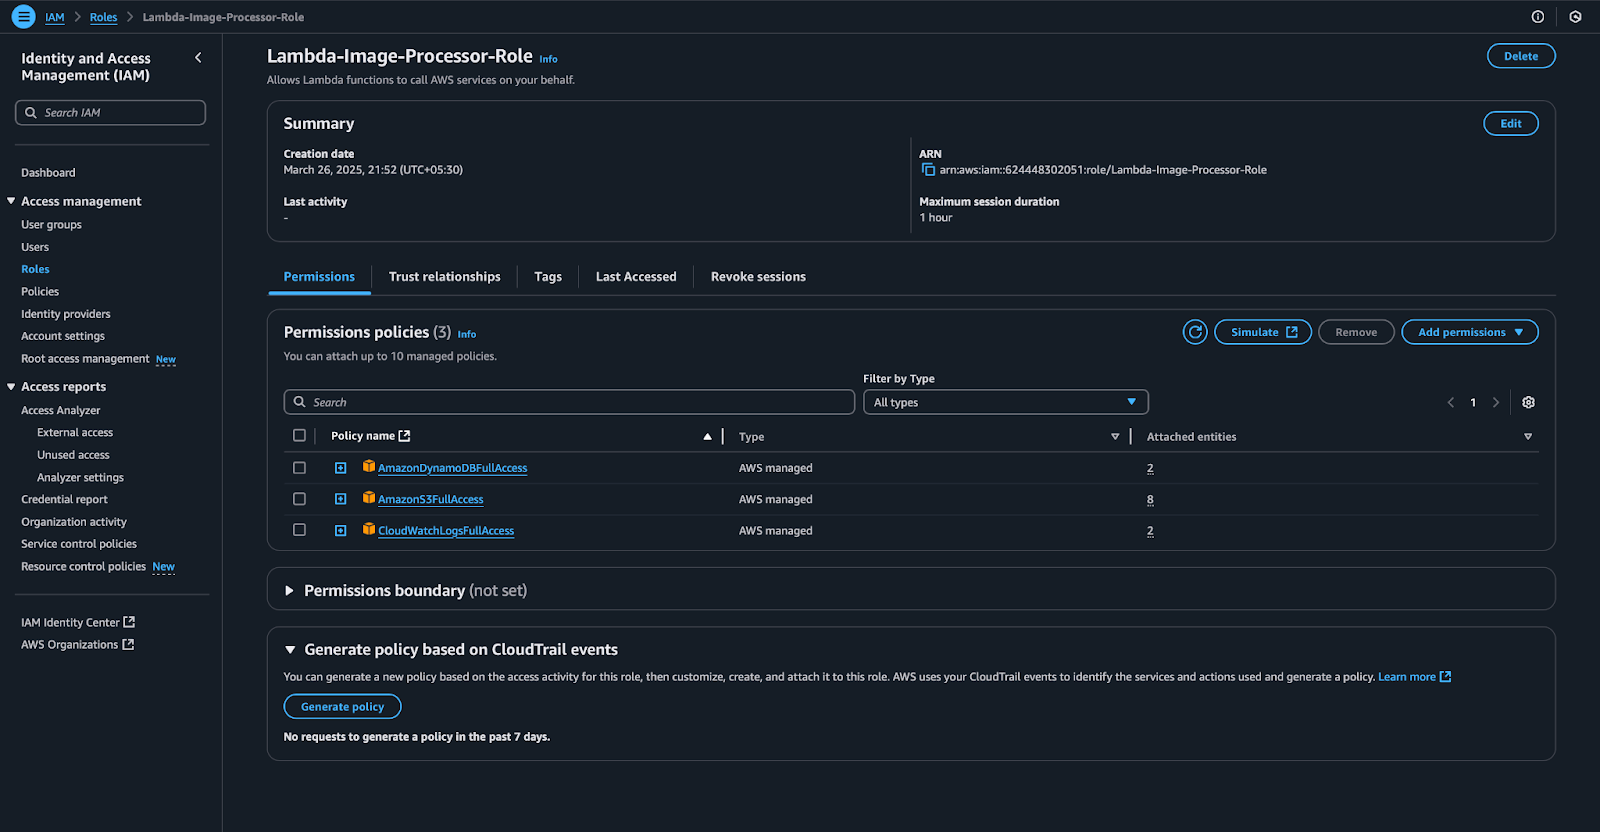
AWS companies will talk with one another, so that they want a task with correct permissions. To create a task, go to the IAM dashboard, choose Position, and click on on Create Position. Beneath belief identification sort, choose AWS service, and underneath use case, select Lambda. Connect the next insurance policies:
- AmazonS3FullAccess
- AmazonDynamoDBFullAccess
- CloudWatchLogsFullAccess
Give this function a reputation (Lambda-Picture-Processor-Position) and put it aside.
Creating Lambda Perform
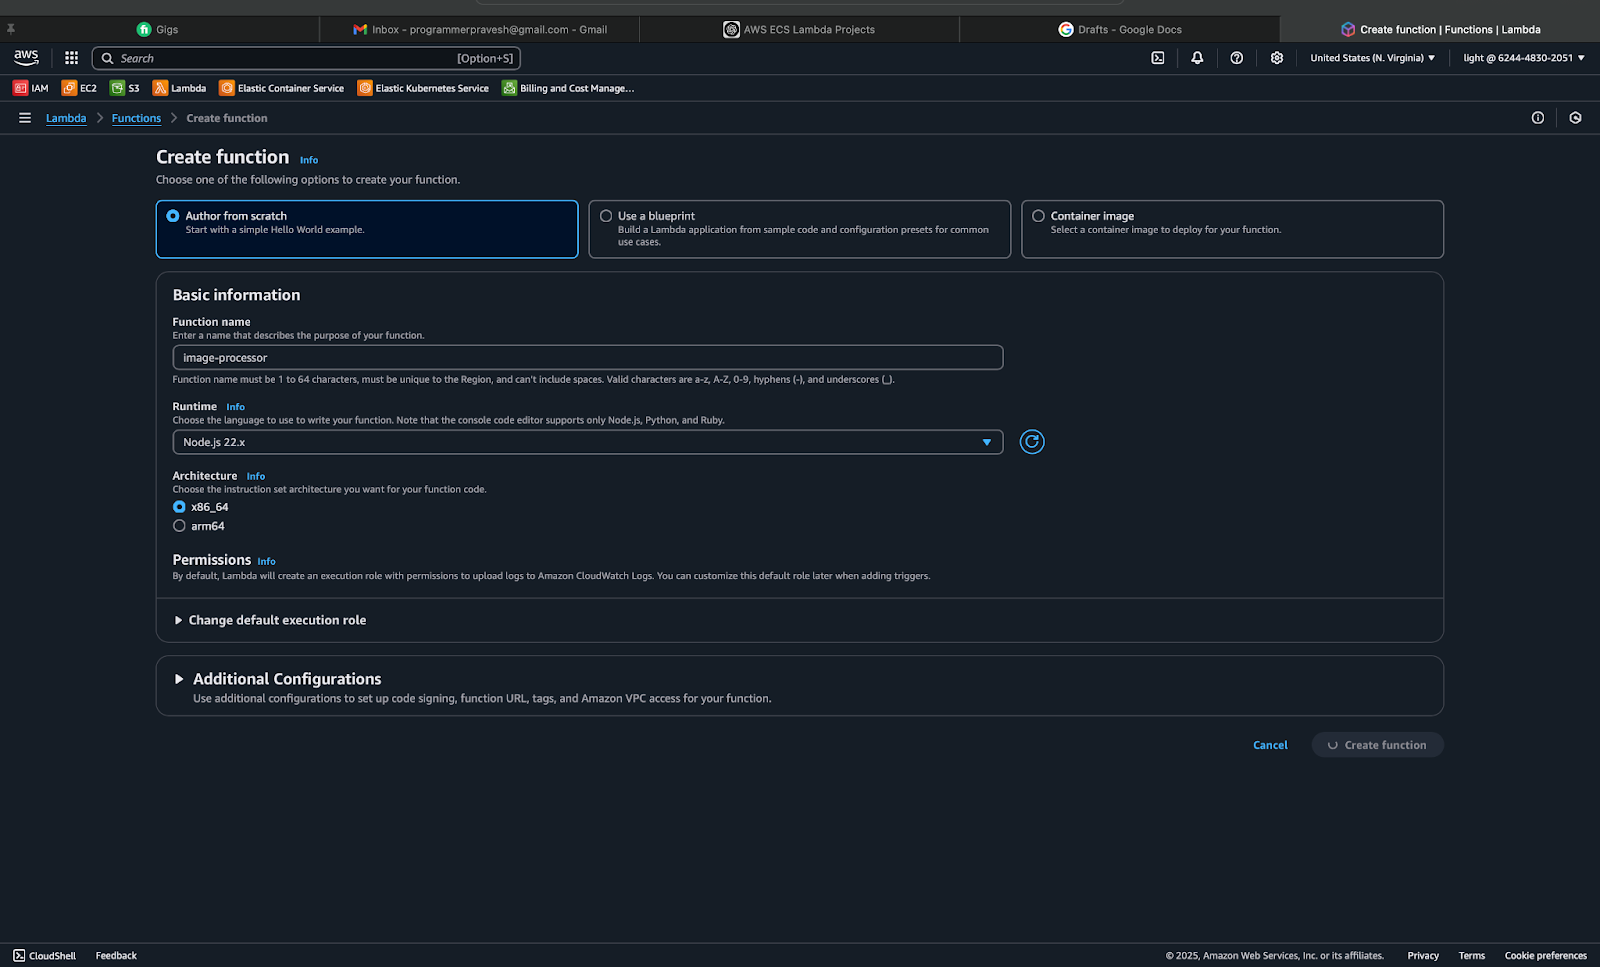
Now we have our Lambda function, buckets, and DynamoDb desk prepared, so now let’s create the Lambda operate which can course of the picture and make the thumbnail out of it, since we’re utilizing the Pillow library to course of the pictures, Lambda by default doesn’t present that. To repair this, we’ll add a layer within the Lambda operate. To do this, comply with the next steps:
Now go to your Lambda dashboard, click on on Create a Perform. Choose Creator from Scratch and select Python 3.9 because the runtime language, give it a reputation: image-processor, and within the Code tab, you could have the Add from Choice, choose that, select zip file, and add your Zip file of the image-processor.
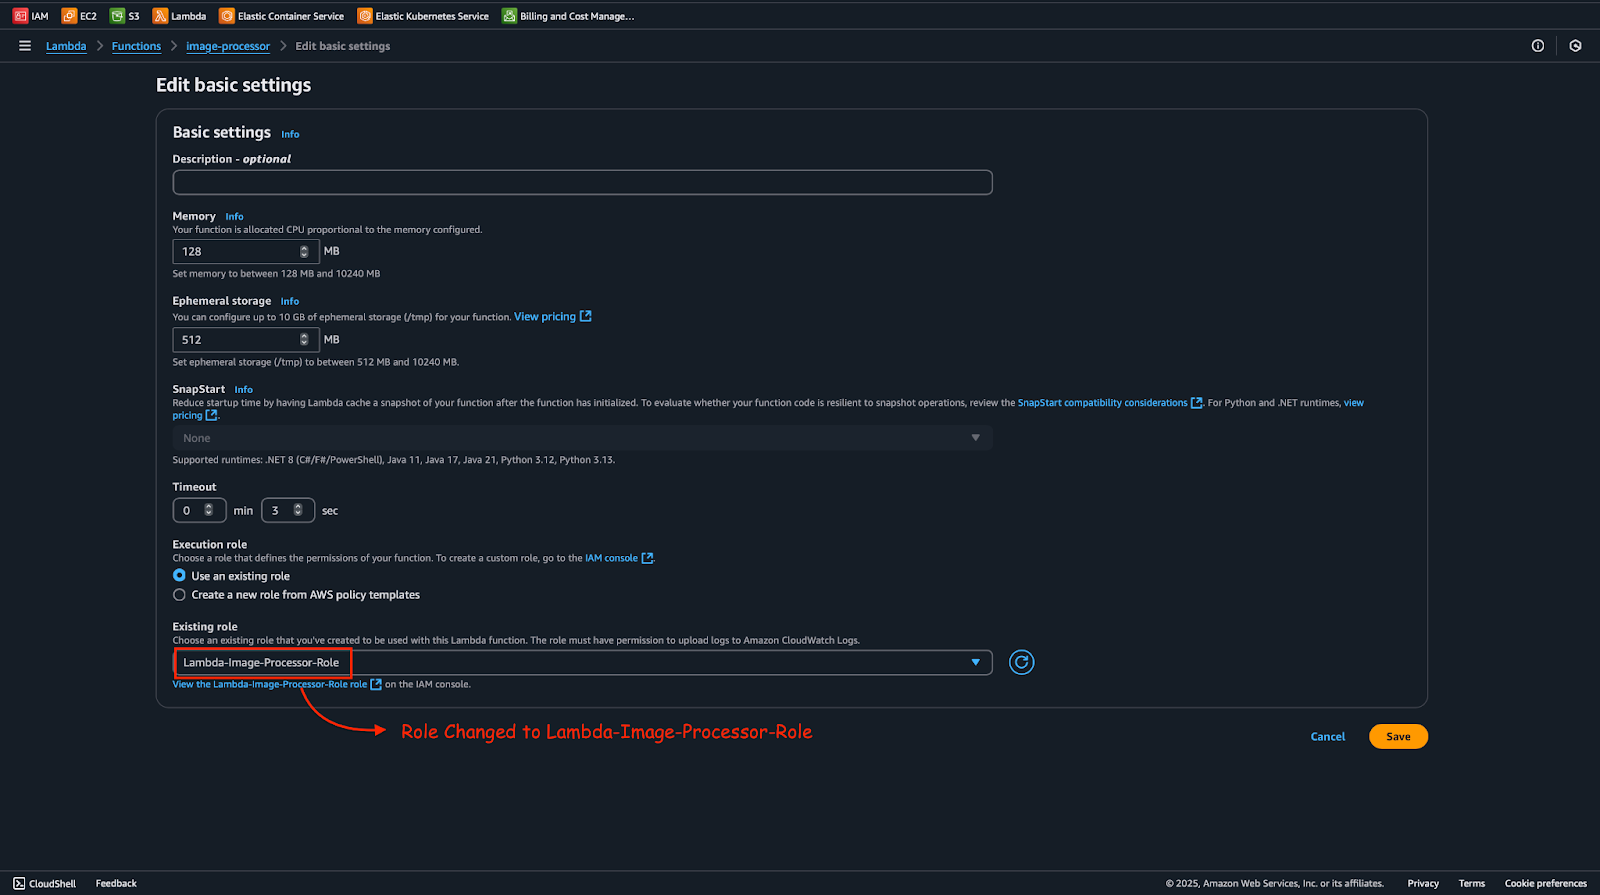
Go to Configuration, and underneath the Permissions column, Edit the configuration by altering the prevailing function to the function we created Lambda-Picture-Processor-Position.
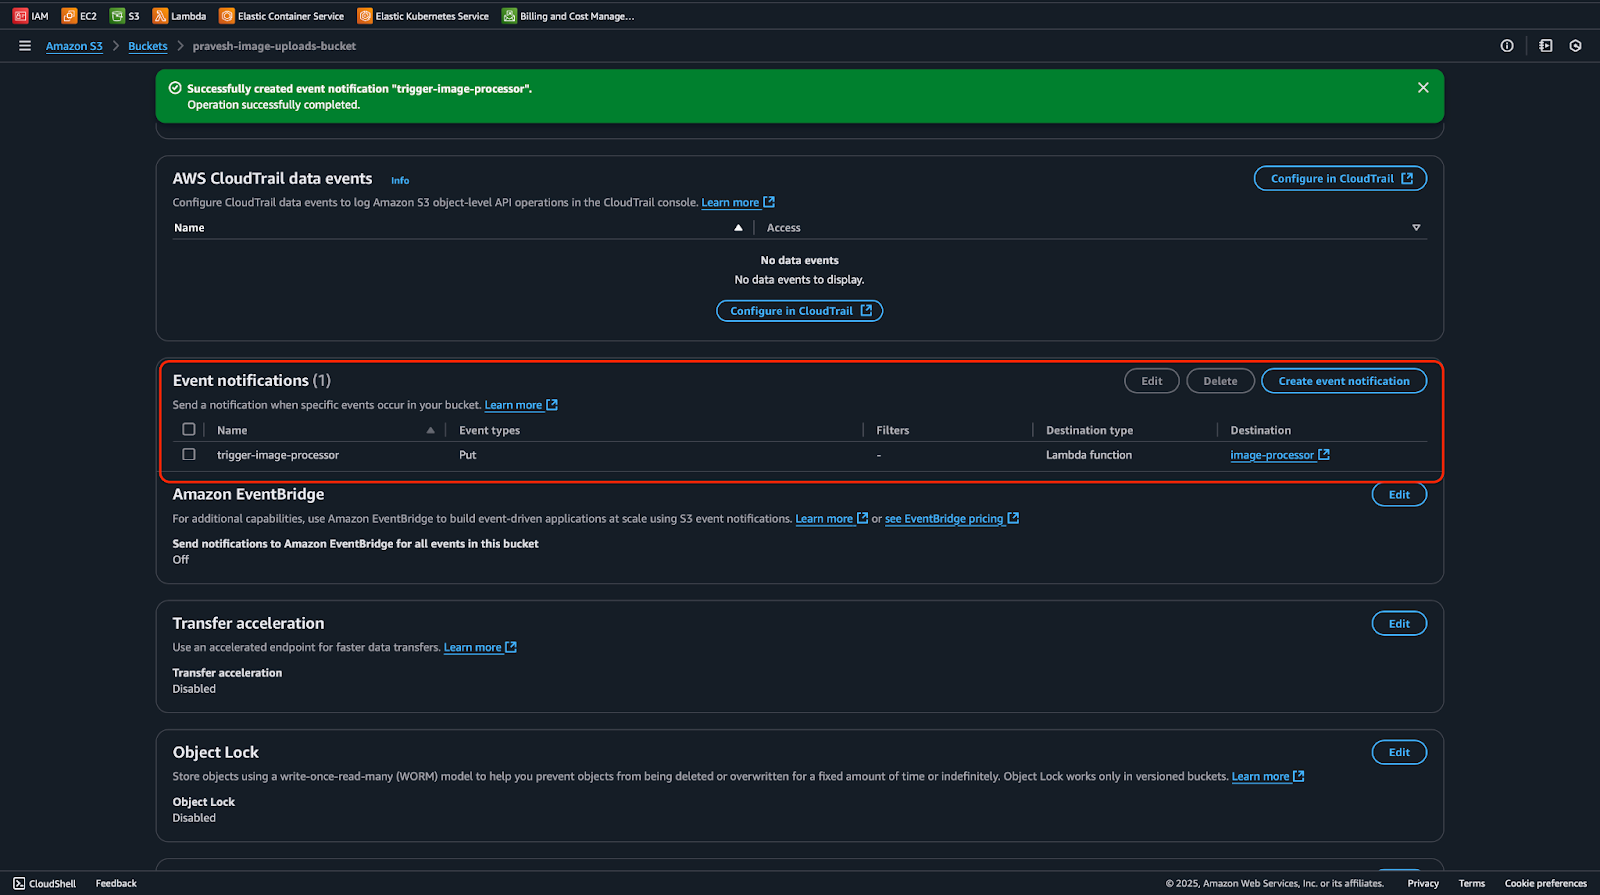
Now go to your S3 bucket (sample-image-uploads-bucket) and go to its Properties part and scroll all the way down to Occasion Notification, right here click on on Create Occasion Notification, give it a reputation (trigger-image-processor) and within the occasion sort, choose PUT and choose the lambda operate we created (image-processor).
Now, since Pillow doesn’t come built-in with the lambda library, we’ll do the next steps to repair that:
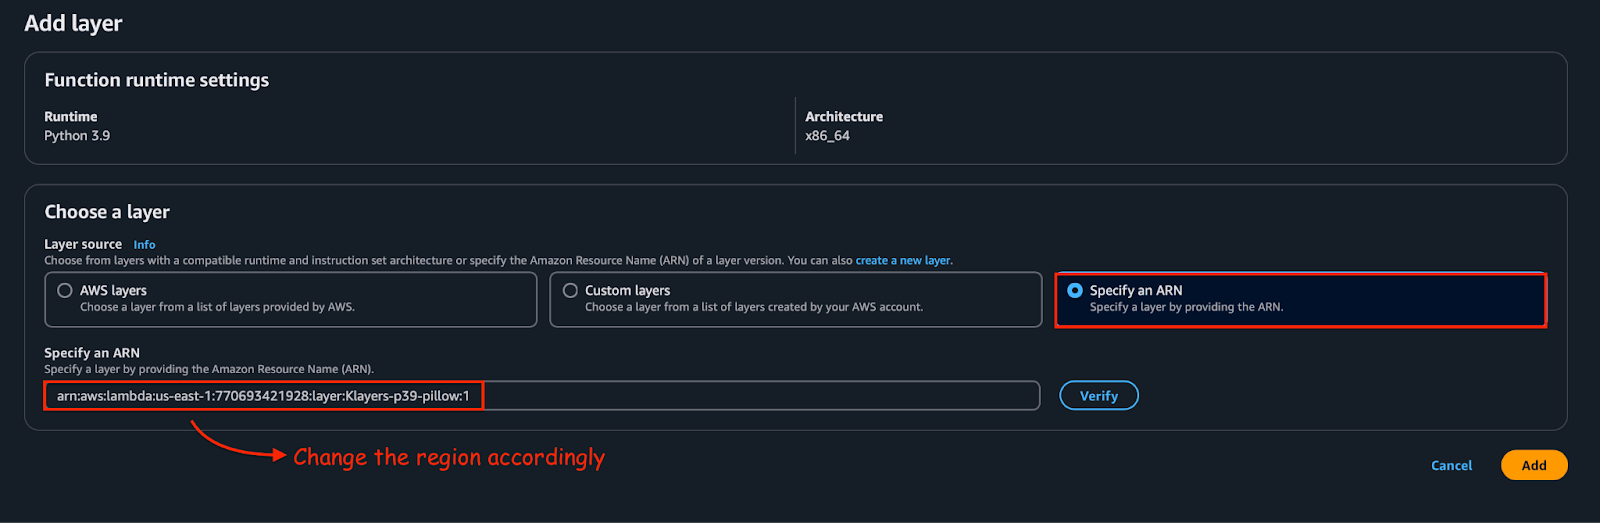
- Go to your Lambda operate (image-processor) and scroll all the way down to the Layer part, right here click on on Add Layer.
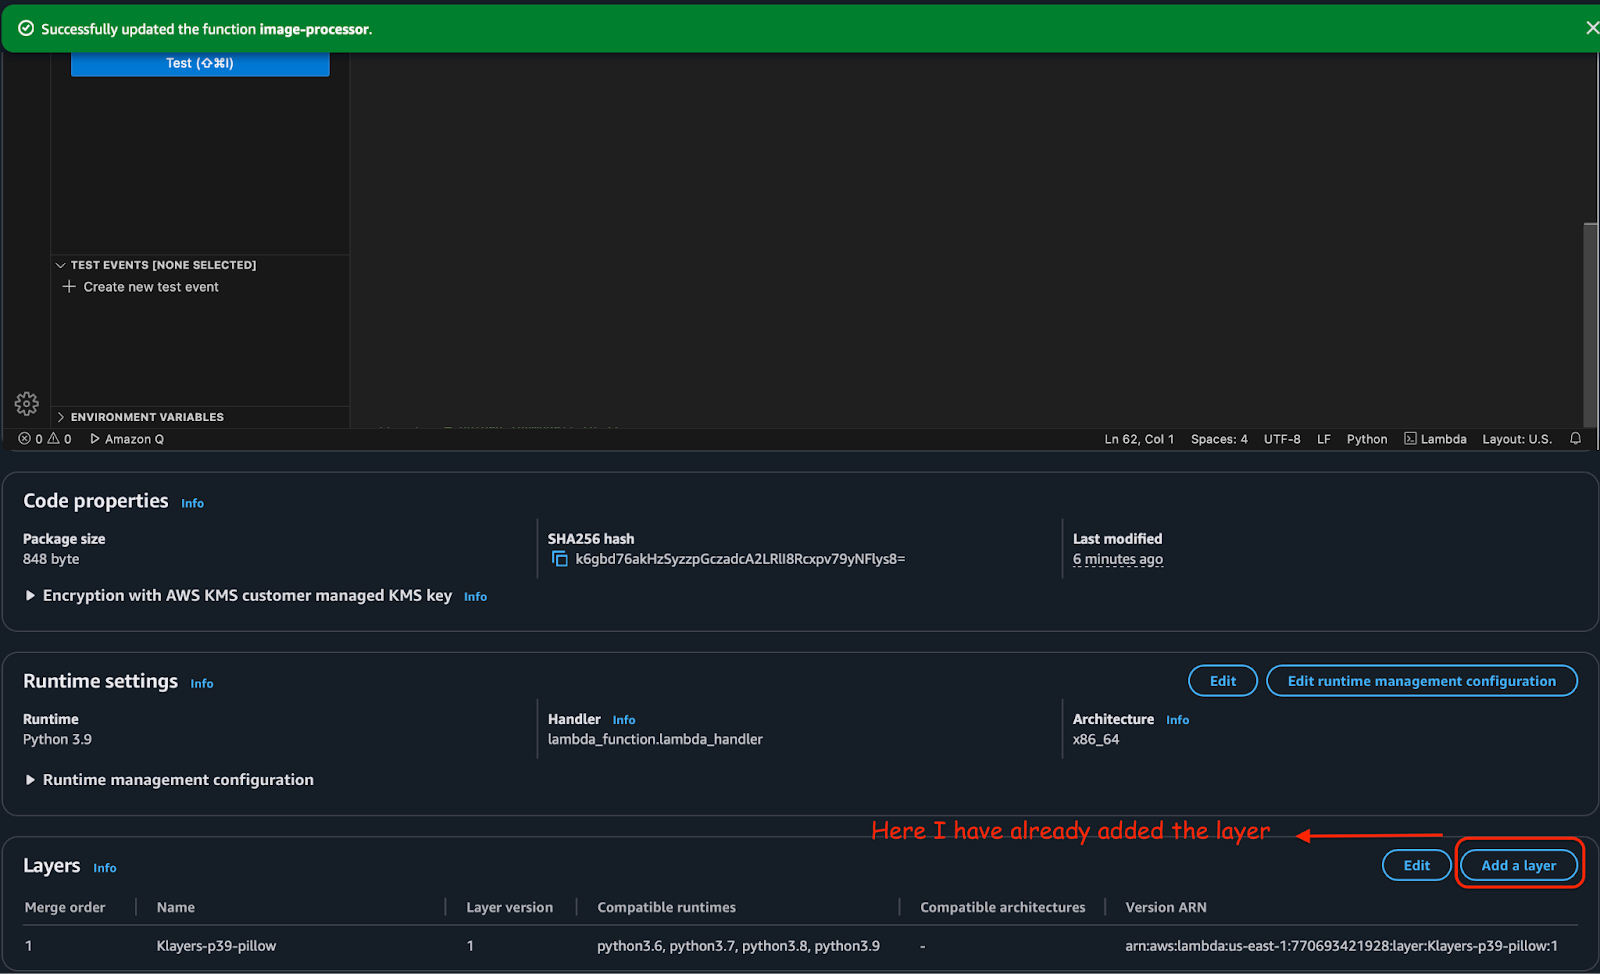
- Within the Add Layer part, choose Specify an ARN and supply this ARN
arn:aws:lambda:us-east-1:770693421928:layer:Klayers-p39-pillow:1. Change the area accordingly; I’m utilizing us-east-1. Add the layer.
Now within the Code tab of your Lambda-Perform you’ll be having a lambda-function.py, put the next content material contained in the lambda_function.py:
import boto3
import uuid
import os
from PIL import Picture
from io import BytesIO
import datetime
s3 = boto3.shopper('s3')
dynamodb = boto3.shopper('dynamodb')
UPLOAD_BUCKET = ''
THUMBNAIL_BUCKET = ''
DDB_TABLE = 'image_metadata'
def lambda_handler(occasion, context):
report = occasion['Records'][0]
bucket = report['s3']['bucket']['name']
key = report['s3']['object']['key']
response = s3.get_object(Bucket=bucket, Key=key)
picture = Picture.open(BytesIO(response['Body'].learn()))
picture.thumbnail((200, 200))
thumbnail_buffer = BytesIO()
picture.save(thumbnail_buffer, 'JPEG')
thumbnail_buffer.search(0)
thumbnail_key = f"thumb_{key}"
s3.put_object(
Bucket=THUMBNAIL_BUCKET,
Key=thumbnail_key,
Physique=thumbnail_buffer,
ContentType='picture/jpeg'
)
image_id = str(uuid.uuid4())
original_url = f"https://{UPLOAD_BUCKET}.s3.amazonaws.com/{key}"
thumbnail_url = f"https://{THUMBNAIL_BUCKET}.s3.amazonaws.com/{thumbnail_key}"
uploaded_at = datetime.datetime.now().isoformat()
dynamodb.put_item(
TableName=DDB_TABLE,
Merchandise={
'image_id': {'S': image_id},
'original_url': {'S': original_url},
'thumbnail_url': {'S': thumbnail_url},
'uploaded_at': {'S': uploaded_at}
}
)
return {
'statusCode': 200,
'physique': f"Thumbnail created: {thumbnail_url}"
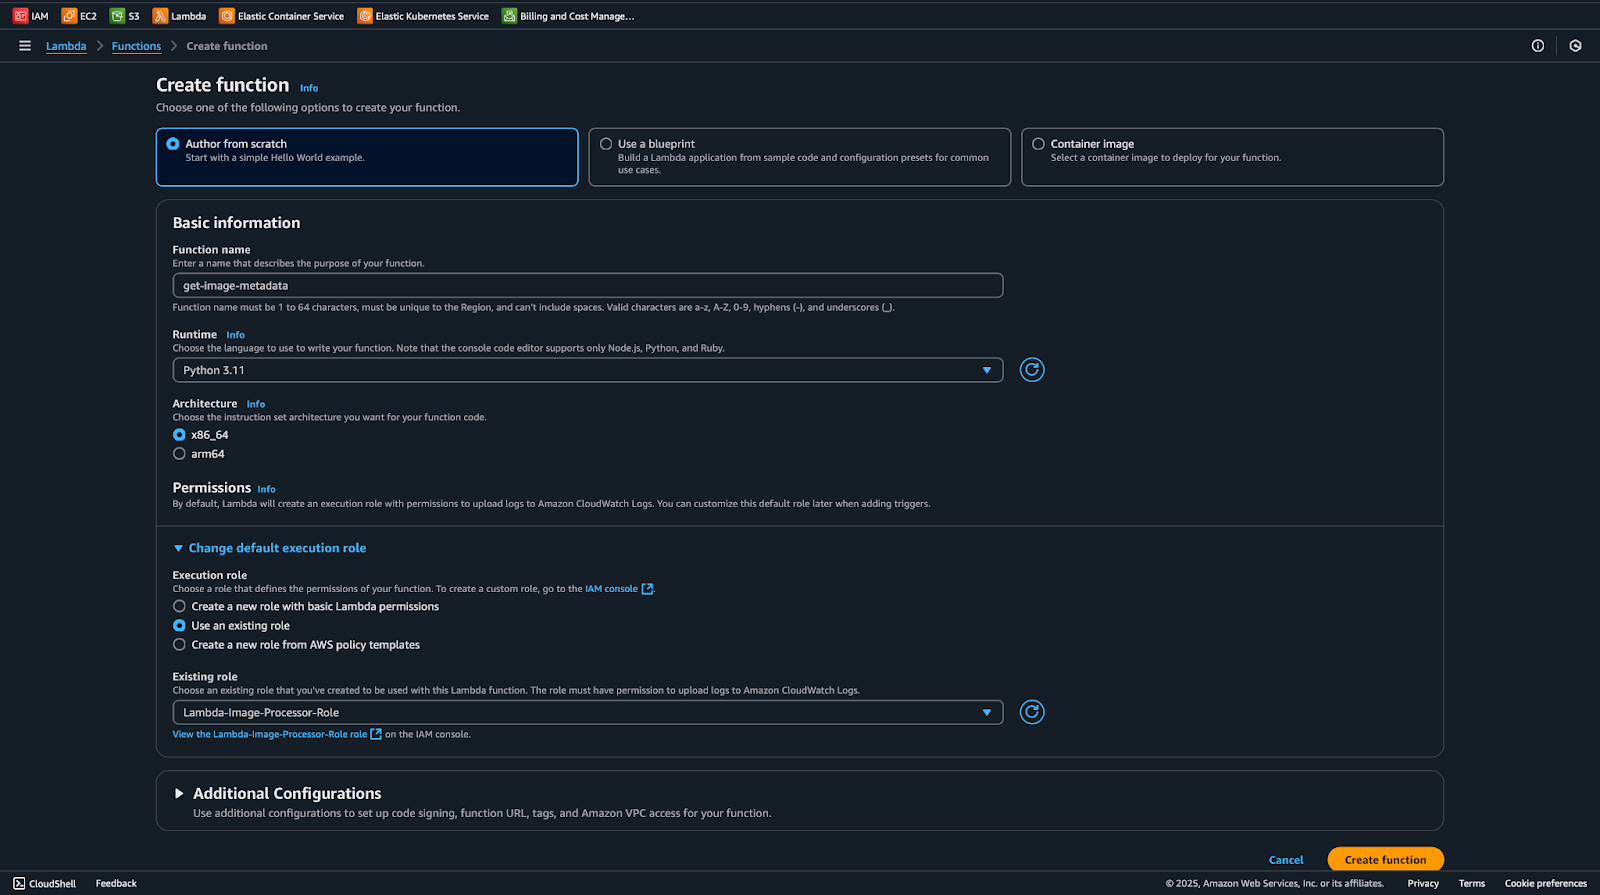
}Now, we’ll want one other Lambda operate for API Gateway as a result of that can act because the entry level for our frontend ECS app to fetch picture information from DynamoDB.
To create the lambda operate, go to your Lambda Dashboard, click on on create operate, choose Creator from scratch and python 3.9 as runtime, give it a reputation, get-image-metadata, and within the configuration, choose the identical function that we assigned to different Lambda capabilities (Lambda-Picture-Processor-Position)
Now, within the Code part of the operate, put the next content material:
import boto3
import json

dynamodb = boto3.shopper('dynamodb')
TABLE_NAME = 'image_metadata'

def lambda_handler(occasion, context):
    strive:

        response = dynamodb.scan(TableName=TABLE_NAME)


        photos = []
        for merchandise in response['Items']:
            photos.append({
                'image_id': merchandise['image_id']['S'],
                'original_url': merchandise['original_url']['S'],
                'thumbnail_url': merchandise['thumbnail_url']['S'],
                'uploaded_at': merchandise['uploaded_at']['S']
            })

        return {
            'statusCode': 200,
            'headers': {
                "Content material-Kind": "utility/json"
            },
            'physique': json.dumps(photos)
        }

    besides Exception as e:
        return {
            'statusCode': 500,
            'physique': f"Error: {str(e)}"
        }
Creating the API Gateway
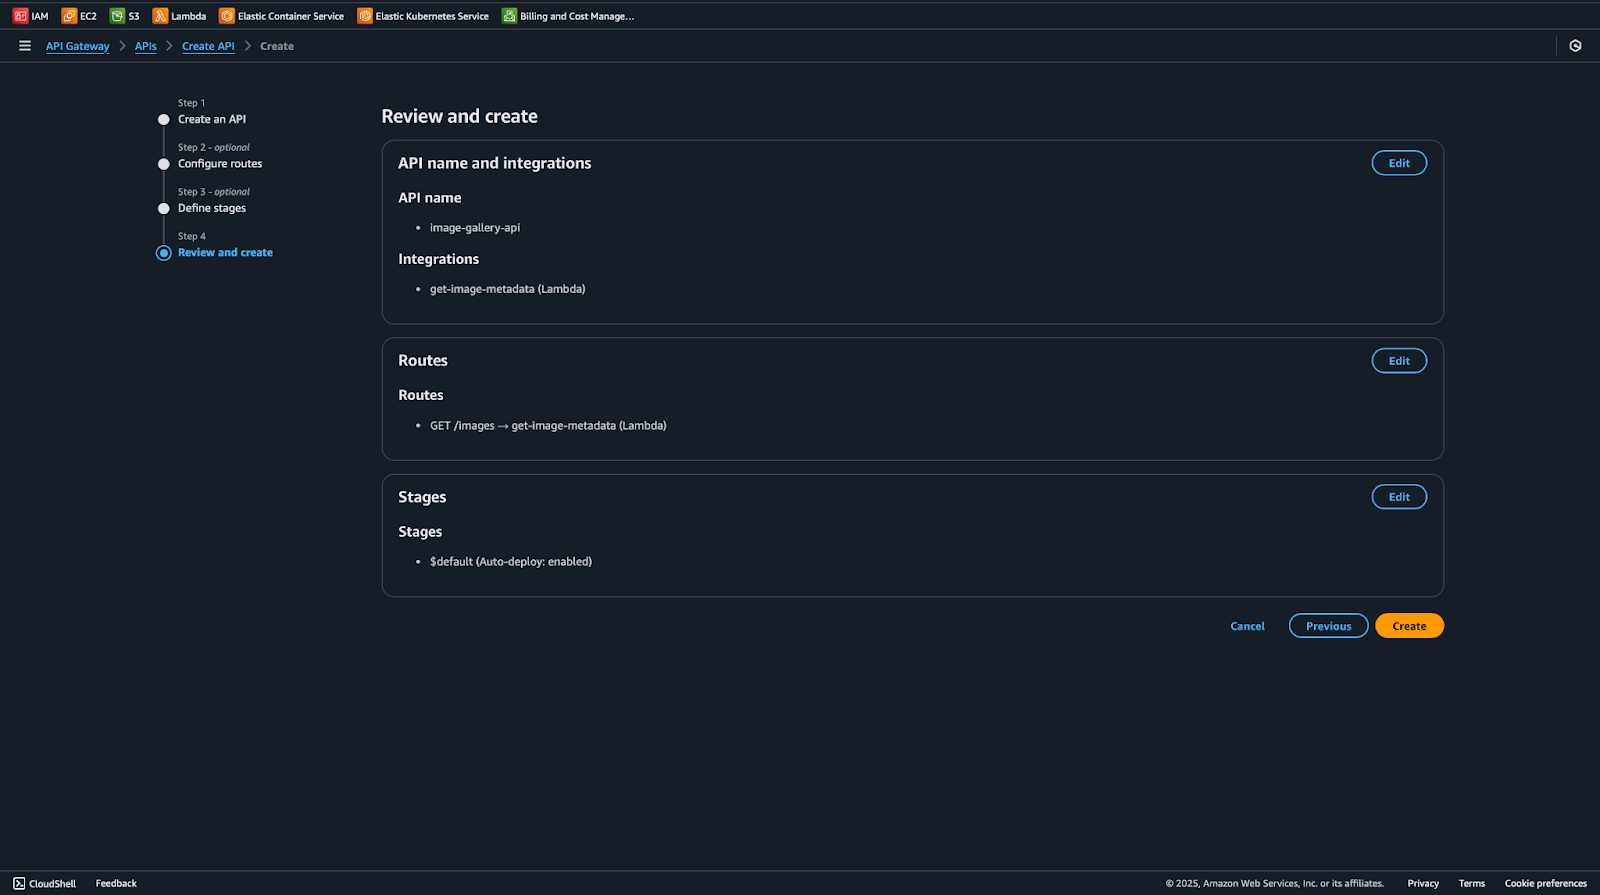
The API Gateway will act because the entry level on your ECS Frontend utility to fetch picture information from DynamoDB. It would hook up with the Lambda operate that queries DynamoDB and returns the picture metadata. The URL of the Gateway is utilized in our Frontend app to show photos. To create the API Gateway, do the next steps:
- Go to the AWS Administration Console → Seek for API Gateway → Click on Create API.
- Choose HTTP API.
- Click on on Construct.
- API identify: image-gallery-api
- Add integrations: Choose Lambda and choose the get_image_metadata operate
- Choose Technique: Get and Path: /photos
- Endpoint sort: Regional
- Click on on Subsequent and create the API Gateway URL.
Earlier than creating the Frontend, let’s take a look at the appliance manually. First go to your Add S3 Bucket (sample-image-uploads-bucket) and add a jpg/jpeg picture; different picture won’t work as your operate solely processes these two varieties:
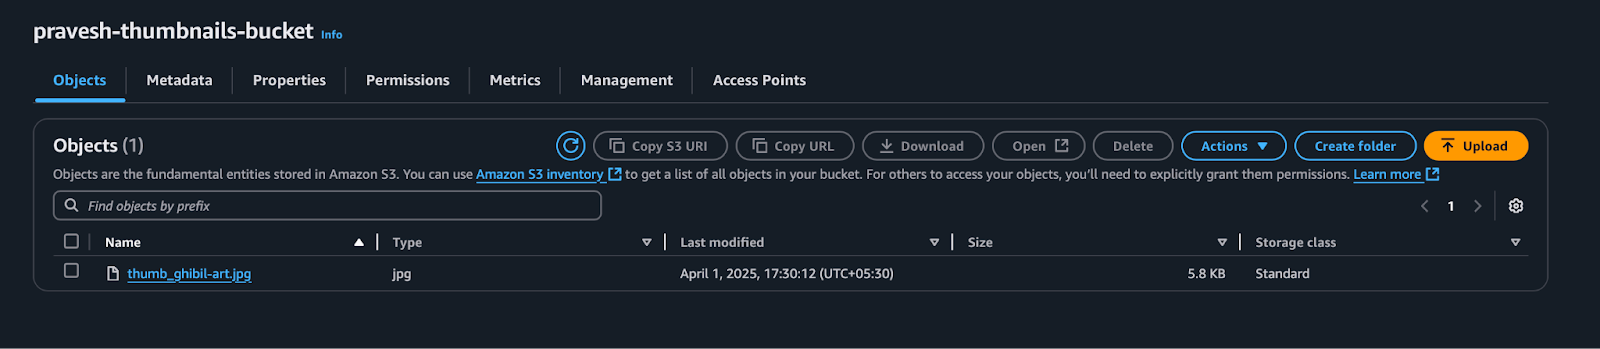
Within the Image above, I’ve uploaded a picture titled “ghibil-art.jpg” file, and as soon as uploaded, it would set off the Lambda operate, that can create the thumbnail out of it named as “thumbnail-ghibil-art.jpg” and retailer it in sample-thumbnails-bucket and the details about the picture can be saved in image-metadata desk in DynamoDb.

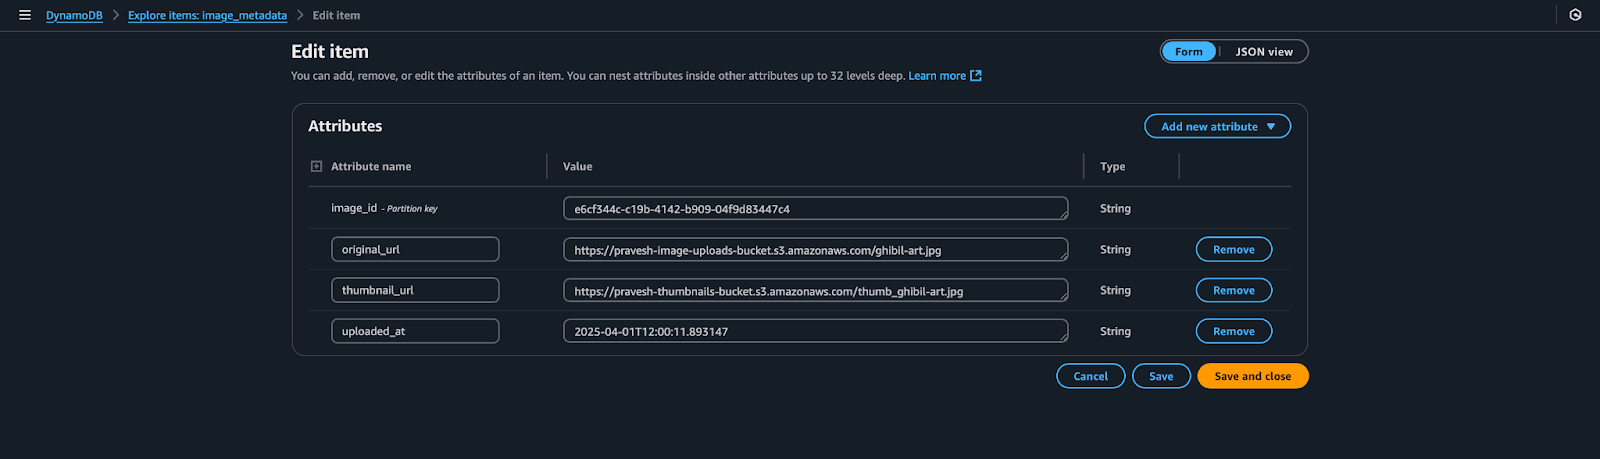
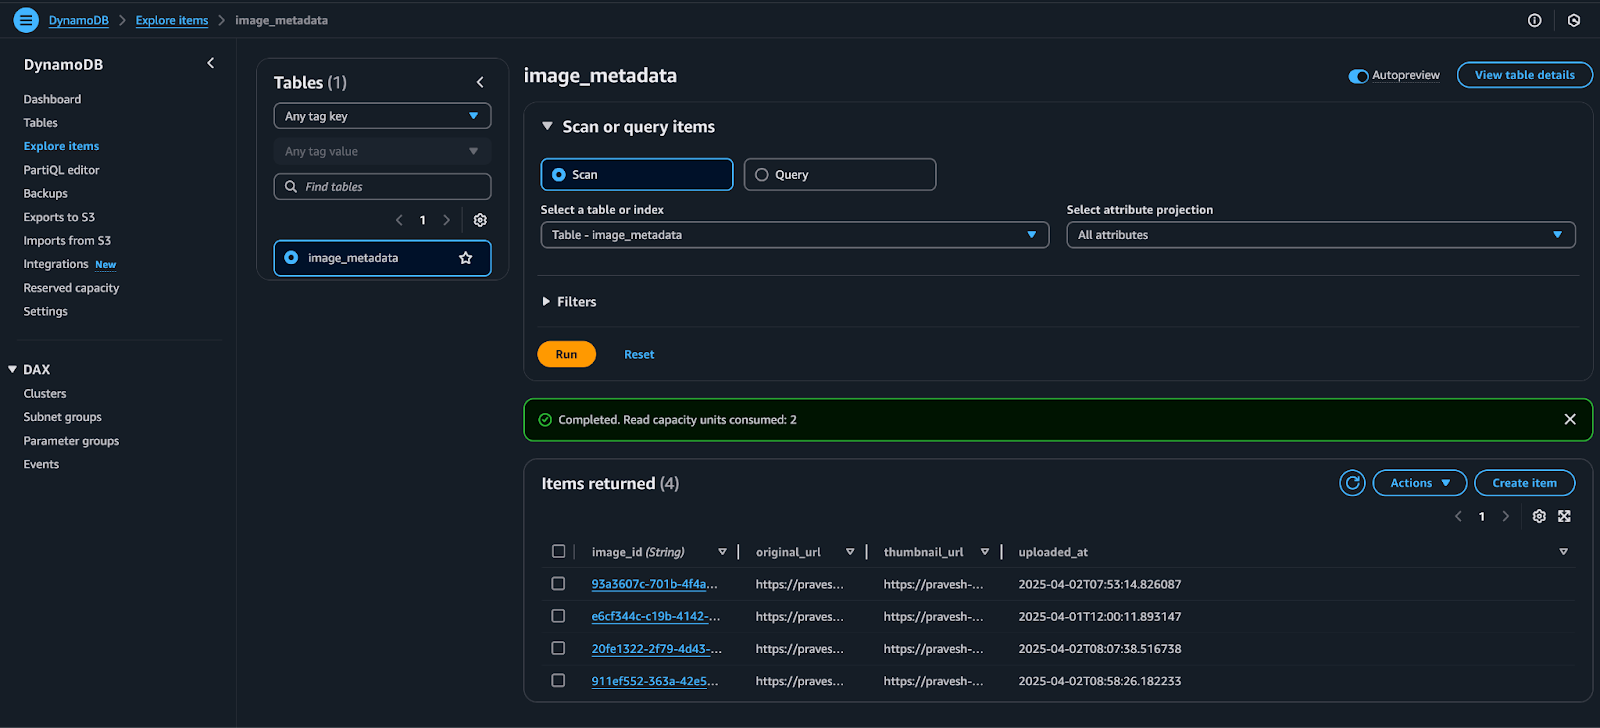
Within the picture above, you’ll be able to see the Merchandise contained in the Discover Merchandise part of our DynamoDb desk “image-metadata.” To check the API-Gateway, we’ll examine the Invoke URL of our image-gallery-API adopted by /photos. It would present the next output, with the curl command:

Now our utility is working superb, we are able to deploy a frontend to visualise the mission.
Creating the Frontend App
For the sake of Simplicity, we can be making a minimal, easy gallery frontend utilizing Subsequent.js, Dockerize it, and deploy it on ECS. To create the app, do the next steps:
Initialization
npx create-next-app@newest image-gallery
cd image-gallery
npm set up
npm set up axios
Create the Gallery Part
Create a brand new file elements/Gallery.js:
'use shopper';
import { useState, useEffect } from 'react';
import axios from 'axios';
import kinds from './Gallery.module.css';
const Gallery = () => {
const [images, setImages] = useState([]);
const [loading, setLoading] = useState(true);
useEffect(() => {
const fetchImages = async () => {
strive {
const response = await axios.get('https:///photos' );
setImages(response.information);
setLoading(false);
} catch (error) {
console.error('Error fetching photos:', error);
setLoading(false);
}
};
fetchImages();
}, []);
if (loading) {
return <div className={kinds.loading}>Loading...</div>;
}
return (
<div className={kinds.gallery}>
{photos.map((picture) => (
<div key={picture.image_id} className={kinds.imageCard}>
<img
src={picture.thumbnail_url}
alt="Gallery thumbnail"
width={200}
peak={150}
className={kinds.thumbnail}
/>
<p className={kinds.date}>
{new Date(picture.uploaded_at).toLocaleDateString()}
</p>
</div>
))}
</div>
);
};
export default Gallery;Make Positive to Change the Gateway-URL to your API_GATEWAY_URL
Add CSS Module
Create elements/Gallery.module.css:
.gallery {
  show: grid;
  grid-template-columns: repeat(auto-fill, minmax(200px, 1fr));
  hole: 20px;
  padding: 20px;
  max-width: 1200px;
  margin: 0 auto;
}
.imageCard {
  background: #fff;
  border-radius: 8px;
  box-shadow: 0 2px 5px rgba(0,0,0,0.1);
  overflow: hidden;
  transition: remodel 0.2s;
}
.imageCard:hover {
  remodel: scale(1.05);
}
.thumbnail {
  width: 100%;
  peak: 150px;
  object-fit: cowl;
}
.date {
  text-align: middle;
  padding: 10px;
  margin: 0;
  font-size: 0.9em;
  colour: #666;
}
.loading {
  text-align: middle;
  padding: 50px;
  font-size: 1.2em;
}
Replace the Residence Web page
Modify app/web page.js:
import Gallery from '../elements/Gallery';

export default operate Residence() {
  return (
    <foremost>
      <h1 model={{ textAlign: 'middle', padding: '20px' }}>Picture Gallery</h1>
      <Gallery />
    </foremost>
  );
}
Subsequent.js’s built-in Picture part
To make use of Subsequent.js’s built-in Picture part for higher optimization, replace subsequent.config.mjs:
const nextConfig = {
  photos: {
    domains: ['sample-thumbnails-bucket.s3.amazonaws.com'],
  },
};

export default nextConfig;
Run the Software
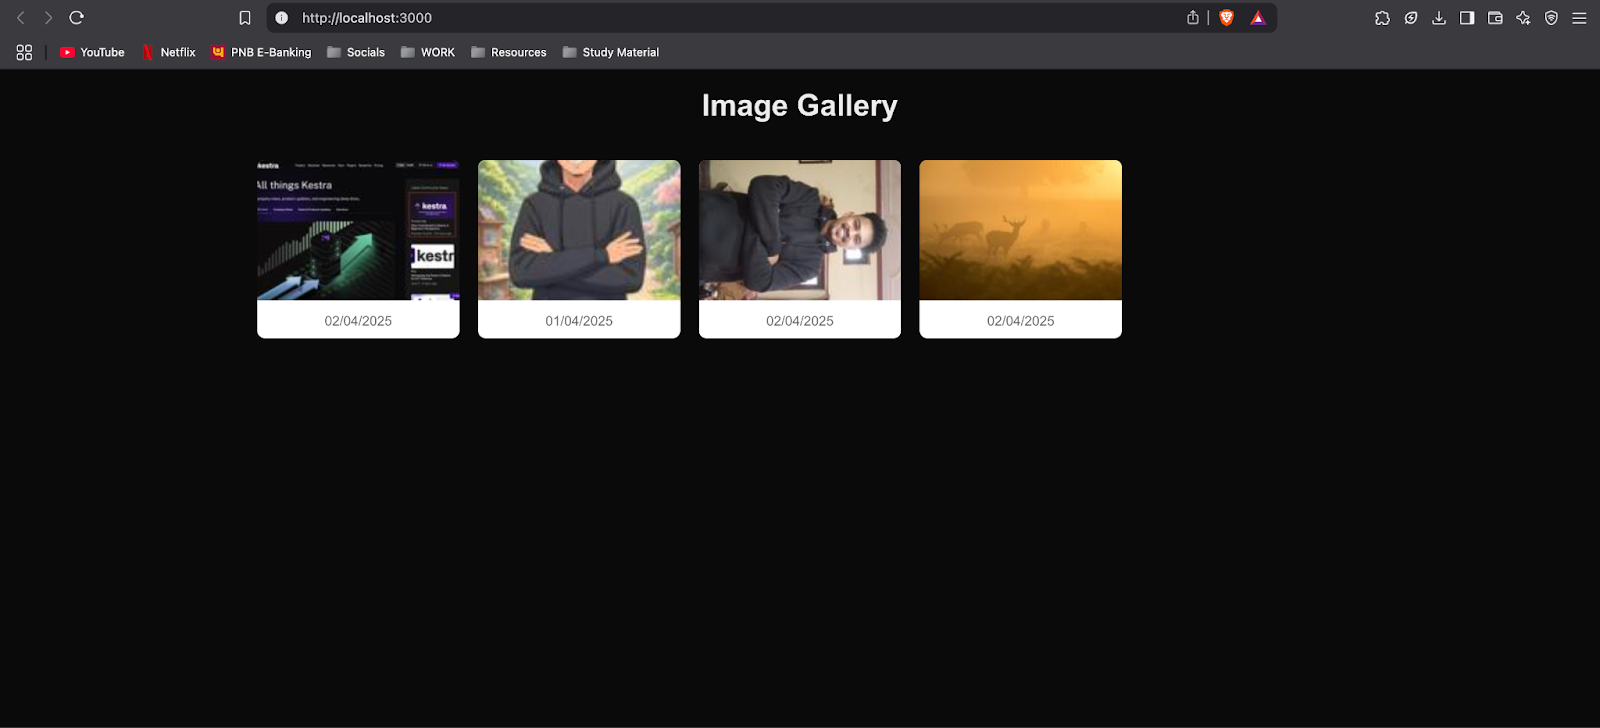
Go to http://localhost:3000 in your browser, and you will notice the appliance working with all of the thumbnails uploaded.
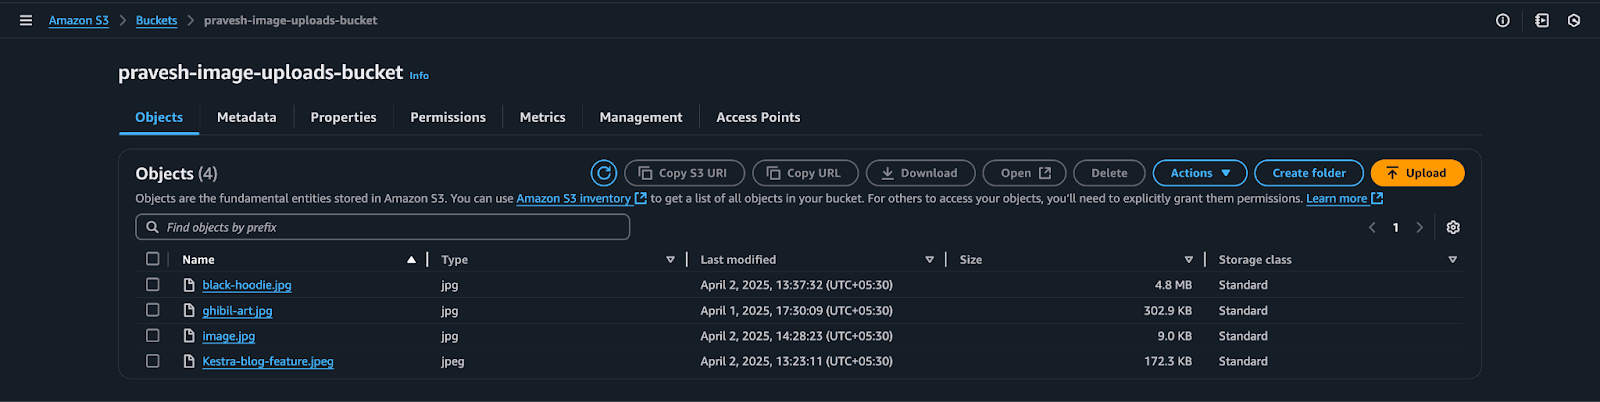
For demonstration functions, I’ve put 4 photos (jpeg/jpg) in my sample-images-upload-bucket. By means of the operate, they’re remodeled into thumbnails and saved within the sample-thumbnail-bucket.

The applying appears like this:
Containerising and Creating the ECS Cluster
Now we’re nearly completed with the mission, so we’ll proceed by making a Dockerfile of the mission as follows:
# Use the official Node.js picture as a base
FROM node:18-alpine AS builder

# Set working listing
WORKDIR /app

# Copy bundle information and set up dependencies
COPY bundle.json package-lock.json ./
RUN npm set up

# Copy the remainder of the appliance code
COPY . .

# Construct the Subsequent.js app
RUN npm run construct

# Use a light-weight Node.js picture for manufacturing
FROM node:18-alpine

# Set working listing
WORKDIR /app

# Copy constructed information from the builder stage
COPY --from=builder /app ./

# Expose port
EXPOSE 3000

# Run the appliance
CMD ["npm", "start"]
Now we’ll construct the Docker picture utilizing:
docker construct -t sample-nextjs-app .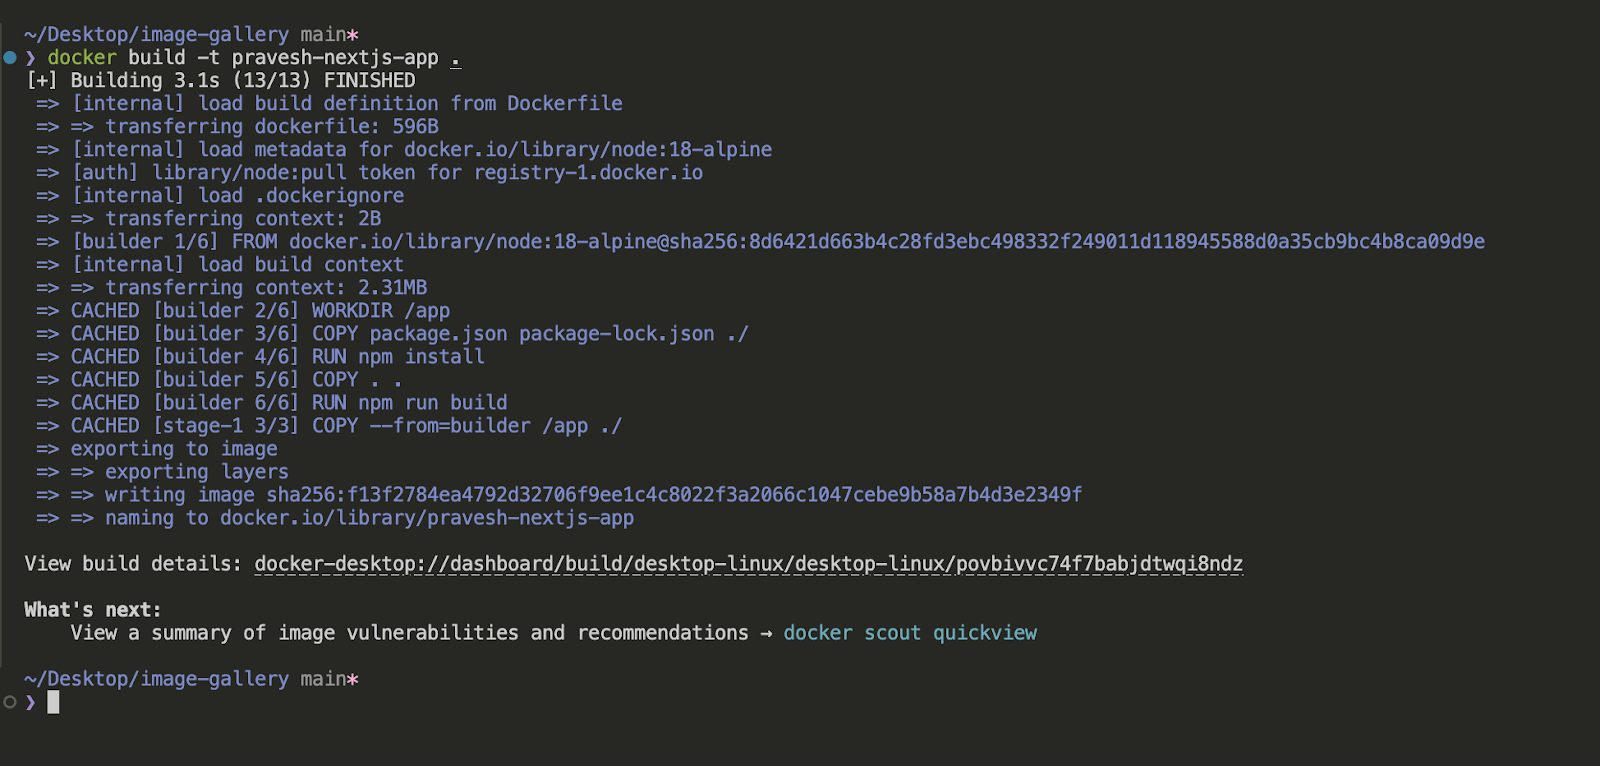
Now that we’ve got our Docker picture, we’ll push it to AWS ECR repo, for that, do the next steps:
Step 1: Push the Docker Picture to Amazon ECR
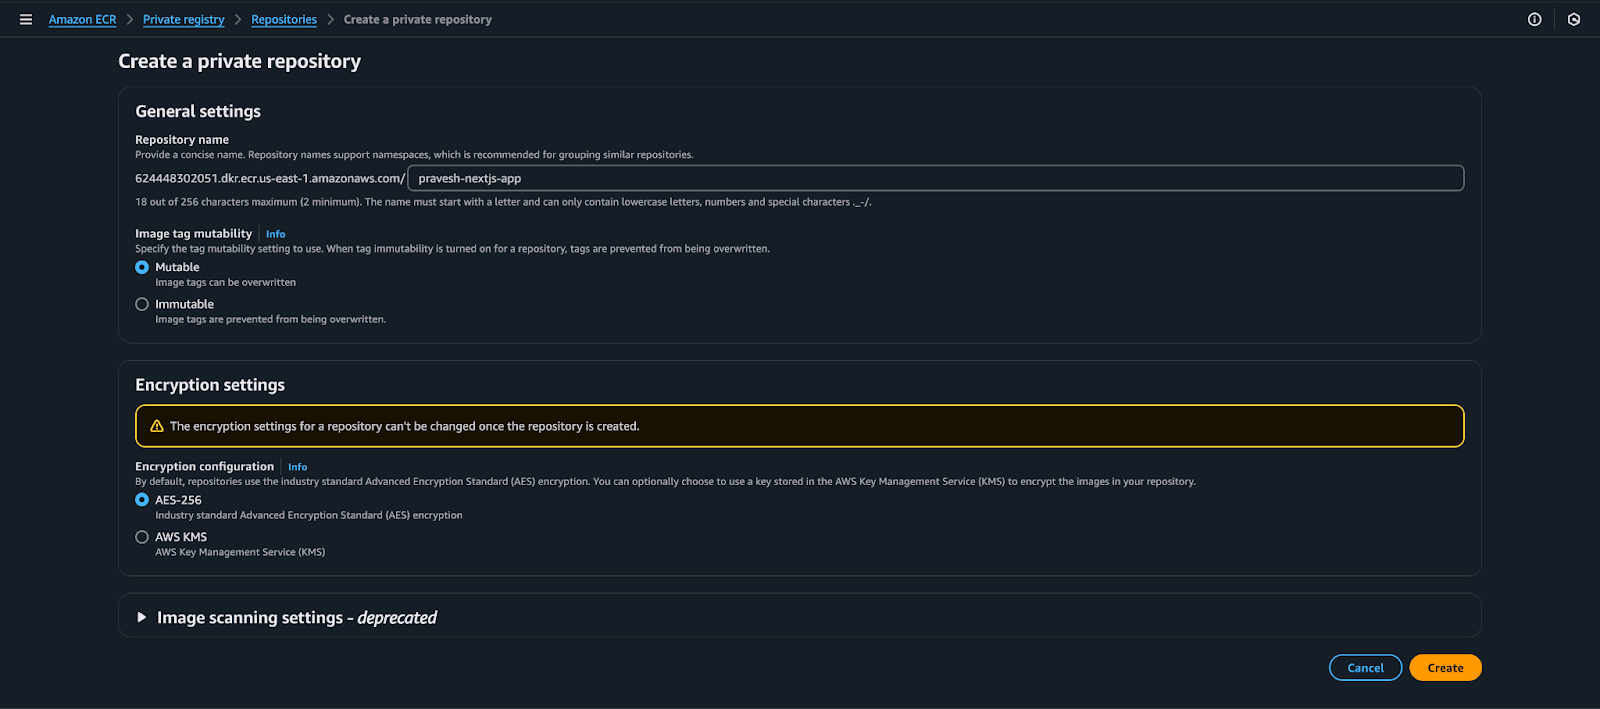
- Go to the AWS Administration Console → Seek for ECR (Elastic Container Registry) → Open ECR.
- Create a brand new repository:
- Click on Create repository.
- Set Repository identify (e.g., sample-nextjs-app).
- Select Personal (or Public if required).
- Click on Create repository.
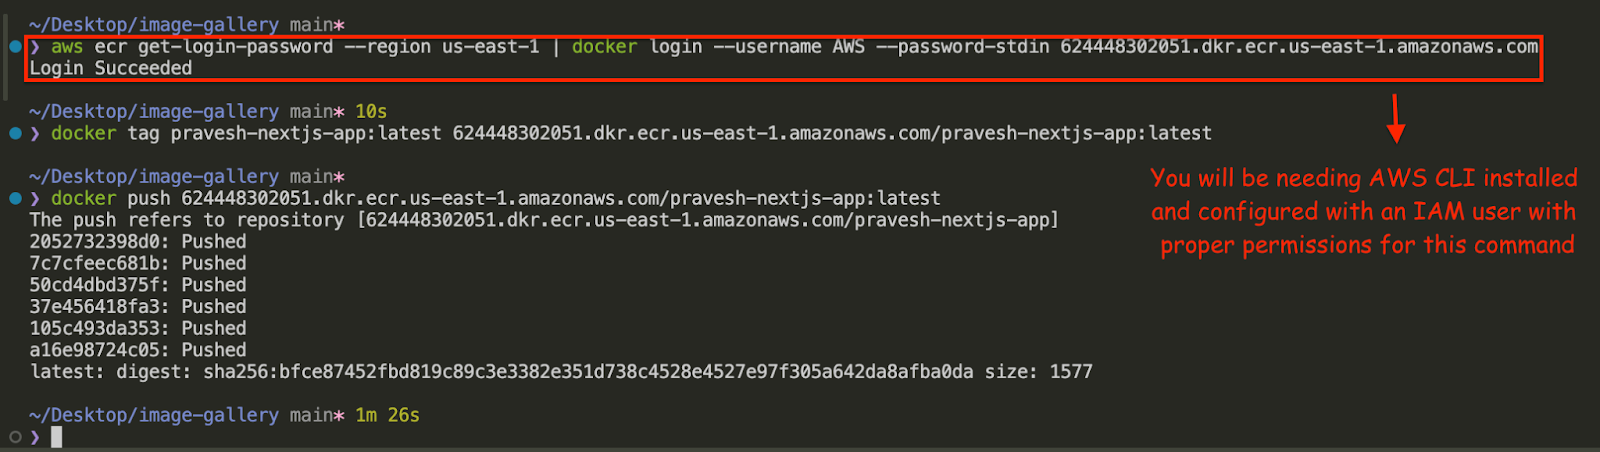
- Push your Docker picture to ECR:
- Within the newly created repository, click on View push instructions.
- Observe the instructions to:
- Authenticate Docker with ECR.
- Construct, tag, and push your picture.
- You want to have AWS CLI configured for this step.
Step 2: Create an ECS Cluster
aws ecs create-cluster --cluster-name sample-ecs-clusterStep 3: Create a Activity Definition
- Within the ECS Console, go to Activity Definitions.
- Click on Create new Activity Definition.
- Select Fargate → Click on Subsequent step.
- Set activity definition particulars:
- Identify: sample-nextjs-task
- Activity function: ecsTaskExecutionRole (Create one if lacking).
{
  "Model": "2012-10-17",
  "Assertion": [
    {
      "Sid": "Statement1",
      "Effect": "Allow",
      "Action": [
        "ecr:GetDownloadUrlForLayer",
        "ecr:BatchGetImage",
        "ecr:GetAuthorizationToken",
        "ecr:BatchCheckLayerAvailability"
      ],
      "Useful resource": "arn:aws:ecr:us-east-1:624448302051:repository/sample-nextjs-app"
    }
  ]
}- Activity reminiscence & CPU: Select acceptable values (e.g., 512MB & 256 CPU).
- Outline the container:
- Click on Add container.
- Container identify: sample-nextjs-container.
- Picture URL: Paste the ECR picture URI from Step 1.
- Port mappings: Set 3000 for each container and host ports.
- Click on Add.
- Click on Create.
Step 4: Create an ECS Service
- Go to “ECS” → Click on Clusters → Choose your cluster (sample-ecs-cluster).
- Click on Create Service.
- Select Fargate → Click on Subsequent step.
- Arrange the service:
- Activity definition: Choose sample-nextjs-task.
- Cluster: sample-ecs-cluster.
- Service identify: sample-nextjs-service.
- Variety of duties: 1 (Can scale later).
- Networking settings:
- Choose an current VPC.
- Select Public subnets.
- Allow Auto-assign Public IP.
- Click on Subsequent step → Create service.
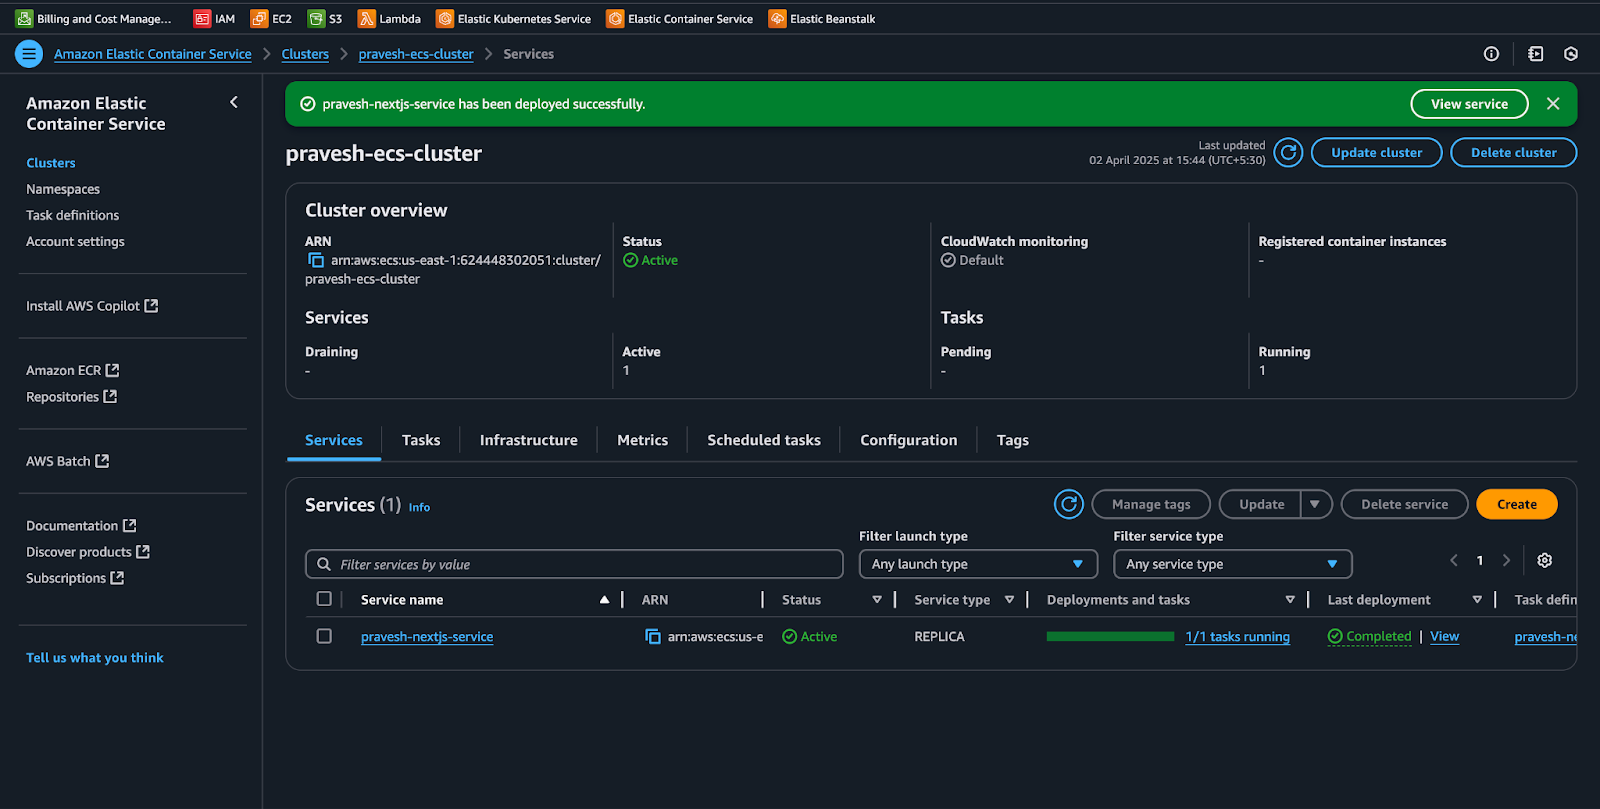
Step 5: Entry the Software
- Go to ECS > Clusters > sample-ecs-cluster.
- Click on on the Duties tab.
- Click on on the working activity.
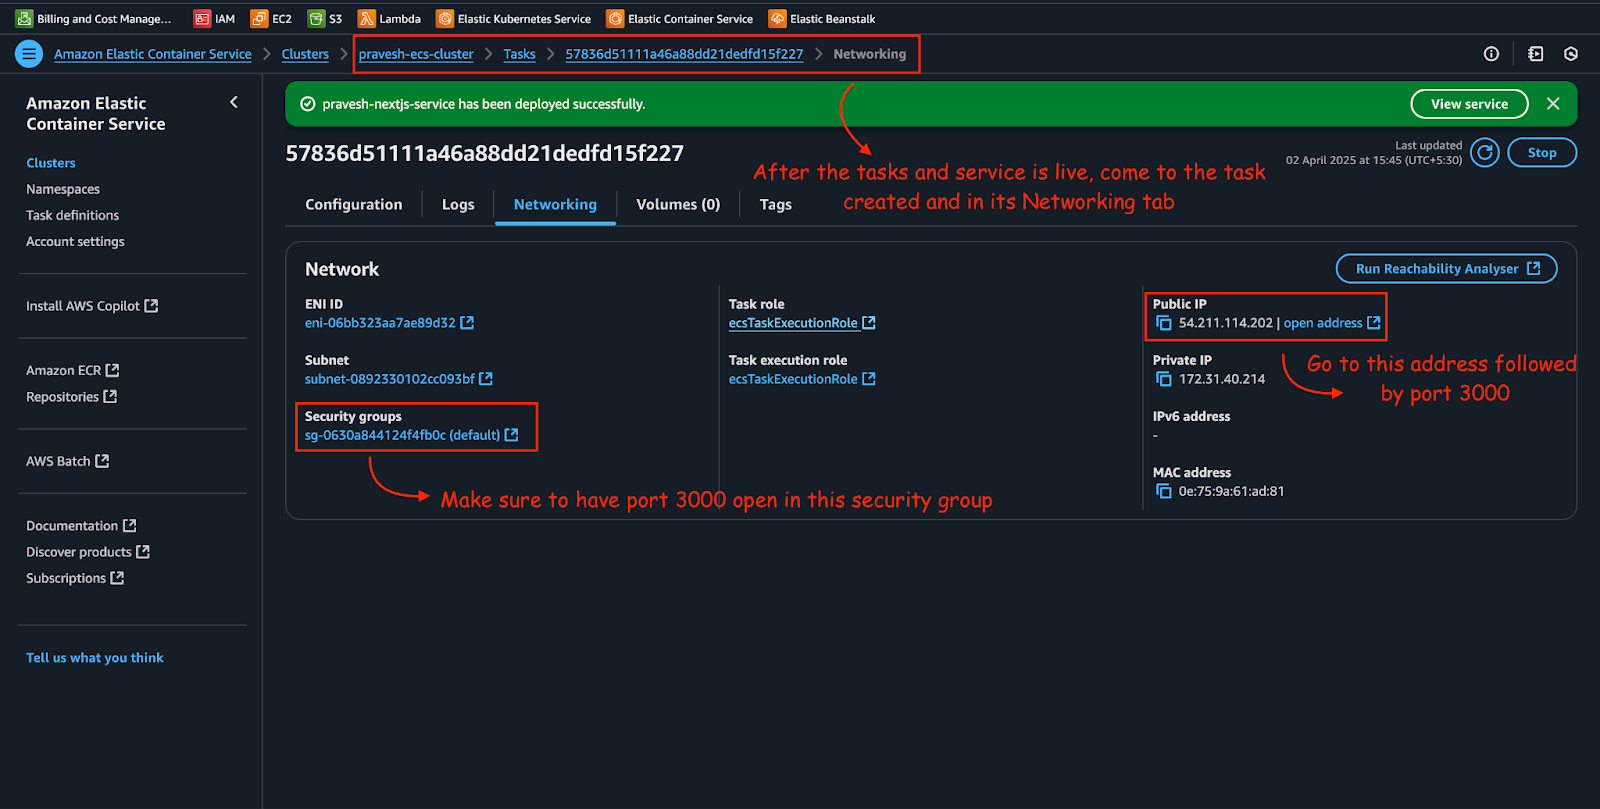
- Discover the Public IP underneath Community.
Open a browser and go to:
http://
Your Subsequent.js app must be reside! 🚀

Conclusion
This marks the tip of the weblog. At present, we divided into many AWS companies: s3, IAM, ECR, Lambda operate, ECS, Fargate, and API Gateway. We began the mission by creating s3 buckets and ultimately deployed our utility in an ECS cluster.
All through this information, we lined containerizing the Subsequent.js app, pushing it to ECR, configuring ECS activity definitions, and deploying through the AWS console. This setup permits for automated scaling, straightforward updates, and safe API entry—all key advantages of a cloud-native deployment.
Potential manufacturing configurations could embrace modifications like beneath:
- Implementing extra restrictive IAM permissions, bettering management over public entry to S3 buckets (utilizing CloudFront, pre-signed URLs, or a backend proxy as a substitute of constructing the sample-thumbnails-bucket public)
- Including error dealing with and pagination (particularly for DynamoDB queries)
- Using safe VPC/community configurations for ECS (like utilizing an Software Load Balancer and personal subnets as a substitute of direct public IPs)
- Addressing scaling issues by changing the DynamoDB.scan operation throughout the metadata-fetching Lambda with the DynamoDB.question
- Utilizing surroundings variables as a substitute of a hardcoded API gateway URL within the Subsequent.js code


