
When constructing the basement studio web site, we wished so as to add 3D characters with out compromising efficiency. We used instancing to render all of the characters concurrently. This publish introduces situations and tips on how to use them with React Three Fiber.
Introduction
Instancing is a efficiency optimization that allows you to render many objects that share the identical geometry and materials concurrently. If you need to render a forest, you’d want tons of bushes, rocks, and grass. In the event that they share the identical base mesh and materials, you possibly can render all of them in a single draw name.
A draw name is a command from the CPU to the GPU to attract one thing, like a mesh. Every distinctive geometry or materials normally wants its personal name. Too many draw calls harm efficiency. Instancing reduces that by batching many copies into one.
Fundamental instancing
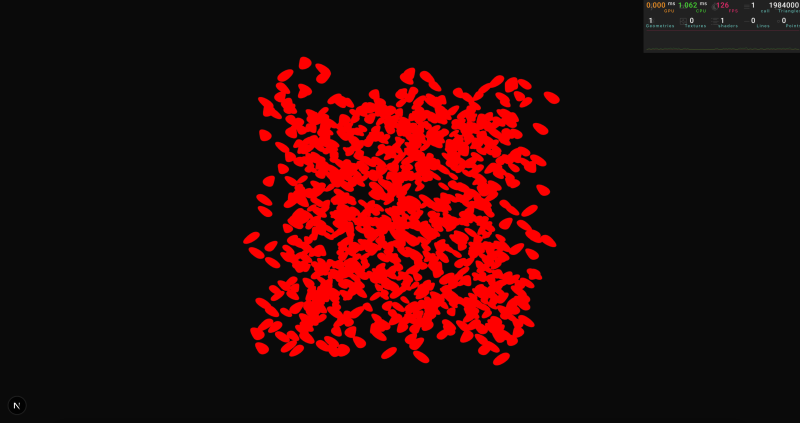
For instance, let’s begin by rendering a thousand packing containers in a standard manner, and let’s loop over an array and generate some random packing containers:
const boxCount = 1000

perform Scene() {
  return (
    <>
      {Array.from({ size: boxCount }).map((_, index) => (


      ))}
    >
  )
}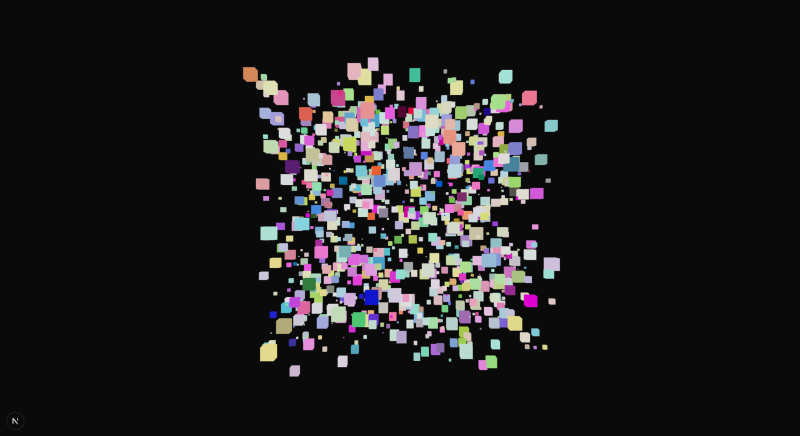
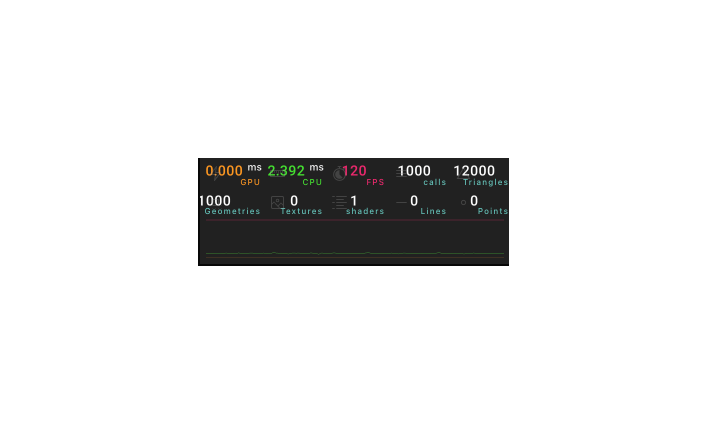
If we add a efficiency monitor to it, we’ll discover that the variety of “calls” matches our boxCount.
A fast method to implement situations in our challenge is to make use of drei/situations.
The Cases element acts as a supplier; it wants a geometry and supplies as youngsters that will likely be used every time we add an occasion to our scene.
The Occasion element will place a type of situations in a specific place/rotation/scale. Each Occasion will likely be rendered concurrently, utilizing the geometry and materials configured on the supplier.
import { Occasion, Cases } from "@react-three/drei"
const boxCount = 1000
perform Scene() {
return (
Discover how “calls” is now diminished to 1, despite the fact that we’re exhibiting a thousand packing containers.
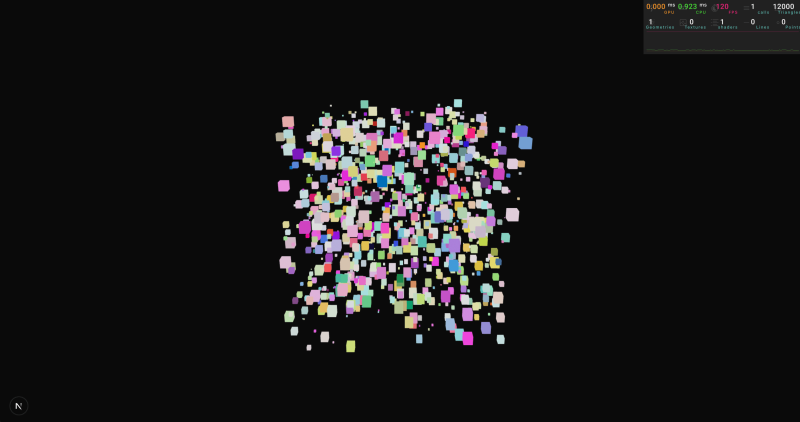
What is occurring right here? We’re sending the geometry of our field and the fabric simply as soon as to the GPU, and ordering that it ought to reuse the identical information a thousand instances, so all packing containers are drawn concurrently.
Discover that we are able to have a number of colours despite the fact that they use the identical materials as a result of Three.js helps this. Nevertheless, different properties, just like the map, needs to be the identical as a result of all situations share the very same materials.
We’ll see how we are able to hack Three.js to help a number of maps later within the article.
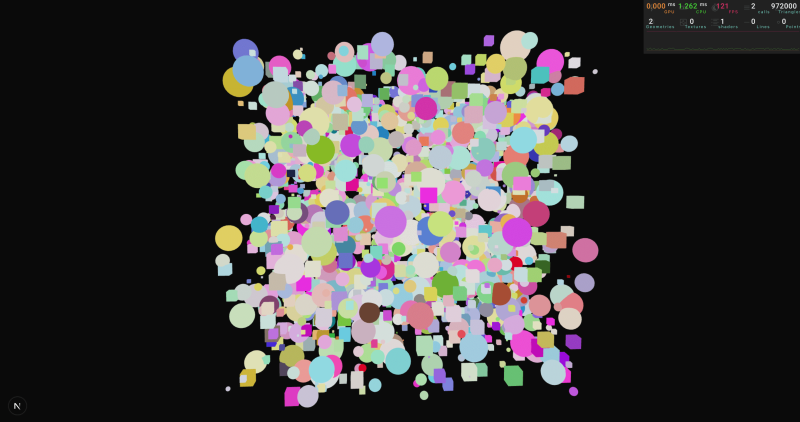
Having a number of units of situations
If we’re rendering a forest, we may have totally different situations, one for bushes, one other for rocks, and one for grass. Nevertheless, the instance from earlier than solely helps one occasion in its supplier. How can we deal with that?
The creteInstnace() perform from drei permits us to create a number of situations. It returns two React elements, the primary one a supplier that can arrange our occasion, the second, a element that we are able to use to place one occasion in our scene.
Let’s see how we are able to arrange a supplier first:
import { createInstances } from "@react-three/drei"
const boxCount = 1000
const sphereCount = 1000
const [CubeInstances, Cube] = createInstances()
const [SphereInstances, Sphere] = createInstances()
perform InstancesProvider({ youngsters }: { youngsters: React.ReactNode }) {
return (
)
}As soon as we’ve got our occasion supplier, we are able to add plenty of Cubes and Spheres to our scene:
perform Scene() {
return (
{Array.from({ size: boxCount }).map((_, index) => (
Discover how despite the fact that we’re rendering two thousand objects, we’re simply operating two draw calls on our GPU.
Cases with customized shaders
Till now, all of the examples have used Three.js’ built-in supplies so as to add our meshes to the scene, however typically we have to create our personal supplies. How can we add help for situations to our shaders?
Let’s first arrange a really fundamental shader materials:
import * as THREE from "three"

const baseMaterial = new THREE.RawShaderMaterial({
  vertexShader: /*glsl*/ `
    attribute vec3 place;
    attribute vec3 instanceColor;
    attribute vec3 regular;
    attribute vec2 uv;
    uniform mat4 modelMatrix;
    uniform mat4 viewMatrix;
    uniform mat4 projectionMatrix;

    void important() {
      vec4 modelPosition = modelMatrix * vec4(place, 1.0);
      vec4 viewPosition = viewMatrix * modelPosition;
      vec4 projectionPosition = projectionMatrix * viewPosition;
      gl_Position = projectionPosition;
    }
  `,
  fragmentShader: /*glsl*/ `
    void important() {
      gl_FragColor = vec4(1, 0, 0, 1);
    }
  `
})

export perform Scene() {
  return (


  )
}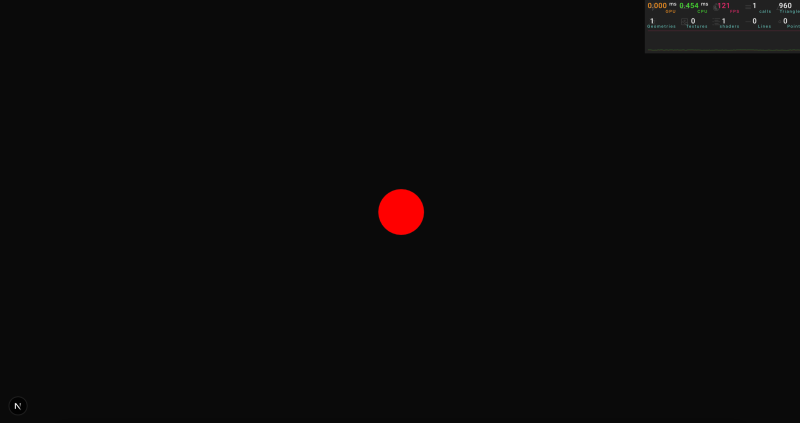
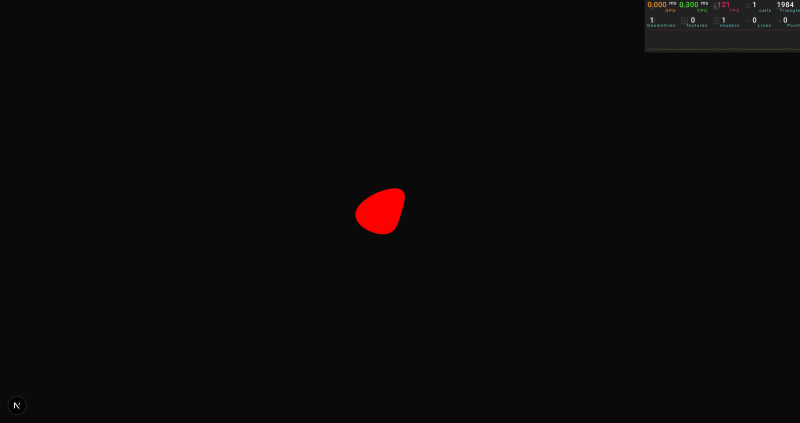
Now that we’ve got our testing object in place, let’s add some motion to the vertices:
We’ll add some motion on the X axis utilizing a time and amplitude uniform and use it to create a blob form:
const baseMaterial = new THREE.RawShaderMaterial({
  // some unifroms
  uniforms: {
    uTime: { worth: 0 },
    uAmplitude: { worth: 1 },
  },
  vertexShader: /*glsl*/ `
    attribute vec3 place;
    attribute vec3 instanceColor;
    attribute vec3 regular;
    attribute vec2 uv;
    uniform mat4 modelMatrix;
    uniform mat4 viewMatrix;
    uniform mat4 projectionMatrix;

    // Added this code to shift the vertices
    uniform float uTime;
    uniform float uAmplitude;
    vec3 motion(vec3 place) {
      vec3 pos = place;
      pos.x += sin(place.y + uTime) * uAmplitude;
      return pos;
    }

    void important() {
      vec3 blobShift = motion(place);
      vec4 modelPosition = modelMatrix * vec4(blobShift, 1.0);
      vec4 viewPosition = viewMatrix * modelPosition;
      vec4 projectionPosition = projectionMatrix * viewPosition;
      gl_Position = projectionPosition;
    }
  `,
  fragmentShader: /*glsl*/ `
    void important() {
      gl_FragColor = vec4(1, 0, 0, 1);
    }
  `,
});

export perform Scene() {
  useFrame((state) => {
    // replace the time uniform
    baseMaterial.uniforms.uTime.worth = state.clock.elapsedTime;
  });

  return (


  );
}
Now, we can see the sphere moving around like a blob:
Now, let’s render a thousand blobs using instancing. First, we need to add the instance provider to our scene:
import { createInstances } from '@react-three/drei';
const [BlobInstances, Blob] = createInstances();
perform Scene() {
useFrame((state) => {
baseMaterial.uniforms.uTime.worth = state.clock.elapsedTime;
});
return (
);
}
The code runs successfully, but all spheres are in the same place, even though we added different positions.
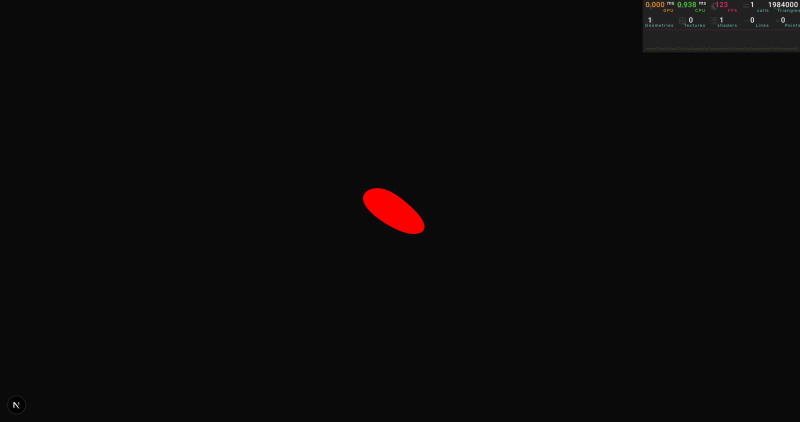
This is happening because when we calculated the position of each vertex in the vertexShader, we returned the same position for all vertices, all these attributes are the same for all spheres, so they end up in the same spot:
vec3 blobShift = movement(position);
vec4 modelPosition = modelMatrix * vec4(deformedPosition, 1.0);
vec4 viewPosition = viewMatrix * modelPosition;
vec4 projectionPosition = projectionMatrix * viewPosition;
gl_Position = projectionPosition;
To solve this issue, we need to use a new attribute called instanceMatrix. This attribute will be different for each instance that we are rendering.
attribute vec3 position;
attribute vec3 instanceColor;
attribute vec3 normal;
attribute vec2 uv;
uniform mat4 modelMatrix;
uniform mat4 viewMatrix;
uniform mat4 projectionMatrix;
// this attribute will change for each instance
attribute mat4 instanceMatrix;
uniform float uTime;
uniform float uAmplitude;
vec3 movement(vec3 position) {
vec3 pos = position;
pos.x += sin(position.y + uTime) * uAmplitude;
return pos;
}
void main() {
vec3 blobShift = movement(position);
// we can use it to transform the position of the model
vec4 modelPosition = instanceMatrix * modelMatrix * vec4(blobShift, 1.0);
vec4 viewPosition = viewMatrix * modelPosition;
vec4 projectionPosition = projectionMatrix * viewPosition;
gl_Position = projectionPosition;
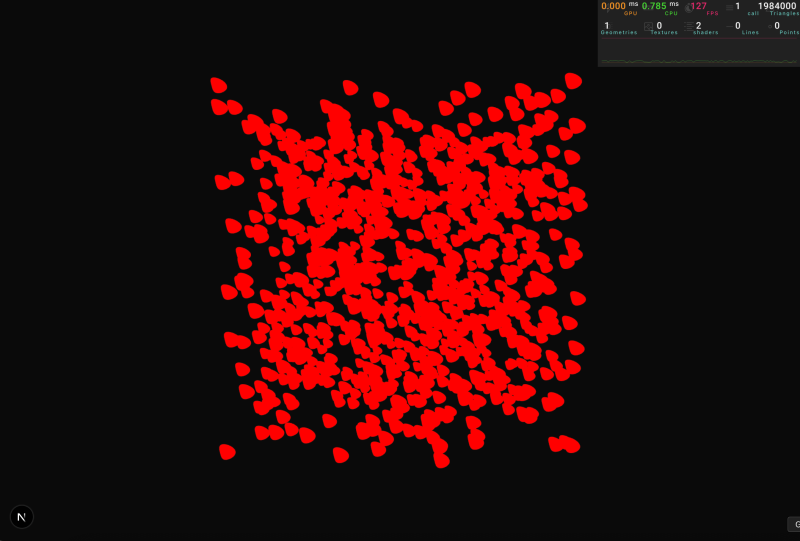
}Now that we have used the instanceMatrix attribute, each blob is in its corresponding position, rotation, and scale.
Changing attributes per instance
We managed to render all the blobs in different positions, but since the uniforms are shared across all instances, they all end up having the same animation.
To solve this issue, we need a way to provide custom information for each instance. We actually did this before, when we used the instanceMatrix to move each instance to its corresponding location. Let’s debug the magic behind instanceMatrix, so we can learn how we can create own instanced attributes.
Taking a look at the implementation of instancedMatrix we can see that it is using something called InstancedAttribute:
InstancedBufferAttribute allows us to create variables that will change for each instance. Let’s use it to vary the animation of our blobs.
Drei has a component to simplify this called InstancedAttribute that allows us to define custom attributes easily.
// Tell typescript about our custom attribute
const [BlobInstances, Blob] = createInstances<{ timeShift: quantity }>()
perform Scene() {
useFrame((state) => {
baseMaterial.uniforms.uTime.worth = state.clock.elapsedTime
})
return (
{/* Declare an instanced attribute with a default worth */}
)
}We’ll use this time shift attribute in our shader material to change the blob animation:
uniform float uTime;
uniform float uAmplitude;
// custom instanced attribute
attribute float timeShift;

vec3 movement(vec3 position) {
  vec3 pos = position;
  pos.x += sin(position.y + uTime + timeShift) * uAmplitude;
  return pos;
}
Now, each blob has its own animation:
Creating a forest
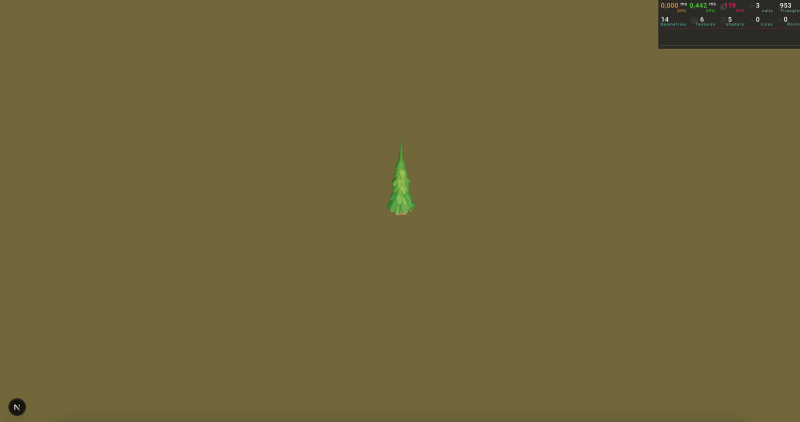
Let’s create a forest using instanced meshes. I’m going to use a 3D model from SketchFab: Stylized Pine Tree Tree by Batuhan13.
import { useGLTF } from "@react-three/drei"
import * as THREE from "three"
import { GLTF } from "three/examples/jsm/Addons.js"

// I always like to type the models so that they are safer to work with
interface TreeGltf extends GLTF {
  nodes: {
    tree_low001_StylizedTree_0: THREE.Mesh<
      THREE.BufferGeometry,
      THREE.MeshStandardMaterial
    >
  }
}

function Scene() {

  // Load the model
  const { nodes } = useGLTF(
    "/stylized_pine_tree_tree.glb"
  ) as unknown as TreeGltf

  return (

      {/* add one tree to our scene */ }


  )
}
(I added lights and a ground in a separate file.)
Now that we have one tree, let’s apply instancing.
const getRandomPosition = () => {
return [
(Math.random() - 0.5) * 10000,
0,
(Math.random() - 0.5) * 10000
] as const
}
const [TreeInstances, Tree] = createInstances()
const treeCount = 1000
perform Scene() {
const { scene, nodes } = useGLTF(
"/stylized_pine_tree_tree.glb"
) as unknown as TreeGltf
return (
{Array.from({ size: treeCount }).map((_, index) => (
)
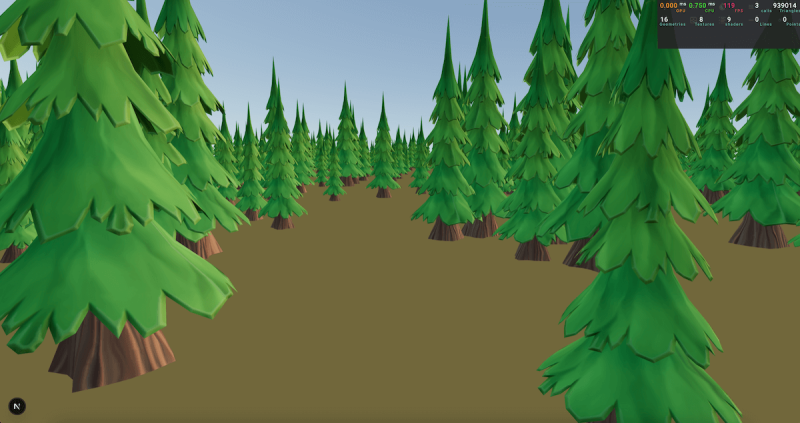
}Our total forest is being rendered in solely three draw calls: one for the skybox, one other one for the bottom airplane, and a 3rd one with all of the bushes.
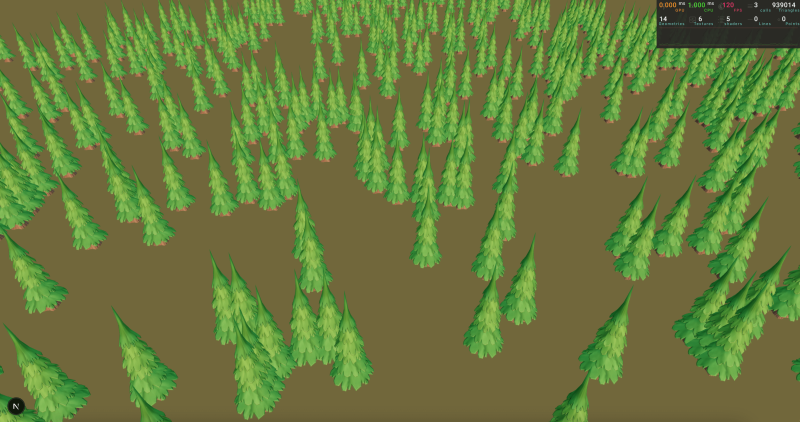
To make issues extra attention-grabbing, we are able to differ the peak and rotation of every tree:
const getRandomPosition = () => {
return [
(Math.random() - 0.5) * 10000,
0,
(Math.random() - 0.5) * 10000
] as const
}
perform getRandomScale() {
return Math.random() * 0.7 + 0.5
}
// ...
Additional studying
There are some matters that I didn’t cowl on this article, however I believe they’re value mentioning:
- Batched Meshes: Now, we are able to render one geometry a number of instances, however utilizing a batched mesh will assist you to render totally different geometries on the similar time, sharing the identical materials. This manner, you aren’t restricted to rendering one tree geometry; you possibly can differ the form of every one.
- Skeletons: They don’t seem to be presently supported with instancing, to create the newest basement.studio web site we managed to hack our personal implementation, I invite you to learn our implementation there.
- Morphing with batched mesh: Morphing is supported with situations however not with batched meshes. If you wish to implement it your self, I’d counsel you learn these notes.


