Nightreign’s Raider class is for anybody who simply needs to beat shit up. It’s probably the most simple class that focuses on pure harm output and nothing else. He has easy mechanics which might be geared to offer enemies as a lot of a tough time as doable.
Means: Fighter’s Resolve
Raider’s passive capability is known as Fighter’s Resolve; it really works in tandem along with his character talent, Retaliate. This makes certain that he won’t ever be knocked out of Retaliate’s animation whereas boosting the talent’s energy Moreover, if he takes harm throughout the animation that will in any other case down him, he’ll survive with simply 1 HP.
Means: Retaliate
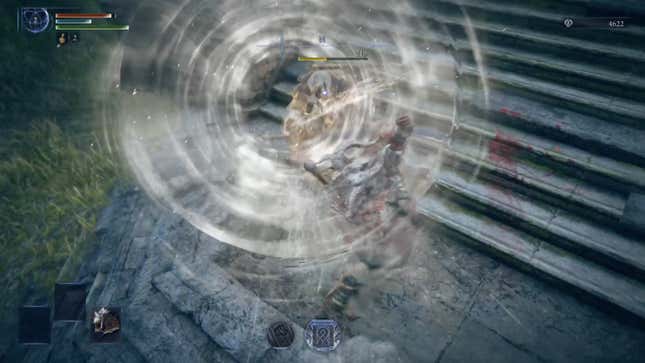
There are two variations of Retaliate. When Raider does the conventional model of his character talent, he’ll stomp on the bottom, blowing away smaller enemies, and do a straight jab to enemies proper in entrance of him. The assault will nonetheless deal some hefty harm and stance-breaking harm, however you’ll really wish to wait earlier than utilizing it.
It’s because the buffed model of Retaliate is a lot better. As Raider retains taking harm, Retaliate shall be charged. You may inform when the cost is full as a result of the character talent icon will glow purple and Raider himself will radiate steam. On this buffed model, Raider will do the identical stomp however will unleash a robust uppercut.
Learn Extra: Elden Ring Nightreign: A Begeinner’s Information To Mastering Recluse
Attacking this manner is way, a lot stronger than the conventional Retaliate. It’s single-handedly probably the most highly effective occasion of stance harm within the sport. This makes it a superb software towards large enemies, particularly Nightlords. Nevertheless, this may be exhausting to land on extra agile enemies or those that like to leap round so much attributable to its longer wind up animation in comparison with the conventional model. It’s higher used on slower or stationary enemies.
Final Artwork: Totem Stela
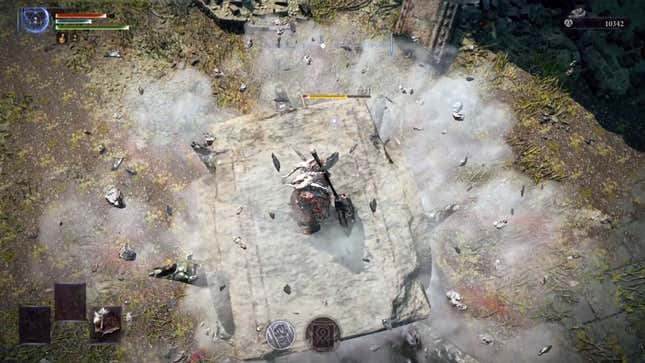
Raider’s Final Artwork is Totem Stela, the place he summons an enormous rock slab from underneath him. This assault does unimaginable stance harm, typically inflicting bigger enemies and managers to double over and leaving them open to essential hits from teammates. Due to its sheer energy, the totem can also be useful for reviving teammates shortly.
The totem could be pulled out from any location, and can keep round for about 30 seconds. Its surrounding aura will buff the attacking energy of you and your close by teammates. It’s climbable as effectively, so ranged characters like Ironeye and Recluse can achieve a major top benefit and vantage level to assault enemies from, protecting them safely away from enemies.
A take a look at Raider’s attributes
- HP: A
- FP: D
- Stamina: A
- Power: S
- Dexterity: C
- Intelligence: D
- Religion: D
- Arcane: C
Raider is the one character within the sport with an S-rank in power, which performs into its fundamental power as a close-range powerhouse. With excessive stamina and HP, Raider may face up to beatings whereas dishing them out himself.
His FP, intelligence, religion, and arcane stats aren’t practically as excessive, however these are relatively irrelevant to his function on the workforce. Nevertheless, his low religion and FP stats makes him a poor candidate for therapeutic incantations. So his major type of therapeutic is thru therapeutic flasks or consumables like Warming Stones.
Learn Extra: Elden Ring Nightreign: A Newbie’s Information To Mastering Ironeye
Throughout your run, make sure to decide up buffs from bosses that buff Totem’s Stela’s boosting capabilities in addition to gear that allow him restore HP and FP by dealing essential hits as he’ll be breaking stances rather a lot.
Elden Ring Nightreign is offered now on PS5, Xbox Sequence X, and Home windows PCs.


