We will additionally do away with the label textual content and use the
Now that we all know what wants to enter the HTML, all we have to do is convert the HTML right into a React element. Let’s begin with a fundamental element right here. We’ll make this a category element, after which we’ll convert it into hooks, because it’s simpler for brand spanking new builders to observe state than useState when constructing a React swap button.
Add the next to src/ToggleSwitch/ToggleSwitch.js file we created within the step 1.
At this level, it’s not attainable to have a number of toggle swap sliders on the identical view or web page because of the repetition of ids. Though we may leverage React’s method of componentization right here, we’ll be utilizing props to dynamically populate the values:
The this.props.Identify will populate the values of id, title and for (word that it’s htmlFor in React JS) dynamically, with the intention to cross totally different values to the element and have a number of cases on the identical web page.
When you seen, the tag doesn’t have an ending tag. As a substitute, it’s closed within the beginning tag like , which is utterly tremendous in JSX.
You possibly can check this element by updating the App.js with the under code.
Examine the output at http://localhost:3000/ (probably utilizing your browser’s dev instruments) and guarantee every part is working accurately.
I just lately wrote about styling React Parts, the place I in contrast the assorted methods this was attainable. In that article, I concluded that SCSS is the perfect methodology, and that’s what we’ll use right here.
For SCSS to work with Create React App, you’ll want to put in the sass bundle.
Be aware: Beforehand, many builders used node-sass for this. However, node-sass library has now been deprecated and it is strongly recommended to make use of sass or sass-embedded.
Now for the styling. This can be a tough define of what we’re after for the styling of our React swap button.
And that is what that appears like in SCSS. Add the next to src/ToggleSwitch/ToggleSwitch.scss:
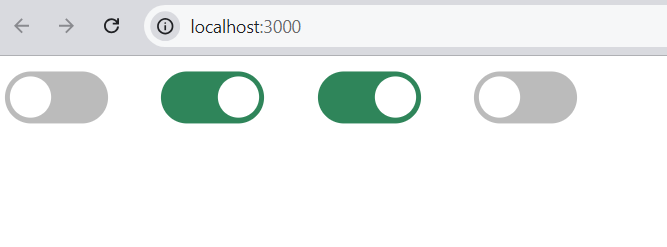
Now, run the server once more at http://localhost:3000/, and also you’ll see 4 properly styled toggle switches. Attempt toggling them; they need to all work.
Additionally, take some time to undergo the code above. If there’s something you’re uncertain about, you’ll be able to seek the advice of the Sass documentation, or ask a query on the SitePoint Boards.
To make the element extra versatile, we will seize these dynamically from the management utilizing HTML5 data-attributes:
We’ll hardcode the info attributes for testing however will make this extra versatile within the closing model:
Additionally, utilizing a smaller model of the swap element React with out the textual content for smaller screens could be an amazing thought. So let’s add the styling for it with some minimal sizes and take away the textual content:
With respect to responsiveness, we needs to be altering the entire measurement, so let’s use the CSS scale operate. Right here we’ve lined all of the Bootstrap-based responsive widths of gadgets.
class ToggleSwitch extends Part {
  render() {
    return (

        ...

    );
  }
}
Head again to the dev server and check your adjustments. When you’d prefer to examine what you’ve got in opposition to the completed SCSS file, you will discover that right here.
Step 6 – Theming in SCSS
Since we will use variables in SCSS, it’s simpler so as to add help for a number of colour themes. You possibly can learn extra about this in “Sass Theming: The By no means Ending Story”. We’ll use some colour themes right here and alter all of the uncooked colours to variables. The primary three strains are a configurable set of colours, which helps us theme our little management:
// Colours
$label-colour: #bbb;
$disabled-colour: #ddd;
$toggle-colour: #2F855A;
$white: #fff;

// Kinds
.toggle-switch {
  ...
  &-label {
    ...
    border: 0 strong $label-colour;
  }
  &-inner {
    ...
    &:earlier than {
      ...
      background-color: $toggle-colour;
      colour: $white;
    }
  }
  &-disabled {
    background-color: $disabled-colour;
    cursor: not-allowed;
    &:earlier than {
      background-color: $disabled-colour;
      cursor: not-allowed;
    }
  }
  &-inner:after {
    ...
    background-color: $label-colour;
    colour: $white;
  }
  &-switch {
    ...
    background: $white;
    border: 0 strong $label-colour;
  }
  ...
}
And that’s it with the styling. Now let’s add some interactivity.
Step 7 – Interactions and JavaScript
Please word that the next part solely accommodates demo code to clarify the ideas. You shouldn’t be updating your precise ToggleSwitch element on this part.
Our fundamental element shall be a dumb element (or presentation element) whose state shall be managed by a mum or dad element or container, resembling a kind. What will we imply by managed? Properly, let’s have a look at an uncontrolled model first:
import React from 'react';

const ToggleSwitch = () => (

          kind="checkbox"
      className="toggle-switch-checkbox"
    />

);

export default ToggleSwitch;
When customers work together with the above checkbox enter, it can toggle between a checked and unchecked state of its personal accord with out us having to jot down any JavaScript. HTML enter components can handle their very own inside state by updating the DOM immediately.
Nonetheless, in React, it’s beneficial we use managed elements, as proven within the following instance:
import React from 'react';

const ToggleSwitch = ({checked}) => (

          kind="checkbox"
      className="toggle-switch-checkbox"
      checked={checked}
    />

);

export default ToggleSwitch;
Right here, React is controlling the state of the checkbox enter. All interactions with this enter must undergo the digital DOM. When you attempt to work together with the element as it’s, nothing will occur, as we haven’t outlined any JavaScript code that may change the worth of the checked prop we’re passing in.
To repair this, we will cross in an onChange prop — a operate to be referred to as every time the checkbox is clicked:
import React from 'react';

const ToggleSwitch = ({checked, onChange}) => (

          kind="checkbox"
      className="toggle-switch-checkbox"
      checked={checked}
      onChange={e => onChange(e.goal.checked)}
    />

);

export default ToggleSwitch;
Now, the checkbox enter is interactive. Customers can toggle the element “on” and “off” similar to earlier than. The one distinction right here is that the state is managed by React, versus the sooner uncontrolled model. This permits us to simply entry the state of our element at any given time by way of JavaScript. We will additionally simply outline the preliminary worth when declaring the element.
Now, let’s have a look at how we will use this within the ToggleSwitch element. Under is a simplified class-based instance:
import React, { Part } from 'react';
class Kind extends Part {
state = { checked : false }
onChange = newValue => {
this.setState({ checked: newValue });
}
render() {
return (
Now let’s convert the class-based element right into a purposeful element utilizing hooks:
import React, { useState } from 'react';
export default operate Kind() {
let [checked, setChecked] = useState(false);
return (
As you’ll be able to see, we drastically decreased the variety of strains utilizing purposeful elements and the hooks creation methodology.
If React Hooks are new to you, “React Hooks: The best way to Get Began & Construct Your Personal”.
Step 8 – Finalizing the ToggleSwitch Part
Now, let’s get again to our ToggleSwitch element. We’ll want the next props:
When the small model shouldn’t be used, the next optionLabels textual content shall be used as default:
// Set optionLabels for rendering.
ToggleSwitch.defaultProps = {
  optionLabels: ["Yes", "No"],
};
Since a lot of the props must be set by the consumer, and we will’t use arbitrary values, it’s all the time higher to cease rendering if the required props aren’t handed in. This may be achieved utilizing a easy JavaScript if assertion or a ternary operator utilizing ? : or a short-circuited &&:
{this.props.id ? (

) : null}
As our app grows, we will catch many bugs by type-checking. React has some built-in type-checking talents. To run kind checking on the props for a element, you’ll be able to assign the particular propTypes property. We will implement the above record of props utilizing React’s PropType library, a separate library that exports a variety of validators that can be utilized to make sure the info you obtain is legitimate.
You possibly can set up it like so:
yarn add prop-types
Then, import the PropTypes library utilizing:
// ToggleSwitch.js
import PropTypes from "prop-types";
We’ll outline the PropTypes within the following method:
ToggleSwitch.propTypes = {
  id: PropTypes.string.isRequired,
  checked: PropTypes.bool.isRequired,
  onChange: PropTypes.func.isRequired,
  title: PropTypes.string,
  optionLabels: PropTypes.array,
  small: PropTypes.bool,
  disabled: PropTypes.bool
};
By means of rationalization:
- PropTypes.string.isRequired: This can be a string worth, and it’s required and obligatory.
- PropTypes.string: This can be a string worth, but it surely isn’t obligatory.
- PropTypes.func: This prop takes in a operate as a worth, but it surely isn’t obligatory.
- PropTypes.bool: This can be a boolean worth, but it surely isn’t obligatory.
- PropTypes.array: That is an array worth, but it surely isn’t obligatory.
Now, we will keep it up with the ToggleSwitch element. Change the contents of src/ToggleSwitch/ToggleSwitch.js with the next:
import React from "react";
import PropTypes from "prop-types";
import './ToggleSwitch.scss';

/*
Toggle Change Part
Be aware: id, checked and onChange are required for ToggleSwitch element to operate.
The props title, small, disabled and optionLabels are non-obligatory.
Utilization:  setValue(checked)}} />
*/

const ToggleSwitch = ({ id, title, checked, onChange, optionLabels, small, disabled }) => {

  return (

              kind="checkbox"
        title={title}
        className="toggle-switch-checkbox"
        id={id}
        checked={checked}
        onChange={e => onChange(e.goal.checked)}
        disabled={disabled}
        />
        {id ? (

                          className={
                disabled
                  ? "toggle-switch-inner toggle-switch-disabled"
                  : "toggle-switch-inner"
              }
              data-yes={optionLabels[0]}
              data-no={optionLabels[1]}
            />
                          className={
              disabled
                ? "toggle-switch-switch toggle-switch-disabled"
                : "toggle-switch-switch"
              }
            />

        ) : null}

    );
}

// Set optionLabels for rendering.
ToggleSwitch.defaultProps = {
  optionLabels: ["Yes", "No"],
};

ToggleSwitch.propTypes = {
  id: PropTypes.string.isRequired,
  checked: PropTypes.bool.isRequired,
  onChange: PropTypes.func.isRequired,
  title: PropTypes.string,
  optionLabels: PropTypes.array,
  small: PropTypes.bool,
  disabled: PropTypes.bool
};

export default ToggleSwitch;
Lastly, to check the element, replace the App.js with the under code:
import React, { useState } from 'react';
import ToggleSwitch from './ToggleSwitch/ToggleSwitch'
operate App() {
let [newsletter, setNewsletter] = useState(false);
const onNewsletterChange = (checked) => {
setNewsletter(checked);
}
return (
<>
Now, once you head to http://localhost:3000/, you need to see the working toggle.

Step 9 – Making the Part Keyboard Accessible
The ultimate step is to make our element keyboard accessible. To do that, first, alter the label like under:
// ToggleSwitch.js
As you’ll be able to see, we’ve added a tabIndex property, which we’re setting to 1 (focusable) or -1 (not focusable), relying on whether or not the element is at the moment disabled.
We’ve additionally declared a handleKeyPress operate to cope with it receiving keyboard enter:
operate handleKeyPress(e){
  if (e.keyCode !== 32) return;

  e.preventDefault();
  onChange(!checked)
}
This checks if the important thing pressed is the house bar. In that case, it prevents the browser’s default motion (scroll the web page on this case) and toggles the element’s state.
And that’s basically all you want. The element is now keyboard accessible.
Nonetheless, there’s a slight downside. When you click on the ToggleSwitch element, you’ll get a top level view of all the element, which might be not desired. To fight this, we will alter issues barely to ensure it receives a top level view when it’s targeted on the keyboard, however not when it’s clicked:
// ToggleSwitch.js
  className={
    disabled
      ? "toggle-switch-inner toggle-switch-disabled"
      : "toggle-switch-inner"
  }
  data-yes={optionLabels[0]}
  data-no={optionLabels[1]}
  tabIndex={-1}
/>
  className={
  disabled
    ? "toggle-switch-switch toggle-switch-disabled"
    : "toggle-switch-switch"
  }
  tabIndex={-1}
/>
Right here, we’ve added a tabIndex property to each internal components to make sure they will’t obtain focus.
Then, replace the ToggleSwitch.scss file with the under code to use a method to the ToggleSwitch’s internal factor when it’s targeted on the keyboard however not when it’s clicked.
$focus-color: #ff0;

.toggle-switch {
  ...
  &-label {
    ...
    &:focus {
      define: none;
      > span {
        box-shadow: 0 0 2px 5px $focus-color;
      }
    }
    > span:focus {
      define: none;
    }
  }
  ...
}
You possibly can learn extra about this method right here. It’s barely hacky and needs to be dropped in favor of utilizing :focus-visible, as quickly as that features large sufficient browser help.
While you run the appliance, you need to have the ability to toggle the element utilizing the house bar.

A Extra Full Instance
To complete off, I’d prefer to display a extra full instance of utilizing the ToggleSwitch element within the following CodeSandbox.
This demo makes use of a number of ToggleSwitch elements on the identical web page. The state of the final three toggles is determined by the state of the primary. That’s, it’s essential settle for advertising emails earlier than you’ll be able to refine your selection of which of them to obtain.
Abstract
On this article, I’ve proven create a reusable, iOS-inspired React toggle element utilizing React. We checked out styling the element with SCSS, making it a managed element, customizing it by passing it props, and making it keyboard accessible.
You will discover the entire code for the React toggle element on our GitHub repo.
FAQs on The best way to Create a Toggle Change in React as a Reusable Part
How Can I Customise the Look of My React Toggle Change?
Customizing the looks of your React toggle swap is sort of easy. You possibly can modify the CSS properties to fit your design wants. As an example, you’ll be able to change the swap’s background colour, border colour, measurement, and form. You can too add animations or transitions for a extra interactive consumer expertise. Bear in mind to maintain your adjustments constant along with your general software design for a seamless consumer expertise.
Can I Use the Change Button React Part with Useful Parts?
Sure, you should utilize the React toggle swap with purposeful elements. The method is much like utilizing it with class elements. You simply have to import and use the swap element in your purposeful element. You can too use hooks like useState to handle the state of the swap.
How Can I Make My Change Button React Part Accessible?
Accessibility is an important side of net growth. To make your React toggle swap accessible, you should utilize ARIA (Accessible Wealthy Web Purposes) attributes. As an example, you should utilize the “aria-checked” attribute to point the state of the swap. You can too add keyboard help to permit customers to toggle the swap utilizing the keyboard.
How Can I Check My React Change Part?
Testing is a necessary a part of the event course of. You should use testing libraries like Jest and React Testing Library to check your react swap element. You possibly can write exams to examine if the swap toggles and renders accurately when clicked and handles props accurately.
Can I Use the React Toggle Change with Redux?
Sure, you should utilize the React toggle swap with Redux. You possibly can handle the state of the swap utilizing Redux actions and reducers. This may be significantly helpful if the state of the swap must be shared throughout a number of elements or if it impacts the worldwide state of your software.
How Can I Add a Label to My React Toggle Change?
Including a label to your React toggle swap can enhance its usability. You possibly can add a label by wrapping the react swap element in a “label” factor. You can too use the “htmlFor” attribute to affiliate the label with the swap.
How Can I Deal with Errors in My React Toggle Change Part?
Error dealing with is a vital a part of any element. In your React toggle swap element, you should utilize try-catch blocks to deal with errors. You can too use error boundaries, a React characteristic that catches and handles errors in elements.
Can I Use the React Toggle Change in a Kind?
Sure, you should utilize the React toggle swap in a kind. You possibly can deal with the state of the swap within the kind’s state. You can too deal with the shape submission and use the state of the swap to carry out sure actions.
How Can I Animate My React Toggle Change?
Animating your React toggle swap can improve the consumer expertise. You should use CSS transitions or animations to animate the swap, or you should utilize libraries like React Spring for extra complicated animations.
Can I Use the React Toggle Change with TypeScript?
Sure, you should utilize the React toggle swap with TypeScript. You simply have to outline the props’ varieties and the swap’s state. This can assist you catch errors throughout growth and make your code extra sturdy and maintainable.
How Can I Optimize the Efficiency of Change Toggles?
You possibly can optimize the efficiency of your React toggle swap by utilizing React’s memo operate to forestall pointless re-renders.
How Can I Deal with State Administration for A number of Toggle Switches in a Single Kind?
You possibly can handle the state of a number of toggle switches in a single kind by utilizing an object to retailer every swap’s state. This lets you simply replace and entry the state of every swap, making your kind dealing with extra environment friendly.


