
From the outset, we knew we wished one thing that subverted any typical company web site formulation. As an alternative,
impressed by the unseen power that drives creativity, connection and transformation, we arrived on the thought of
invisible forces
. May we take the highly effective but intangible parts that form our world—movement, emotion, instinct, and
inspiration—and manifest them in a digital area?
We have been enthusiastic about creating one thing that included many customized interactions and a really experiential really feel. Nevertheless,
our concern was selecting a set of instruments that might enable most of our builders to contribute to and preserve the location
after launch.
We selected to begin from a Subsequent / React base, as we regularly do at Phantom. React additionally has the benefit of being
appropriate with the superb React Three Fiber library, which we used to seamlessly bridge the hole between our DOM
parts and the WebGL contexts used throughout the location. For types, we’re utilizing our very personal
CSS parts
in addition to SASS.
For interactive behaviours and animation, we selected to make use of GSAP for 2 principal causes. Firstly, it comprises numerous
plugins we all know and love, reminiscent of SplitText, CustomEase and ScrollTrigger. Secondly, GSAP permits us to make use of a single
animation framework throughout DOM and WebGL parts.
We might go on and on speaking concerning the particulars behind each single animation and micro-interaction on the location, however
for this piece we’ve chosen to focus our consideration on two of probably the most distinctive parts of our website: the homepage
grid and the scrollable worker face particle carousel.
The Homepage Grid
It took us a really very long time to get this view to carry out and really feel simply how we wished it to. On this article, we’ll deal with the interactive half. For more information on how we made issues performant, head to our earlier article: Welcome again to Phantomland
Grid View
The mission’s grid view is built-in into the homepage by incorporating a primitive Three.js object right into a React
Three Fiber scene.
//GridView.tsx
const GridView = () => {
return (
);
}
//ProjectsGrid.tsx
const ProjectsGrid = ({atlases, tiles}: Props) => {
const {canvas, digicam} = useThree();
const grid = useMemo(() => {
return new Grid(canvas, digicam, atlases, tiles);
}, [canvas, camera, atlases, tiles]);
if(!grid) return null;
return (
We initially wished to jot down all of the code for the grid utilizing React Three Fiber however realised that, as a result of
complexity of our grid part, a vanilla
Three.js
class can be simpler to take care of.
One of many key parts that offers our grid its iconic really feel is our post-processing distortion impact. We carried out
this function by making a customized shader cross inside our post-processing pipeline:
// Postprocessing.tsx
const Postprocessing = () => {
  const {gl, scene, digicam} = useThree();

  // Create Impact composer
  const {effectComposer, distortionShader} = useMemo(() => {
    const renderPass = new RenderPass(scene, digicam);
    const distortionShader = new DistortionShader();
    const distortionPass = new ShaderPass(distortionShader);
    const outputPass = new OutputPass();

    const effectComposer = new EffectComposer(gl);
    effectComposer.addPass(renderPass);
    effectComposer.addPass(distortionPass);
    effectComposer.addPass(outputPass);

    return {effectComposer, distortionShader};
  }, []);

  // Replace distortion depth
  useEffect(() => {
    if (workgridState === WorkgridState.INTRO) {
      distortionShader.setDistortion(CONFIG.distortion.flat);
    } else {
      distortionShader.setDistortion(CONFIG.distortion.curved);
    }
  }, [workgridState, distortionShader]);

  // Replace distortion depth
  useFrame(() => {
    effectComposer.render();
  }, 1);

  return null;
}
When the grid transitions out and in on the location, the distortion depth adjustments to make the transition really feel
pure. This animation is finished by way of a easy tween in our
DistortionShader
class:
class DistortionShader extends ShaderMaterial {
  non-public distortionIntensity = 0;

  tremendous({
      identify: 'DistortionShader',
      uniforms: {
        distortionIntensity: {worth: new Vector2()},
        ...
      },
      vertexShader,
      fragmentShader,
  });

  replace() {
    const ratio = window.innerWidth, window.innerHeight;
    this.uniforms[DistortionShaderUniforms.DISTORTION].worth.set(
      this.distortionIntensity * ratio,
      this.distortionIntensity * ratio,
    );
  }

  setDistortion(worth: quantity) {
    gsap.to(this, {
      distortionIntensity: worth,
      length: 1,
      ease: 'power2.out',
      onUpdate: () => this.replace()    }
  }
}
Then the distortion is utilized by way of our customized shader:
// fragment.ts
export const fragmentShader = /* glsl */ `
  uniform sampler2D tDiffuse;
  uniform vec2 distortion;
  uniform float vignetteOffset;
  uniform float vignetteDarkness;

  various vec2 vUv;

  // convert uv vary from 0 -> 1 to -1 -> 1
  vec2 getShiftedUv(vec2 uv) {
    return 2. * (uv - .5);
  }

  // convert uv vary from -1 -> 1 to 0 -> 1
  vec2 getUnshiftedUv(vec2 shiftedUv) {
    return shiftedUv * 0.5 + 0.5;
  }


  void principal() {
    vec2 shiftedUv = getShiftedUv(vUv);
    float distanceToCenter = size(shiftedUv);

    // Lens distortion impact
    shiftedUv *= (0.88 + distortion * dot(shiftedUv));
    vec2 transformedUv = getUnshiftedUv(shiftedUv);

    // Vignette impact
    float vignetteIntensity = smoothstep(0.8, vignetteOffset * 0.799,  (vignetteDarkness + vignetteOffset) * distanceToCenter);

    // Pattern render texture and output fragment
    colour = texture2D( tDiffuse, distortedUV ).rgb * vignetteIntensity;
    gl_FragColor = vec4(colour, 1.);
  }
We additionally added a vignette impact to our post-processing shader to darken the corners of the viewport, focusing the
person’s consideration towards the middle of the display.
With a purpose to make our residence view as easy as potential, we additionally spent a good period of time crafting the
micro-interactions and transitions of the grid.
Ambient mouse offset
When the person strikes their cursor across the grid, the grid strikes barely in the other way, creating a really
refined ambient floating impact. This was merely achieved by calculating the mouse place on the grid and transferring the
grid mesh accordingly:
getAmbientCursorOffset() {
  // Get the pointer coordinates in UV area ( 0 - 1 ) vary
  const uv = this.navigation.pointerUv;
  const offset = uv.subScalar(0.5).multiplyScalar(0.2);
  return offset;
}

replace() {
  ...
  // Apply cursor offset to grid place
  const cursorOffset = getAmbientCursorOffset();
  this.mesh.place.x += cursorOffset.x;
  this.mesh.place.y += cursorOffset.y;
}
Drag Zoom
When the grid is dragged round, a zoom-out impact happens and the digicam appears to pan away from the grid. We created
this impact by detecting when the person begins and stops dragging their cursor, then utilizing that to set off a GSAP
animation with a customized ease for further management.
onPressStart = () => {
  this.animateCameraZ(0.5, 1);
}

onPressEnd = (isDrag: boolean) => {
  if(isDrag) {
    this.animateCameraZ(0, 1);
  }
}

animateCameraZ(distance: quantity, length: quantity) {
  gsap.to(this.digicam.place, {
    z: distance,
    length,
    ease: CustomEase.create('cameraZoom', '.23,1,0.32,1'),
  });
}
Drag Motion
Final however not least, when the person drags throughout the grid and releases their cursor, the grid slides by way of with a
certain quantity of inertia.
drag(offset: Vector2) {
  this.dragAction = offset;

  // Progressively enhance velocity with drag time and distance
  this.velocity.lerp(offset, 0.8);
}

// Each body
replace() {
  // positionOffset is later used to maneuver the grid mesh
  if(this.isDragAction) {
    // if the person is dragging their cursor, add the drag worth to offset
    this.positionOffset.add(this.dragAction.clone());
  } else {
    // if the person just isn't dragging, add the rate to the offset
    this.positionOffset.add(this.velocity);
  }

  this.dragAction.set(0, 0);
  // Attenuate velocity with time
  this.velocity.lerp(new Vector2(), 0.1);
}
Face Particles
The second main part we need to spotlight is our worker face carousel, which presents workforce members by way of a
dynamic 3D particle system. Constructed with React Three Fiber’s
BufferGeometry
and customized GLSL shaders, this implementation leverages customized shader supplies for light-weight efficiency and
flexibility, permitting us to generate complete 3D face representations utilizing solely a 2D color {photograph} and its
corresponding depth map—no 3D fashions required.
Core Idea: Depth-Pushed Particle Era
The muse of our face particle system lies in changing 2D imagery into volumetric 3D representations. We’ve
stored issues environment friendly, with every face utilizing solely two optimized 256×256 WebP photos (below 15KB every).
To seize the photographs, every member of the Phantom workforce was 3D scanned utilizing
RealityScan
from Unreal Engine on iPhone, making a 3D mannequin of their face.
These scans have been cleaned up after which rendered from Cinema4D with a place and color cross.
The place cross was transformed right into a greyscale depth map in Photoshop, and this—together with the color cross—was
retouched the place wanted, cropped, after which exported from Photoshop to share with the dev workforce.
Every face is constructed from roughly 78,400 particles (280×280 grid), the place every particle’s place and
look is set by sampling information from our two supply textures.
/* generate positions attributes array */
const POINT_AMOUNT = 280;

const factors = useMemo(() => {
  const size = POINT_AMOUNT * POINT_AMOUNT;
  const vPositions = new Float32Array(size * 3);
  const vIndex = new Float32Array(size * 2);
  const vRandom = new Float32Array(size * 4);

  for (let i = 0; i < size; i++) {
      const i2 = i * 2;
      vIndex[i2] = (i % POINT_AMOUNT) / POINT_AMOUNT;
      vIndex[i2 + 1] = i / POINT_AMOUNT / POINT_AMOUNT;

      const i3 = i * 3;
      const theta = Math.random() * 360;
      const phi = Math.random() * 360;
      vPositions[i3] = 1 * Math.sin(theta) * Math.cos(phi);
      vPositions[i3 + 1] = 1 * Math.sin(theta) * Math.sin(phi);
      vPositions[i3 + 2] = 1 * Math.cos(theta);

      const i4 = i * 4;
      vRandom.set(
        Array(4)
          .fill(0)
          .map(() => Math.random()),
        i4,
      );
  }

  return {vPositions, vRandom, vIndex};
}, []);
// React Three Fiber part construction
const FaceParticleSystem = ({ particlesData, currentDataIndex }) => {
return (
);
};
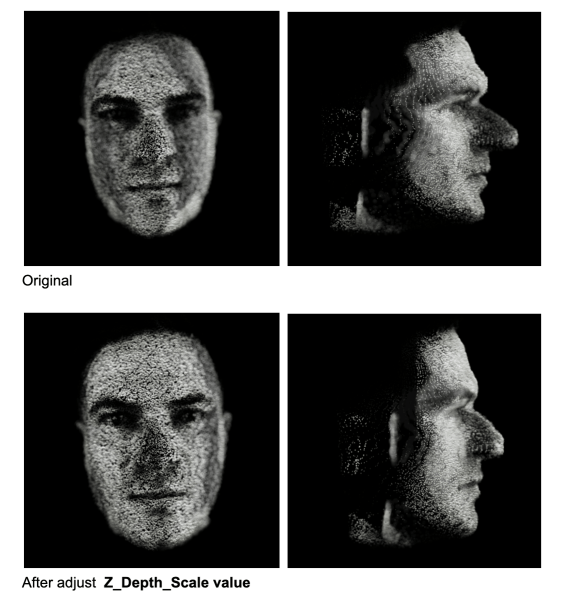
The depth map provides normalized values (0–1) that directly translate to Z-depth positioning. A value of 0 represents
the furthest point (background), while 1 represents the closest point (typically the nose tip).
/* vertex shader */
// sample depth and color data for each particle
vec3 depthTexture1 = texture2D(depthMap1, vIndex.xy).xyz;
// convert depth to Z-position
float zDepth = (1. - depthValue.z);
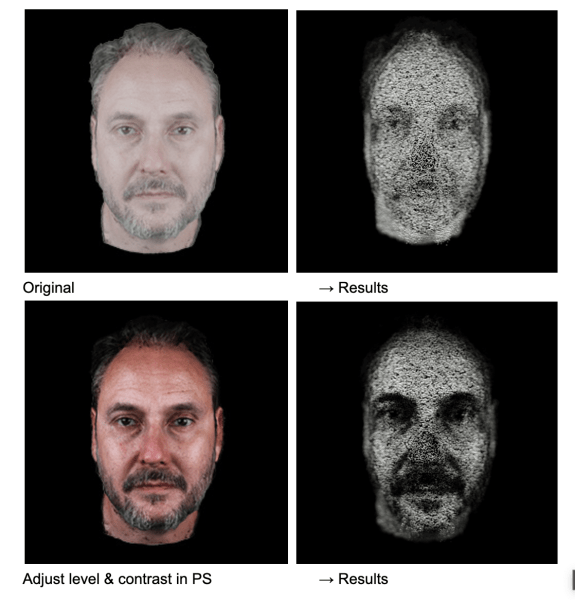
pos.z = (zDepth * 2.0 - 1.0) * zScale;Dynamic Particle Scaling Through Colour Analysis
One of the key methods that brings our faces to life is utilizing colour data to influence particle scale. In our
vertex shader, rather than using uniform particle sizes, we analyze the colour density of each pixel so that brighter,
more colourful areas of the face (like eyes, lips, or well-lit cheeks) generate larger, more prominent particles,
while darker areas (shadows, hair) create smaller, subtler particles. The result is a more organic, lifelike
representation that emphasizes facial features naturally.
/* vertex shader */

vec3 colorTexture1 = texture2D(colorMap1, vIndex.xy).xyz;

// calculate color density
float density = (mainColorTexture.x + mainColorTexture.y + mainColorTexture.z) / 3.;

// map density to particle scale
float pScale = mix(pScaleMin, pScaleMax, density);
The calibration below demonstrates the influence of colour (contrast, brightness, etc.) on the final 3D particle formation.
Ambient Noise Animation
To prevent static appearances and maintain visual interest, we apply continuous noise-based animation to all
particles. This ambient animation system uses curl noise to create subtle, flowing movement across the entire
face structure.
/* vertex shader */

// primary curl noise for overall movement
pos += curlNoise(pos * curlFreq1 + time) * noiseScale * 0.1;
// animation updates in React Three Fiber
useFrame((state, delta) => {
if (!materialRef.current) return;
materialRef.current.uniforms.time.value = state.clock.elapsedTime * NOISE_SPEED;
// update rotation based on mouse interaction
easing.damp(pointsRef.current.rotation, 'y', state.mouse.x * 0.12 * Math.PI, 0.25, delta);
easing.damp(pointsRef.current.rotation, 'x', -state.pointer.y * 0.05 * Math.PI, 0.25, delta);
});Face Transition Animation
When transitioning between different team members, we combine timeline-based interpolation with visual effects written
in shader materials.
GSAP-Driven Lerp Method
The transition foundation uses GSAP timelines to animate multiple shader parameters simultaneously:
timelineRef.current = gsap
  .timeline()
  .fromTo(uniforms.transition, {value: 0}, {value: 1.3, duration: 1.6})
  .to(uniforms.posZ, {value: particlesParams.offset_z, duration: 1.6}, 0)
  .to(uniforms.zScale, {value: particlesParams.face_scale_z, duration: 1.6}, 0);
And the shader handles the visual blending between two face states:
/* vertex shader */

// smooth transition curve
float speed = clamp(transition * mix(0.8, .9, transition), 0., 1.0);
speed = smoothstep(0.0, 1.0, speed);

// blend textures
vec3 mainColorTexture = mix(colorTexture1, colorTexture2, speed);
vec3 depthValue =mix(depthTexture1, depthTexture2, speed);
To add visual interest during transitions, we further inject additional noise that’s strongest at the midpoint of the
transition. This creates a subtle “disturbance” effect where particles temporarily deviate from their target
positions, making transitions feel more dynamic and organic.
/* vertex shader */

// secondary noise movement applied for transition
float randomZ = vRandom.y + cnoise(pos * curlFreq2 + t2) * noiseScale2;

float smoothTransition = abs(sin(speed * PI));
pos.x += nxScale * randomZ * 0.1 * smoothTransition;
pos.y += nyScale *randomZ * 0.1 * smoothTransition;
pos.z += nzScale * randomZ * 0.1 * smoothTransition;
Custom Depth of Field Effect
To enhance the three-dimensional perception, we implemented a custom depth of field effect directly in our shader
material. It calculates view-space distance for each particle and modulates both opacity and size based on proximity
to a configurable focus plane.
/* vertex shader - calculate view distance */

vec4 viewPosition = viewMatrix * modelPosition;
vDistance = abs(focus +viewPosition.z);

// apply distance to point size for blur effect
gl_PointSize = pointSize * pScale * vDistance * blur * totalScale;
/* fragment shader - calculate distance-based alpha for DOF */
float alpha = (1.04 - clamp(vDistance * 1.5, 0.0, 1.0));
gl_FragColor = vec4(color, alpha);Challenges: Unifying Face Scales
One of the challenges we faced was achieving visual consistency across different team members’ photos. Each photograph
was captured under slightly different conditions—varying lighting, camera distances, and facial proportions.
Therefore, we went through each face to calibrate multiple scaling factors:
-
Depth scale calibration
to ensure no nose protrudes too aggressively -
Colour density balancing
to maintain consistent particle size relationships -
Focus plane optimization
to prevent excessive blur on any individual face
// individual face parameters requiring manual tuning

particle_params: {
  offset_z: 0,           // overall Z-position
  z_depth_scale: 0,      // depth map scaling factor
  face_size: 0,          // overall face scale
}
Final Words
Our face particle system demonstrates how simple yet careful technical implementation can create fun visual
experiences from minimal assets. By combining lightweight WebP textures, custom shader materials, and animations,
we’ve created a system that transforms simple 2D portraits into interactive 3D figures.
Check out the full site.
Curious about what we’re up to in the Phantom studio? Or have a project you think we’d be interested in? Get in touch.


